This is the multi-page printable view of this section. Click here to print.
Unified Configuration
1 - Configuration Overview
CallReplay v9 uses a new, hierarchical system of adding new users and roles, with the possibility to configure all the settings related to these users in a new, Unified Configuration panel.
This system allows inheritance for permissions and recording policies, with the ability to edit settings on a per-user basis, grouping of users by folders and management of tags and customers.
This chapter covers the available settings in the Unified
Configuration module, available from the System | Configuration menu.
2 - Global Settings
Tags represent an additional method to classify calls and to give special attributes to selected calls. By using the filters, you determine which calls are assigned to a tag, irrespective of any other category they may be assigned to (another tag, or user).
By setting the recording policy you may alter the recording behaviour of a certain call to a user (for example recording all calls from specific external numbers, irrespective of the policy that may otherwise apply).
Setting up the Email Notifications enables you to send emails when such a call starts and ends, so you can, for example make sure e-mails are sent to the appropriate persons when important calls are being made, irrespecrive of the usual settings.
Calls assigned to such a tag can also have different retention policy settings.
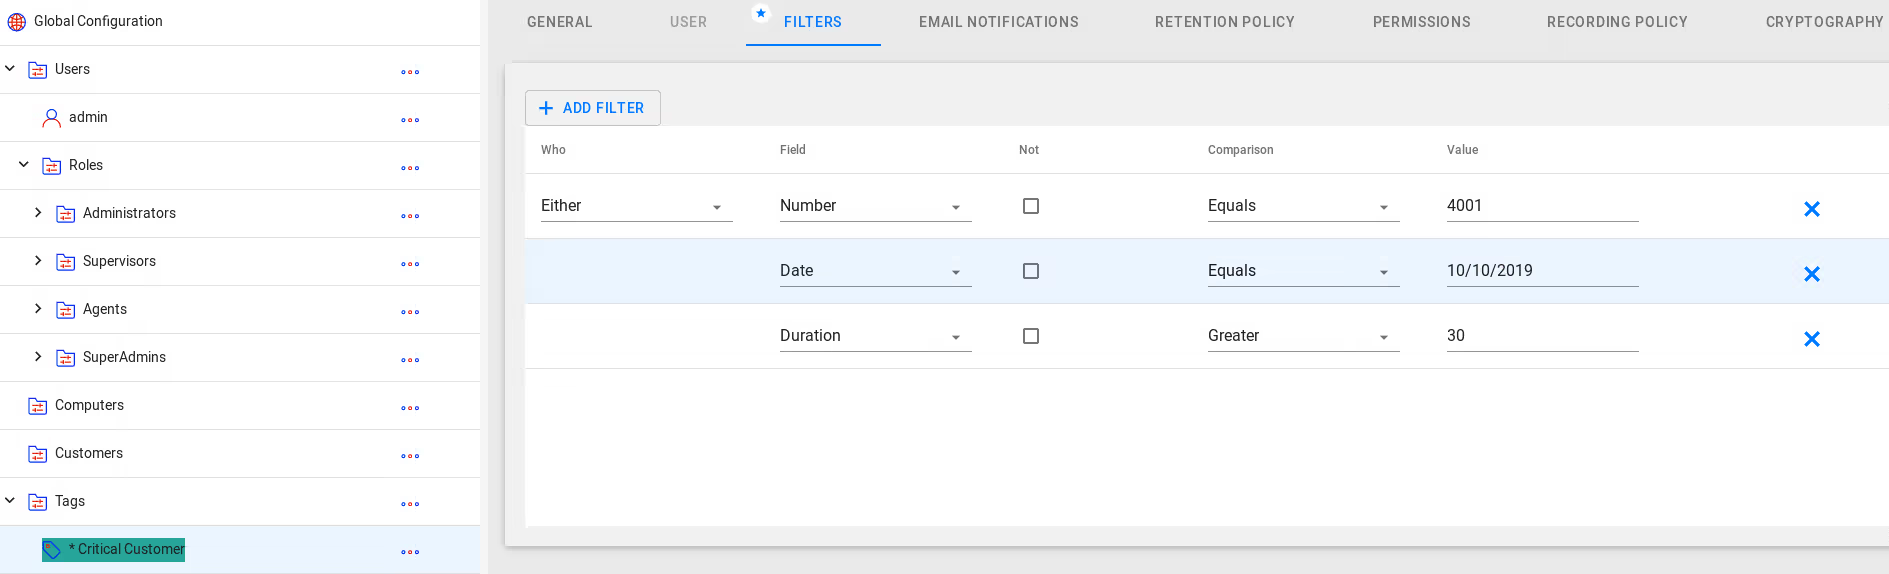
3 - Filters
CallReplay can associate call records with a specific item category (e.g. a user, customer, tag or computer) by matching these elements using filters that you can create.
To create a filter
- Go to
System | Configuration. - Select the item category on which the filter aplies.
- Click
Edit. - Select
Filterstab. - Click
Add.
To delete a filter
- Mark the filter line you want to delete using the check box.
- Click
Delete. - Click
Yes, in the Confirmation dialog.
You can define multiple filters in order to reach complex matching criteria
- The "Who" field will compare the either the source, destination or both against the filter
- The "Field" contains the elements that can be filtered:
- Number - the extension/telephone number of a party
- Name - the name of a party, as defined in CUCM
- MAC - the MAC address of a party
- IPAddress - the ip address of a party
- Description - the call description, which is filled in the call details menu
- Duration - the duration of a call, in miliseconds
- Date - the date of a call
- Suid - the user ID of a party, in an IP Trade call
- The "Not" checkbox will negate the result of the filter
- The "Comparison" field enables you to make different types of
matchings to the declared value:
- Equals - values have to match
- Starts with - the declared value must be found in the begining of the compared value
- Ends with - the declared value must be found in the end of the compared value
- Less - the declared value must be lower than the compared value
- Greater - the declared value must be greater than the compared value
- Between - the compared value must be between the two declared values
- In - the declared value must be found in the body of the compared value
- Contains - the declared value must be found in the body of the compared value
- Is Empty - the compared value mst be empty
- Wildcard(*) - enable use of wildcards (use _ (underline) to match one character, and % (percent) to match multiple characters)
- RegEx - enable use of regular expressions
- The "Value" field is the value that will be compared to the selected type of element
4 - E-mail Notifications
In the Email Notifications tab you can add addresses to which emails will be dispatched as soon as calls matching the respective user are recorded by the system.
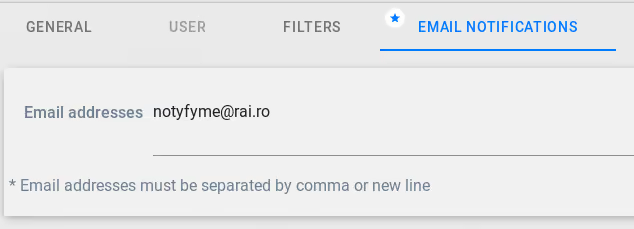
You can add multiple e-mail addresses here, where the E-mail Notifications for this user will be sent
In order for this to work the SMTP need to be configured. Please refer to E-mail Configuration sections for more details on how to configure SMTP.
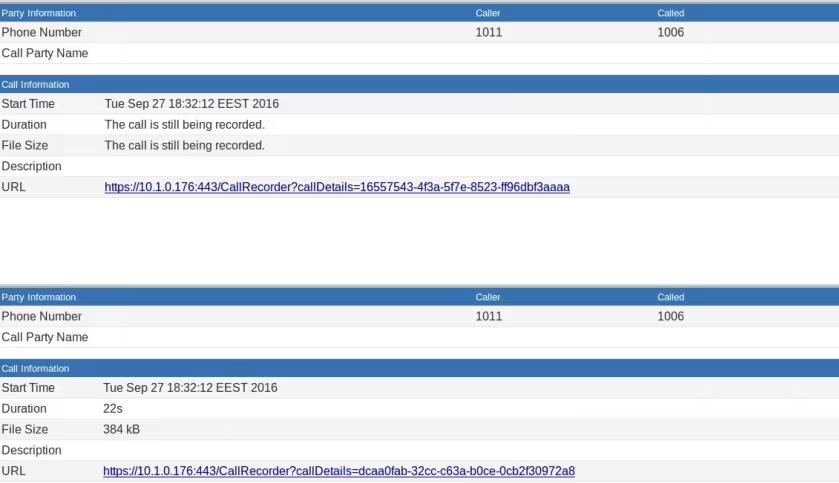
Two e-mails will be sent, one at the start of a call and one at the end of the call. They include the call details, as well as a link to the respective call, in the CallReplay interface. Note: the recipient will have to login with a user that has replay permissions for that call, in order to access the URL.
5 - Permissions
Newly created users and folders will inherit permissions from their parents. Permissions can be modified however on a per-user basis. Changing a folder's permissions will change the permissions of all children that inherit those permissions.
When a permission is inherited, the inherited value and the node it is inherited from will be shown between brackets. It is possible to change any permission, as long as you have the right for that permission yourself. Permission changes will also inherit down the inheritance line, so changing any permission will change it for all it's inheritants.
This feature is available only for items of user type
To configure permissions
- Go to
System | Configuration. - Select the user for which you want to change permissions.
- Click on
Permissionstab.

- Replay Calls - allow or deny access to replaying calls (allow setting will show name tags on the right, clicking on them will edit the users or folders for which the recorded calls can be played)
- Is Admin - grants an administrator the rights to change settings within the tenant he is a member of
- Replay All Calls - gives permissions to replay all calls, irrespective of the selection made at "Replay calls"
- Delete Calls - gives permission to delete calll recordings from CallReplay
- Edit Tags - grants the permisson to edit tags
- Super Admin - grants super administrator rights to a user, allowing to create tenants and change global settings, tenent-independent
- Assign Customers To Calls - grants permission to assign existing customers to calls and to create new customers as well
- Login and Replay Own Calls - grants the permissions to log in the web interface and replay calls
- Export - grants the permission to export any call that can be replayed
- Audit - grants access to the audit page
- Assign Tags to Calls - grants the permisson to add tags to calls
- Stop Active Calls - grants the permission to stop the recording of an ongoing call
- Do Not Record - obsolete
- Edit Quality Standards - gives access to quality standards management (add and edit questionnaires)
- Fill Questionnaires - grants permission to fill questionnaires on the recordings that are available
- View Quality Reports - grants access to the Quality Reports menu
- Create user - grants the permission to create new users, with the ability to edit the same permissions that are available for this user
6 - Retention Policy
CallReplay can respond to various data retention requirements and can be configured in various ways in order to meet such requirements. By default, CallReplay keeps call records until there is no more storage available.
To set retention policy
- Go to
System | Configuration. - Select item category for which you want to customize the retention policy.
- Click on
Retention Policytab.
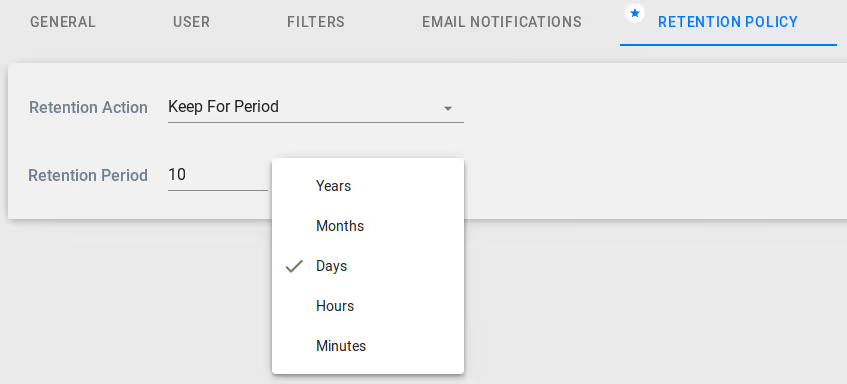
- Keep For Period - it will keep the user's recordings for the specified amount of time, then delete them
- Keep Until Backup - it will keep the user's recordings untill they are backed up, then delete them
- Keep until Space Required - will keep user recordings untill the set amount of disk space is reached.
7 - Cryptography
Cryptography allows the encryption of the recorded calls with the use of imported or self-generated certificates.
Before using this feature you need to have valid license that support encryption. Otherwize you will get

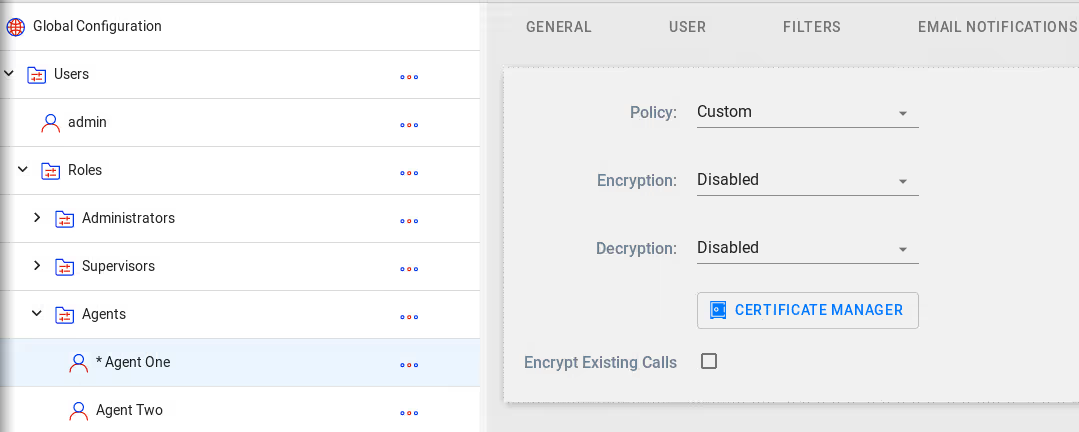
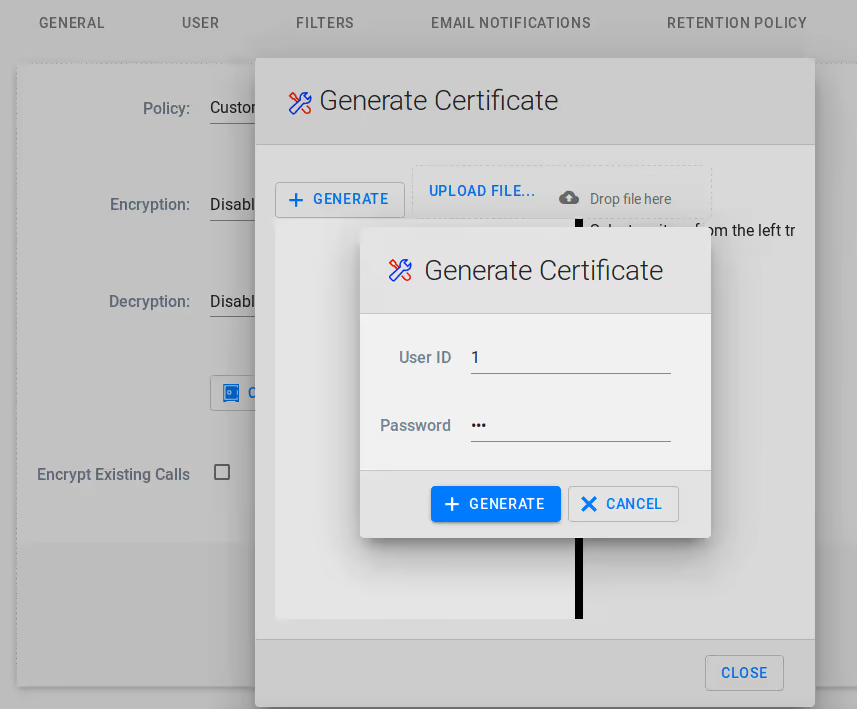
In order to enable records encryption, you must first add a certificate. Please open the Certificate Manager link. In the upper left of the Cryptographic Key Manager window you can choose wether to upload a certificate or generate a new one.
For a new certificate you will need to provide a User ID and a private key passphrase - your certificate password.
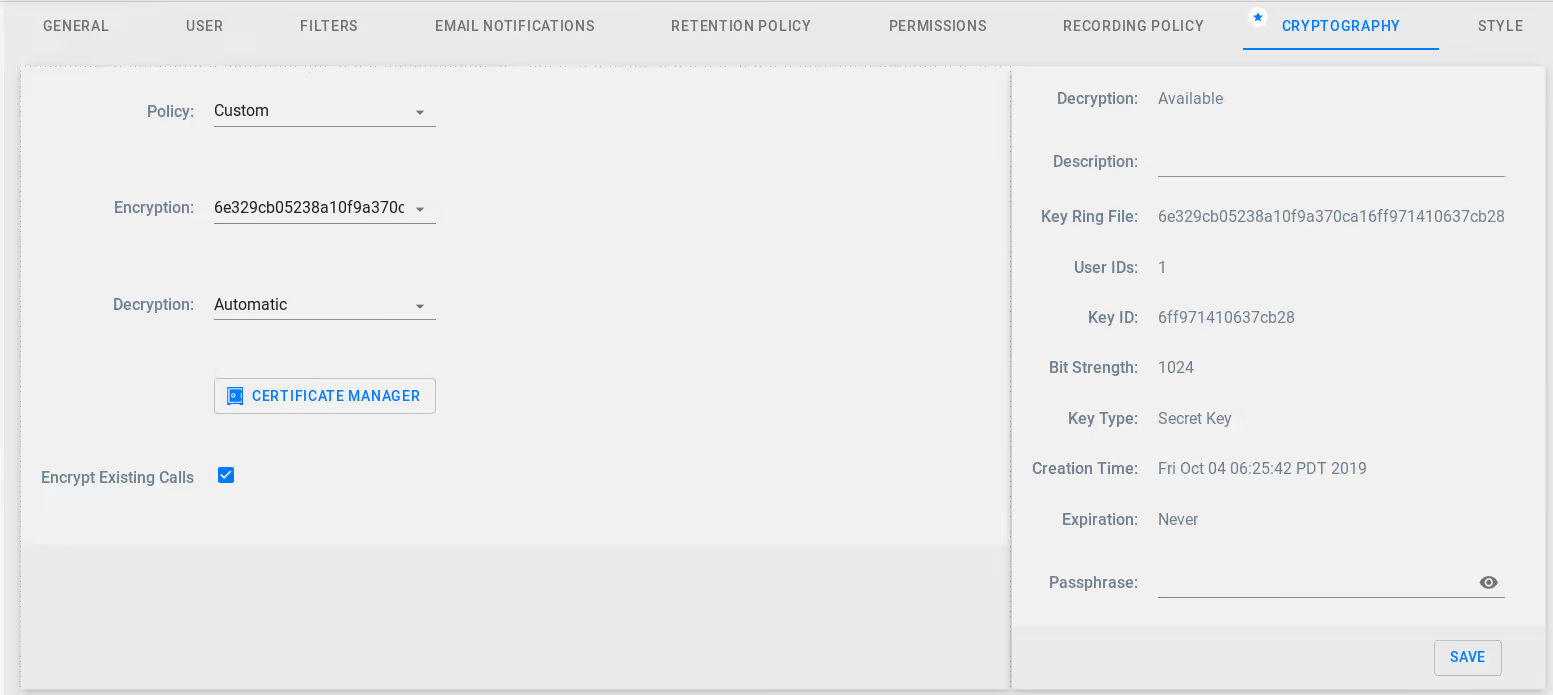
After generating or uploading a certificate, close the window and select it for encryption. Next, select how you want the recordings decryption to be handled:
- Automatic mode will decrypt the calls automatically when playing them from the CallReplay interface
- Passphrase will ask for the certificate's passphrase when playing a call from the web interface
- Disabled will not allow the recordings to be played from the web interface
Encrypt Existing Calls - you can choose if you want to encrypt existing calls with the new certificate, or just encrypt new calls
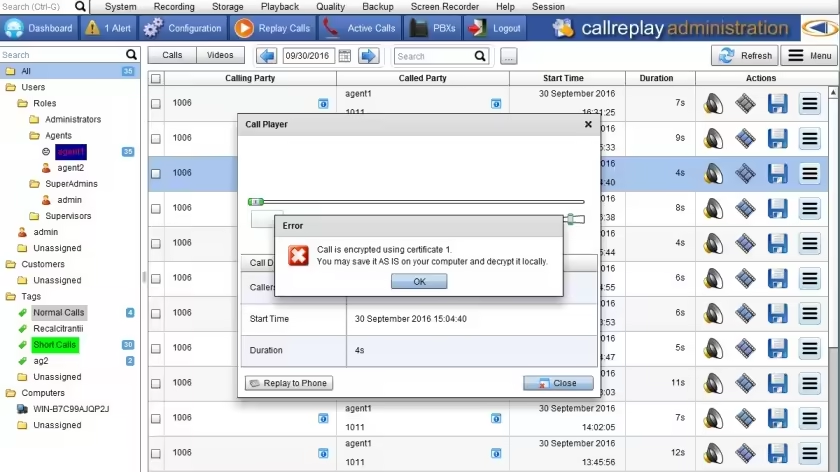
When playing a call, if Decryption mode is Passphrase, you will be asked for the passphrase of the certificate used to encrypt the call.

If the Decrtyption mode is Automatic, the call will be decrypted automatically and played.
If the Decrtyption mode is Disabled, You will be informed that you need to save the call as it is on your PC, then decrypt it locally using PGP.
8 - Recording Policy
Recording policy has been integrated into the new unified configuration menu, so it is now possible to customize it for departments or even users. Inheritance works for recording policies as well. You may change the settings for a particular user, folder, or just go with the default policy:

- The Call Recording Trigger determines if calls are recorded automatically, on-demand or not at all
- The Screen Recording Trigger is deprecated
- Channel Pool subscribes the user to a Pool, please make sure enough channels are provisioned to the selected pool
- On Demand Approval determines if the full call is recorded, or if the recording is done after the request
- Enabling Record Unlicensed will register calls that do not match the recording policy, but they will have no audio recording available
- Incoming, Outgoing or Internal recording determines if a call is recorded, based on the direction of the call
For proper call direction determination, you need to set the External PBX Trunks in the PBX configuration interface. For details, please consult the CallManagers (PBXs) Configuration page
- Recording Parked and Transferred calls will keep recording such a call regardles of the next leg's policy
- Remove Empty will delete all recordings with no associated audio data
- Lookup Party Name will get the CallerID value from the PSTN and associate it
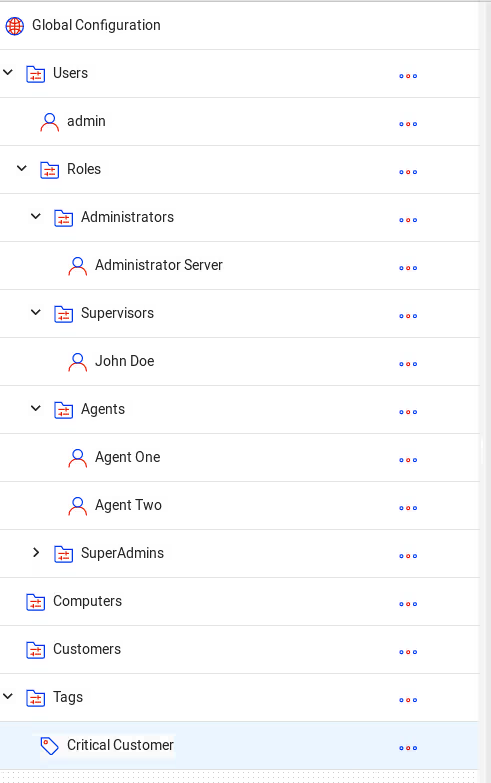
9 - Category Tree
Users and departments are managed in a category tree which allows inheritance for permissions and recording policies. On a clean installation, the Category Tree will be similar to the structure shown in the screenshot below:
System > Configuration
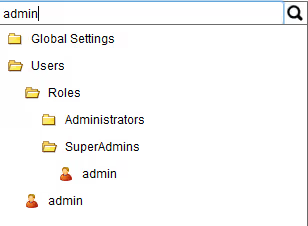
The top search field allows you to quickly search and display only the objects matched by the search criteria.
By default, a pre-defined, logical structure is available, defining several folders and the admin username. Each child entry will inherit by default from its parent, however, any option can be overriden by specifically changing its value from Inherit to something else in the respective Recording Policy or Permissions tab.
The categories may contain three types of objects: folders, users and tags.
The Global Settings is the root object of the tree, and has all its inheritable permissions set to a default. Any child who has an inherit permission (as opposed to an explicit permission set manually) will inherit that permission from its parent. Inheritance calculation goes up the tree until the first explicitly set permission is encountered. This permission will also be the one that eventual children will inherit.
The Global Settings folder acts as a logical fallback for added users or folders that will not have set their permissions explicitly.
The Computers special folder will get populated with computer hostnames that are added to Screen Recorder.
The Customers folder contains all the customers that users create. Customers can be ussed to identify and classify calls, store basic customer info, as well as setting different policies for them.
The Tags folder, groups the various created tags.Tags are used to classify certain calls and can impar different policies to them, behaving simillar to Customer type categories.
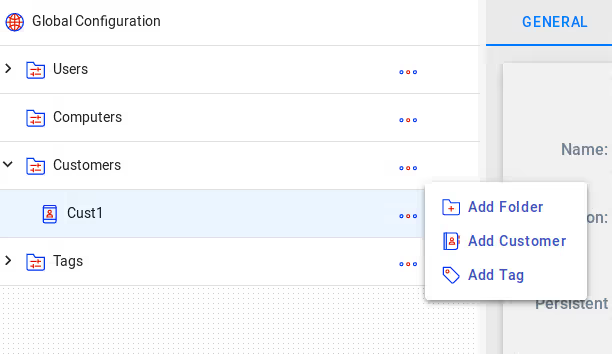
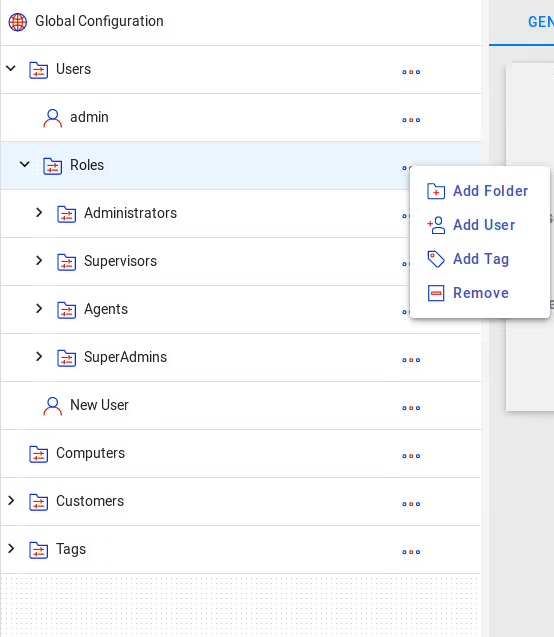
Adding new entries
To add a new entry to the system, mouse-over the category under which you want to add the user and click on the icon that pops up, as shown in the below screenshot:
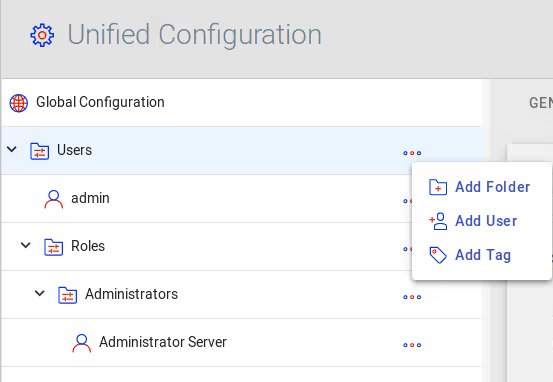
A menu allowing you to add a user, folder or tag will appear. Once you click the desired entry (User, Folder or Tag), the Edit Mode will be enabled, allowing you to fill in the details of the newly created entry:
10 - Tags and Customers
The Tag and Customer category types can be used to classify calls for a better oranization of recordings, to set different policies to calls or to send notifications when certain calls are being made.
These 2 categories do not have the User and Permissions tab, which is what sepparates them from the user category. In addition, the Customers category has a Customer tab which contains the customer data.

- Customer ID
- Name - the name of the customer
- Email - the email address of the customer
- Address - the physical address of the customer
- Website - whe websire address of the customer
All other tabs serve the same functions as in the User category.
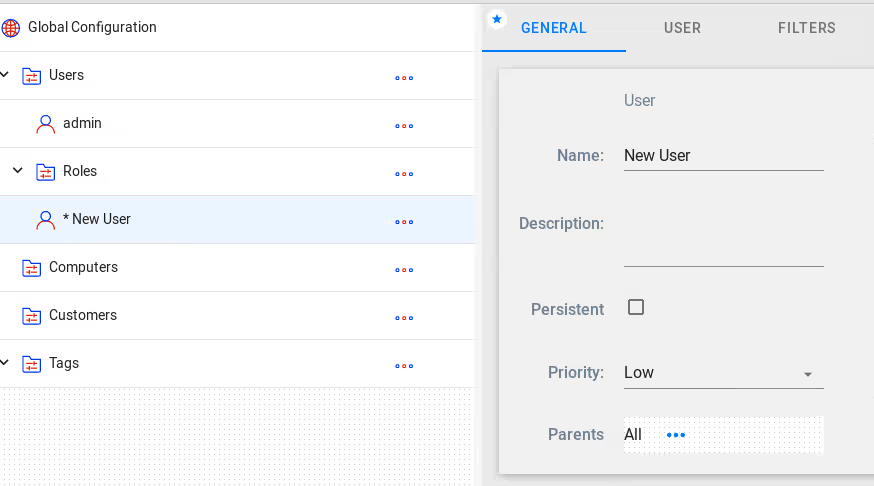
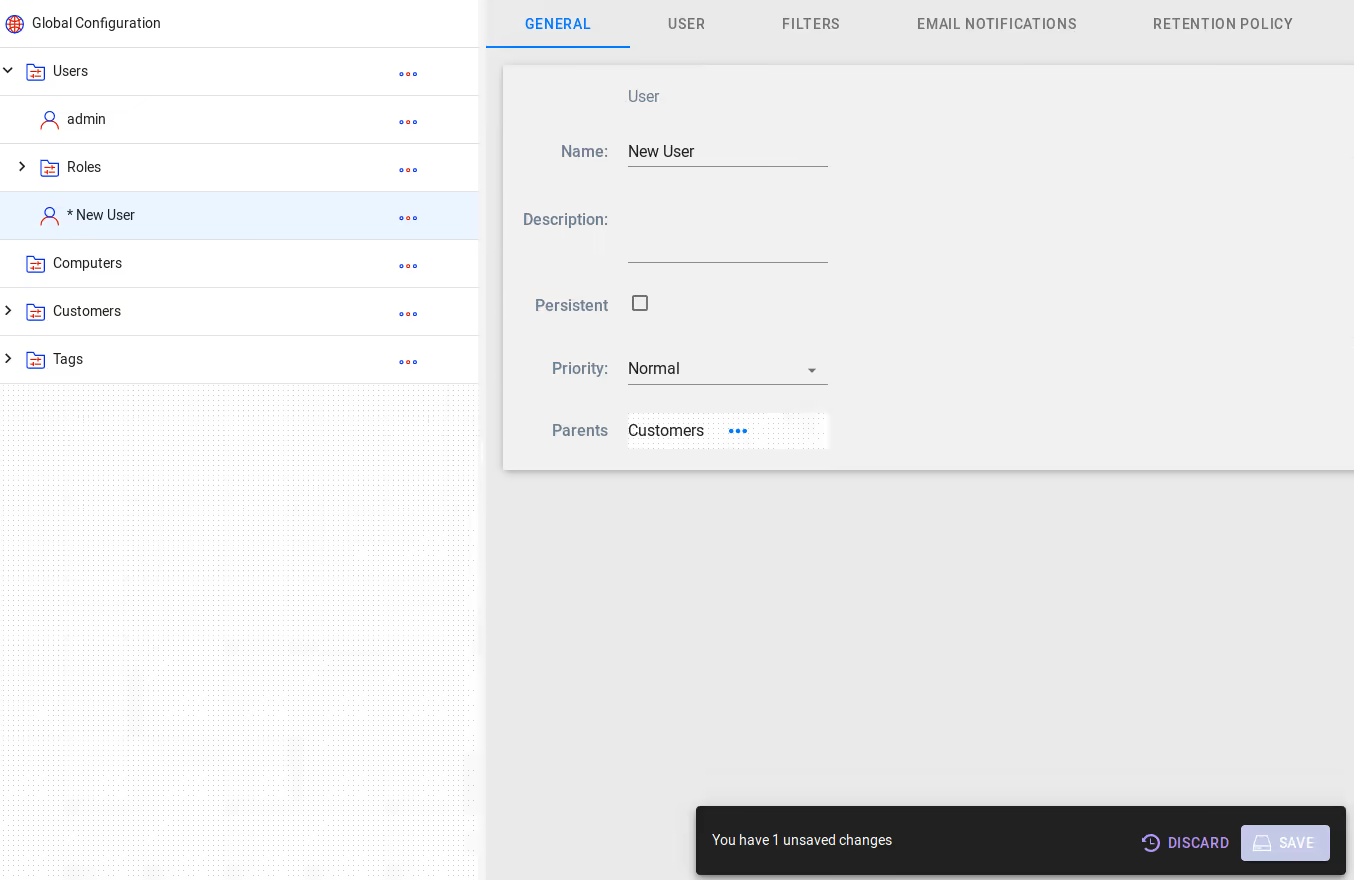
11 - General Tab
The General tab allows you to set the name and description of a node, as well as select which nodes are its parents.
Menu > Configuration > Edit
12 - Classifier
The classifier is a back-end mechanism that looks at a call's properties and then compairs them against each category's filters.
When a call starts and when it ends, the classifier compares the call against all the filters and assigns that call to one or more categories. This means that at the call's start, the classification will determine wether the call is recorded or not and other properties, depending on the category that receives ownership of the call. At the call's end the duration might get compared against existing filters which might assign the call to even more categories.
The classifier is also invoked whenever a new filter is added, or an existing one is modified, checking all existing calls against the new filter.
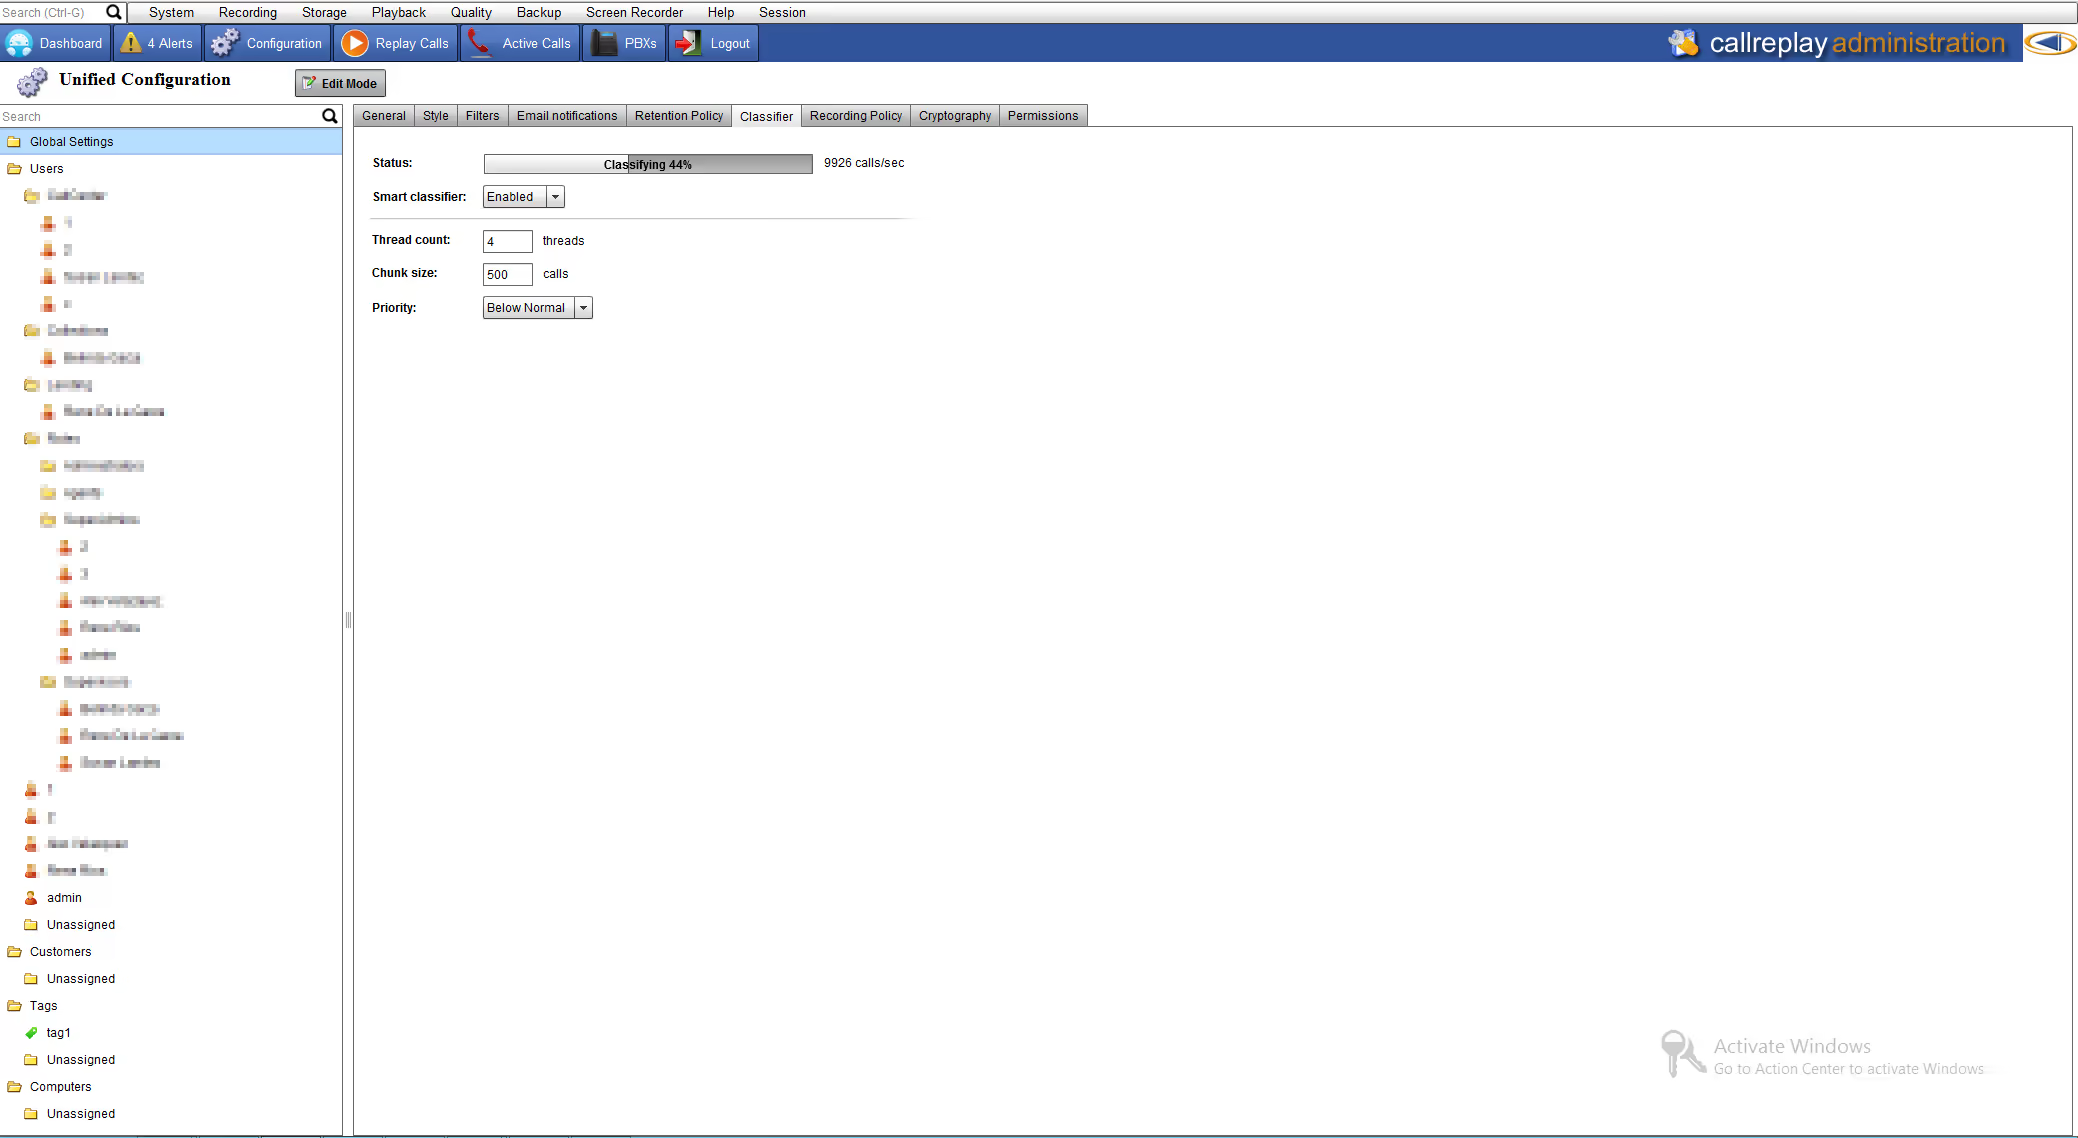
- Status shows the status and speed of the classifier
- Smart classifier is the default option, disabling it turns the classifier into a "safe mode" classifier - do not change unless explicitly instructed by CallReplay support staff
- Thread count: sets the number of threads the classifier will use. Lowering the value will make the classifier work slower, but will decrease CPU load. This should be set accordingly to your CPU resources and third-party CPU load.
- Chunk size: the number of calls it processes at a time - do not change unless explicitly instructed by CallReplay support staff
- Priority: sets the priority of the classifier against other CallReplay functions - do not change unless explicitly instructed by CallReplay support staff
13 - Roles
Roles are collections of permissions similar to Windows user groups.
The application has 3 built-in roles: Administrators Group, Supervisors
Group and Agents Group.
| Administrators | can configure the application which includes adding other users, upgrading it or configure system-wide settings may take any action on any call |
| Supervisors | can replay his own calls and the calls in al the departments and their sub-departmentes. |
| Agents | can only access his own calls |
An administrator can also configure the application so that a manager
can only replay calls, with the exception that a manager can view all
calls within the filter set.
The administrator account settings are made in application web site.
14 - Phone Directory
Phone Directory
This feature allows to identify the caller and destination phone numbers of a call when caller ID is not available. You can organize your contacts hierarchically on organizations and sub-departments by clicking on System / Phone Directory.
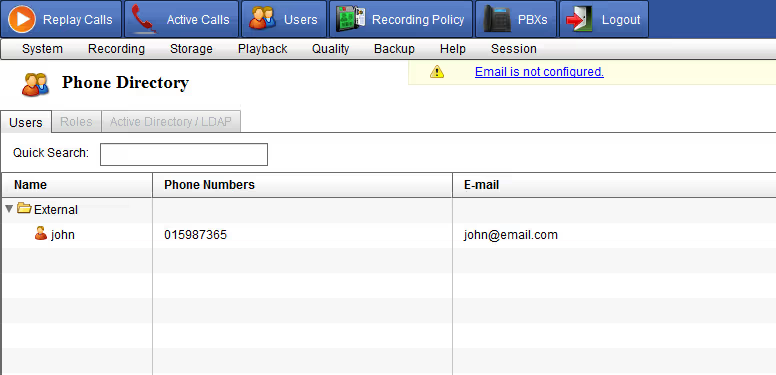
Adding External Organization / Department
Press Add button and choose Add Directory for adding new directory.
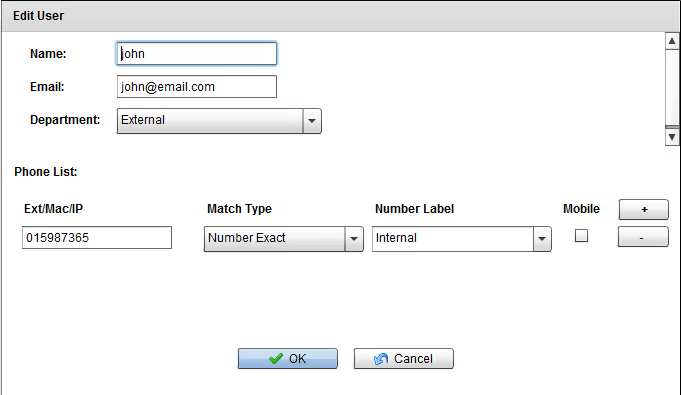
Adding a new external contact
Press Add button and choose Add User for adding new contact. Each
contact can have one or more phones
After adding an external contact, each call with that contact will have
it colored in blue, with a tool-tip when hovering the cursor over the
contact name.
15 - Email Configuration
- Enter your SMTP server credentials (SMTP server, Authentication User, password).
- The Admin Email Password is also used for critical alerts.
- Click Save.
System > E-mail
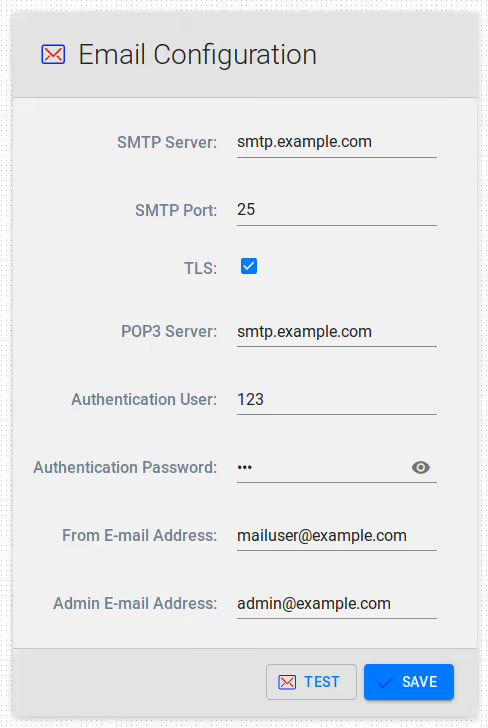
SMTP Server: The IP or FQDN of your SMTP Server.
SMTP Port: 25 is standard.
TLS: Most people do not use TLS security. This should be left unchecked.
POP3 Server: If the Mail server leverages POP3, input the IP or FQDN. Most people do not use this, so it may be left unchecked.
Authentication User/Password: If the Mail server requires credentials, input the User/Pass.
From E-Mail Address: When low level emails, like exporting a call, the From Address will be used as the From address in the email.
Admin E-mail Address: When System Level emails need to be transmitted to the CallReplay admin, the Admin email address will be who receives those emails.
System level emails may include:
* Running low on storage.
* Calls have not been recorded for X days.