1 - Watchdog Configuration
Watchdog is a monitoring component that tracks - at each 60 seconds - the CallReplay service performance and trigers recovery actions, including service restart, and automatic notification in case of impeding errors. In addition, watchdog can be scheduled to perform automatic service restarts, or to send email notification when no recording are made within a specified period of time.
Out Of Memory threshold should not be changed without express instructions from CallReplay support staff.
Configure
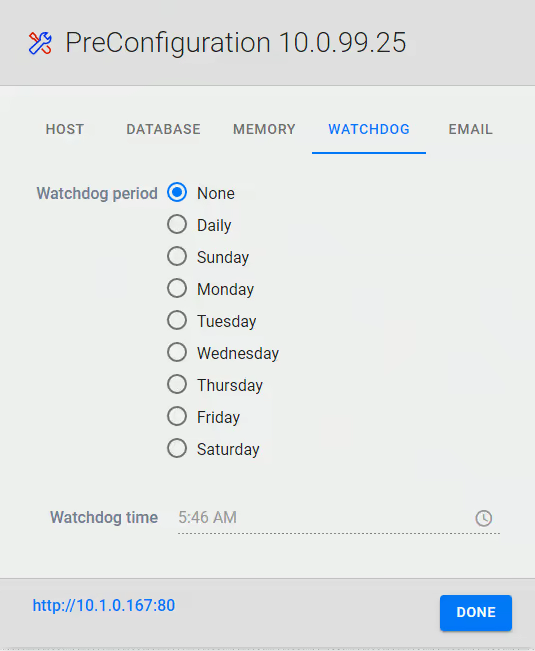
Watchdog configuration page can be accessed through System > Watchdog
menu.
| Total Memory: | Total memory allocated for CallReplay service. |
| Current Memory Usage: | Currently memory used by the CallReplay service. |
| Out of Memory Threshold: | If threshold is reached a restart is initiated regardless scheduling stettings. |
Restart Scheduling
Watchdog can be scheduled to initiate a service restart at a specific hour and at a specific day of week, or daily.
Watchdog is a monitoring component that tracks - at each 60 seconds - the CallReplay service performance and trigers recovery actions, including service restart, and automatic notification in case of impeding errors. In addition, watchdog can be scheduled to perform automatic service restarts, or to send email notification when no recording are made within a specified period of time.
Out Of Memory threshold should not be changed without express instructions from CallReplay support staff.
E-mail Notifications
Watchdog can be configured to send e-mail notification in case when no recording are made within a specified number of calendar or business days.
Please check E-mail Configuration page for details about how to configure it.
2 - E-mail Configuration
CallReplay can be configured to send e-mail notification whenever alerts are available, including:
- Running low on storage
- Call have not being recorded for sevaral days
In order to configure the e-mail notification go to the menu and select
System | E-mail.

Where:
- SMTP Server: The IP or FQDN of your SMTP Server.
- SMTP Port: 25 is standard.
- TLS: Most people do not use TLS security. This should be left unchecked.
- POP3 Server: If the Mail server leverages POP3, input the IP or FQDN. Most people do not use this, so it may be left unchecked.
- Authentication User/Password: If the Mail server requires credentials, input the User/Pass.
- From E-Mail Address: When low level emails, like exporting a call, the From Address will be used as the From address in the email.
- Admin E-mail Address: When System Level emails need to be transmitted to the CallReplay admin, the Admin email address will be who receives those emails.
System level emails may include:
- Running low on storage.
- Calls have not been recorded for X days.
3 - IP Phone Service
Manual Phone Service Configuration
(This chapter has been obsoleted by the Configure Cisco CM wizard in version 6). Please use the Forked Recording Wizard in the Capture / PBXs page.
Observation: Instructions for setting up a Cisco CallManager Express phone service can be found on Cisco's site:
http://www.cisco.com/en/US/docs/voice_ip_comm/cucme/srnd/design/guide/external.html#wp1074400
The IP phone service is a component of our application that allows users
with a primary extension to listen to their calls from their Cisco Phone
or to demand recording of calls.
By accessing the System/Watchdog menu, you can specify the
authentication parameters used with the Cisco Phone XML, and other
values that affect the way that the service works:
- Cisco User - The user name used for authentication with the Cisco Phone XML.
- Cisco Password - The password used for authentication with the Cisco Phone XML.You don't need to specify the password each time that you make an update in the configuration page, but only when you need to change the existing password.
System > IP Phone Service
Application Phone XML User
This user is required for the application phone services to function properly. There is only one application Phone XML User, and it is different from the site users. You may choose any user you want, but we recommend creating a new special user that nobody else uses.
Create a new Cisco User or select an existing one
- Go to the CallManager Administration Site
- Go to User/Global Directory
- Click "Add a New User".For more details about adding a new user, please consult the CallManager Help.
Associate all devices with the desired user
Make sure that this user has all the devices associated to him.
Go to the CallManager Administration Site
- Go to User/Global Directory, then click "Search"
- Select or create the user you want to use with Cisco Phone XML. For example "CallRecorder"
- In the User Configuration page, please click "Device Association"
- Now you have to associate all the phones through which you want to access the application and/or Call Monitoring phone services with this user. If you want to associate all devices, do the following:
- Press "Select Devices" ( leaving the search field empty )
- Select "Check All in Search"
- Click "Update Selected".
Setting up the authentication
- Go to System/IP Phone Service
- In the "IP Phone Service" page enter the following values:
- In the "Cisco User" field, enter the name of the user that you associated all your phones with (see the previous step)
- In the "Cisco Password" field enter the password of that user
- Press "Save"
To make the application service accessible on your Cisco IP phones, you have to go through the following steps:
Add a new service
- Go to CallManager Adminitsration / Device / Device Settings / Phones Services
- Press "Add New" button
- Set "Service Name" to Call Recorder
- Service Category must be XML Service and Service Type* Standard IP Phone Service*
- Set "Service URL" to http://CallRecorderServer(:port)/CallRecorder/phoneService
- Click Save
For Demand recording the URL is http://CallRecorderServer(:port)/CallRecorder/phoneService/onDemandPhoneDemandThisCall
Assign the service to the phones you want
For large number of phones this is best done using Device Profiles.
Using the Call Manager Administration site:
- Go to the CallManager Admin/Device/Phone
- For each phone having access to CallRecorder, do the following:
- Go to that phone's configuration page
- Click "Subscribe/Unsubscribe Services"
- In the available services list select CallRecorder, then click "Continue"
- Click "Subscribe"
- Click "Update"
- Restart the phones so that they can read the new configuration (only
if you had to change the URL to the value we specified)
- Go to CallManager Admin/Device/Phone
For each page "Select all", click "Reset", then "Restart".
4 - Tenants
CallReplay supports the concept of multitenancy by which an instance of CallReplay can serve different groups of users providing access with specific privileges, or structured in different ways. For example there might be a business branch and its users that can use CallReplay in an isolated way.
Additional tenants may be added hereby clicking the Add Tenant button. You will need to provision the desired number of channels and screen recorders, as well as the company's name TLD and number of branches.
Please note that when you upgrade your license with additional channels/recorders, you will need to assign them here, to the desired tenant.
System > Tenants.
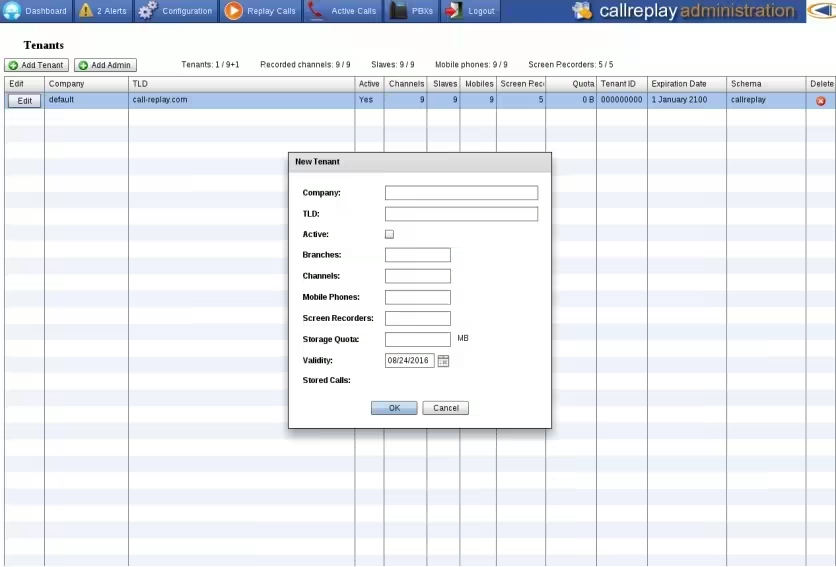
- Company - please enter the company name here, it will be used to identify the tenant
- Please enter the company's top level domain, such as guest-company.com{.external-link} in the TLD field
- Active checkbox enables or disables the tenant
- Branches field represents the number of branch replication channels assigned to this tenant
- You must set the desired number of channels you are granting the tenant in the channels field. Please note that those channels must not be assigned to any other tenannt, including the default one. If all channels are assigned, you will have to revoke some and then check the respective Licensing Pools allocations.
- Mobile phones -
- Screen Recorders - add the number of desired Screen Recorder channels for the tenant. As with the recording channels, they will need to be unassigned.
- Storage Quota - you can set a storage quota for this tenant.
- Validity - an expiration date can be set for the tenant.
- Stored Calls will show the number of stored calls for the tenant.
5 - Authentication
CallReplay supports two authentication modes: DB and AD/LDAP.
- DB Authentication is the default authentication mode and is integrated at the application level. This means that the user name and password pairs are maintained at database level
- AD/LDAP Authentication can be configured and is the authentication mode that is integrated at operating system level via AD (Active Directory) or LDAP (Lightweigth Directory Access Protocol)
For AD/LDAP Authentication to work, you need an Active Directory or other LDAP compatible service available.
To configure AD/LDAP authentication mode
- Go to menu
System | LDAP Authentication. - Select AD/LDAP Authentication Mode.
- Provide the name of the AD/LDAP server
- Enter the port where AD/LDAP is listening (389 is the default port for LDAP service)
- Select the authentication method.
- Enter the domain's name
- Provide the user name as is defined within AD/LDAP
- Provide the password associated as recorded by AD/LDAP
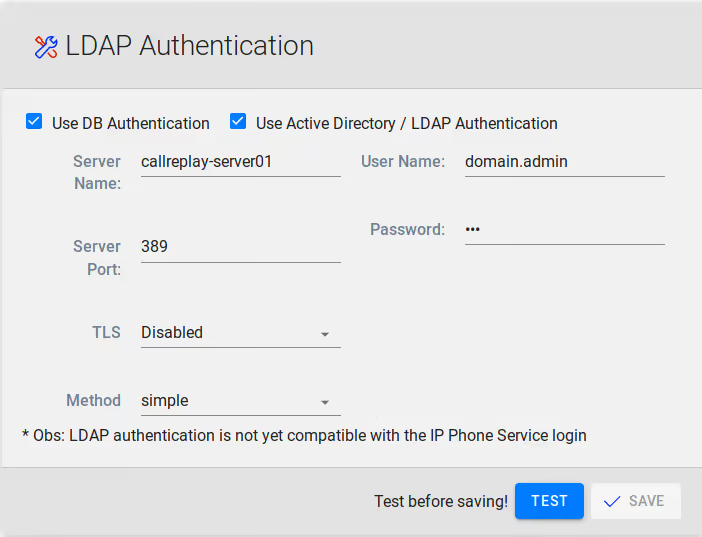
"Save" button becomes active only if a connection test was performed successfully
To configure DB Authentication mode
- Go to menu
System | LDAP Authentication. - Select DB* Authentication Mode*.
6 - CDR Verifier
The CDR Verifier module is designed to fetch information from the CDR Analysis and Reporting information. The CDR Verifier is available from the System > CDR Verifier menu, but it first must be enabled in CallManager and on a per-PBX basis from Recording > CallManagers (PBXs) in CallReplay.
Enable CDR in PBX
To enable the CDR Verifier in CallReplay, go to PBXs and click Edit on a PBX line. Once the Edit PBX window appears, switch to the CDR Setup tab:

CallReplay uses a built-in FTP server to which CallManager will upload its CDR information. Make sure to fill in all the fields:
- Ftp Server Enabled: This must be checked so the built-in FTP server is active and listening.
- FTP Server: This is automatically filled in by CallReplay with its IP address.
- FTP Username: This will be the username used by CallManager to login to the FTP server. You can change this to a desired username, or leave it to default.
- FTP Password: This will be the password used by CallManager to login to the FTP server. You can change this to a desired password, or leave it to default.
- Directory Path: This is the path used by CallReplay to store the information received from CallManager (e.g. C:\CallReplay\Cdr\10.1.0.30\).
- Import Enabled: Check this to enable CDR imports.
Once the fields are filled in, click OK. One more step is required, and that is to enable CDR uploading in CallManager. Proceed to the next step to do this.
Enable CDR in CallManager
In CallManager, go to System > Service Parameters, and make sure that under the System section, the CDR Enabled Flag is set to True:
Next, open the Cisco Unified Serviceability from the top-right drop-down Navigation entry. Now go to the Tools > CDR Management menu entry. Under the Billing Application Server Parameters section, click the Add New button:
A new window where you can configure the FTP settings should appear:
- Host Name / IP Address*: Enter the IP of CallReplay.
- User Name*: Enter a username to use when authenticating to the FTP server of CallReplay (this will be configured later as well in CallReplay).
- Password*: Choose a password to authenticate to the CallReplay FTP server.
- Protocol*: Choose FTP instead of SFTP.
- Directory Path*: Enter a path in the form /CCM_IP/. This path will be used by CallReplay to place CDR data. By default, it will be stored in DATA_FOLDER/Cdr/CCM_IP (e.g. C:\CallReplay\Cdr\10.1.0.30\).
Click the Add button.
It will take a while until CallManager starts uploading information to CallReplay, and once it does, you should be able to see statistics from the System > CDR Verifier menu.