This is the multi-page printable view of this section. Click here to print.
Storage
1 - Storage Volumes
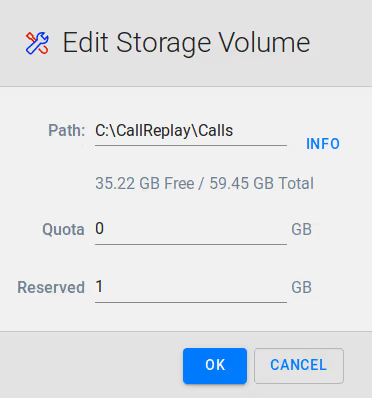
The Storage Volume page allows to set the folder where the calls are stored. You can add new folders, you can join folder, or you can remove folders. In addition, CallReplay can manage multiple volumes that store calls on separate drives, which will be used in a round-robin order.
To add new volumes
- Go to
Storage > Storage Volumes. - Click
Add Volume. - Provide all the information requested.
- Click
Ok.

- Path - destination path on the local HD, where calls will be stored
- Quota - the maximum space that can be used to store calls. (0 means unlimited).
- Reserved - the reserved storage space for CallReplay
When (Used Space + Remaining Drive Free Space) becomes lower than Reserved Space, a warning e-mail will be sent to the administrator.
The storage volume list will be updated, including the information about free space on available drivers.

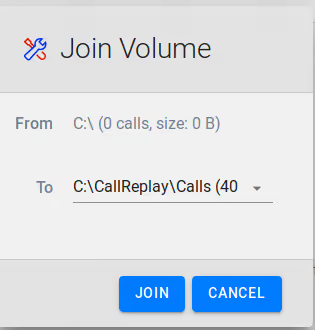
To join volumes
- Go to
Storage > Storage Volumes. - Click
Joinon the volume that will be the source - Select the
Toas the destination folder. - Click
Join.

To delete a volume
- Go to
Storage > Storage Volumes. - Select the row with volume to delete.
- Click on the red circle button in Delete column.
- Click
Yesto confirm.
NOTES
A deleted volume is not removed when it contains calls, will be just marked as deleted and no other calls will be stored on it.
2 - Storage Settings
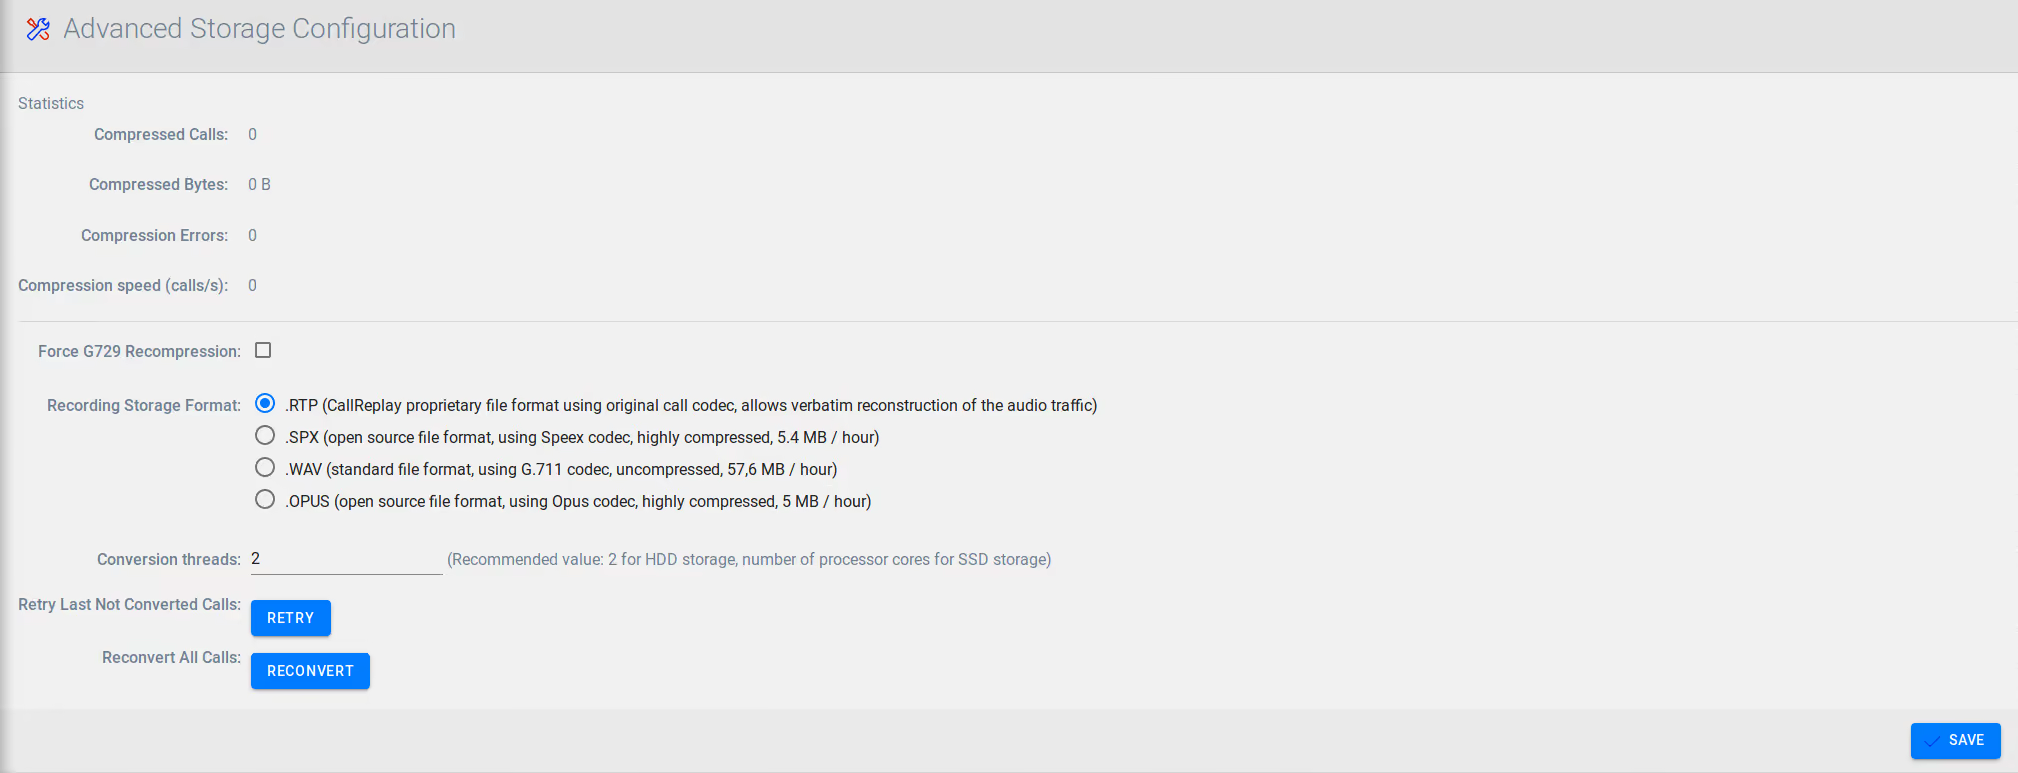
The Advanced Storage Configuration holds further options for the storage of recordings:
Force G729 Recompression will encode all the stored files with the G.729
Capture Device Buffer - sets the buffer used to store capture packets in SPAN recording. It should not be changed unless instructed by CallReplay support team.
Recording Database Connections should correspond to the number of cores your processor has. Overprovisioning or high processor load from other applications can lead to a decrease in performance or, in the case of SPAN, recording quality
Recording Disk Threads should be tailored to the write speed and IOPS of your current storage. For regular HDD storage, 2 threads should be enough, and SSD based storage can use more threads, up to the number of processing cores.
Temporary Files Expiration - time to keep the temporary files, such as .PNG files
Recording Storage Format allows you to set the file type of the recorded calls. The recording is made in RTP format, and the default setting is to convert it to SPX, which is the most efficient compression format, designed specifically for voice audio. When changing the format, you have the option of converting existing recordings to the new format, as well.
Conversion Threads should be provisioned like Recording Disk Threads, as they have the same impact on the storage hardware. For regular HDD storage, 2 threads should be enough, and SSD based storage can use more threads, up to the number of processing cores.
Player Access Password - auto generated password, used for interfacing with APIs

3 - File Renaming
File Name Templates Page allows the administrator to change the template used to generate the file names for storing recorded calls.
The file names template is a string containing macros that expand to values related to the call like the call ID or caller number. The list of macro names that can be used is displayed in the "Fields list" table as can be seen in the image. Click on a macro name from the table to have the macro included at the end of the current file names template. You can also type any macro name from the table in the File Name Template field, surrounded by barces { and }, to include the macro in the file name template string.
The Example field (below the File Name Template field) shows how a file name would look like using the currently displayed template string. Also watch the Example field for errors like a worng macro name being typed in the template string.
A new file name template takes effect after the Save button is pressed, and the new template will be used for all calls recorded thereafter. To also apply the new template to all the old files, that is to rename all previous files using the new template, use the "Rename existing files ?" radio group and select the option "On". For this case, you can use the "Call count" field as an estimate of the number of calls that would have to be renamed with this option.
After saving a new template with the option to rename existing files, you can see the rename progress in the Call count field, in the format "remaning / total", like for example "120 / 550".
The "Cancel" button restores the current template string into the File Name Template field, and discards any changes you might have typed in the input box.
Storage > File Renaming

4 - Call Encryption
Overview
We value your privacy, so we introduced an OpenPGP public key encryption of recorded calls. If you do not have an OpenPGP public / private key pair, you can generate them using a 3rd party software which you can find freely on Internet (see notes on the bottom of the page).
Setting Up Call Encryption
Login as administrator on CallReplay Cloud Server and go to 'Storage' / 'Recording Encryption'.
Click the 'Upload' button and select your OpenPGP public key file. If successful, you will see some of the details of the public key certificate. For the purpose of call encryption, the certificate does not need to be signed.
Upon the next connection of your mobile phones to your tenant, the certificate will be sent to all of them and all subsequent calls will be encrypted using this certificate.
You can change the certificate any time you want, and only subsequent calls will be encrypted with the new certificate, the older ones will remain as they were (unencrypted or encrypted with older certificates).
Notes:
1.Uploading only the public key gives you a great deal of privacy: in
case of mobile phone theft, the calls could not be listened. The
drawback is that neither you can listen to your calls on the mobile
phone.
2.In case you've wondered if someone could listen to your calls
uploaded to CallReplay Cloud Server, this way you can be sure nobody
could. The drawback is the same: neither you can listen to your calls
online.
The only way to listen to your encrypted calls is to download them to a computer, decrypt them with your PGP capable software of your choice. The software will ask you for the private key, will decrypt your files and you can listen to them using your favorite WAV/3GPP player.
Quick setup for call encryption
You can also generate an OpenPGP private/public key pair using 'Generate' button from the same page. After entering a name and a password, you will be prompted to save the private key to your computer.
The generated public key will be sent to your mobile phones and calls will be encrypted using it. However, the private key will not be kept on our server for security reasons, so you should take proper care of the saved key. If you lose it, your calls cannot be decrypted.
Mobile phone encryption configuration
For the encryption to work, after you generated or uploaded a public key on CallReplay Cloud Server, you need to connect your mobile to the server. Make sure you have Internet connection then either go to 'Status' page and click 'Upload Now'.
Then go to the 'Settings' page, 'Upload Server' section and you should see the new info on 'Encryption Certificate' item.
Note: in case you have used multiple certificates over time, for each encrypted call you will see the certificate details on the call details page; this way you can identify the private key required to decrypt the recorded call.
Notes
The encrypted file conforms with OpenPGP standard (RFC 4880). The encryption is done using AES 256.
The generated certificate is a 1024-bit RSA key OpenPGP.
If you do not have an OpenPGP certificate and prefer creating one yourself, you can use GPG4Win, which is a 3rd party OpenPGP compliant free software for Windows: http://www.gpg4win.org.