This is the multi-page printable view of this section. Click here to print.
Recording
1 - Recording Overview
CallReplay Call Recorder offers two methods for recording calls: Forked (SPANless) and SPAN recording. The modern, recommended, recording method is Forked Recording, because of its ease of installation.
For Cisco CallManager Express please use SPAN recording, and manually set the PBX type to Express, as auto-detection will not work.
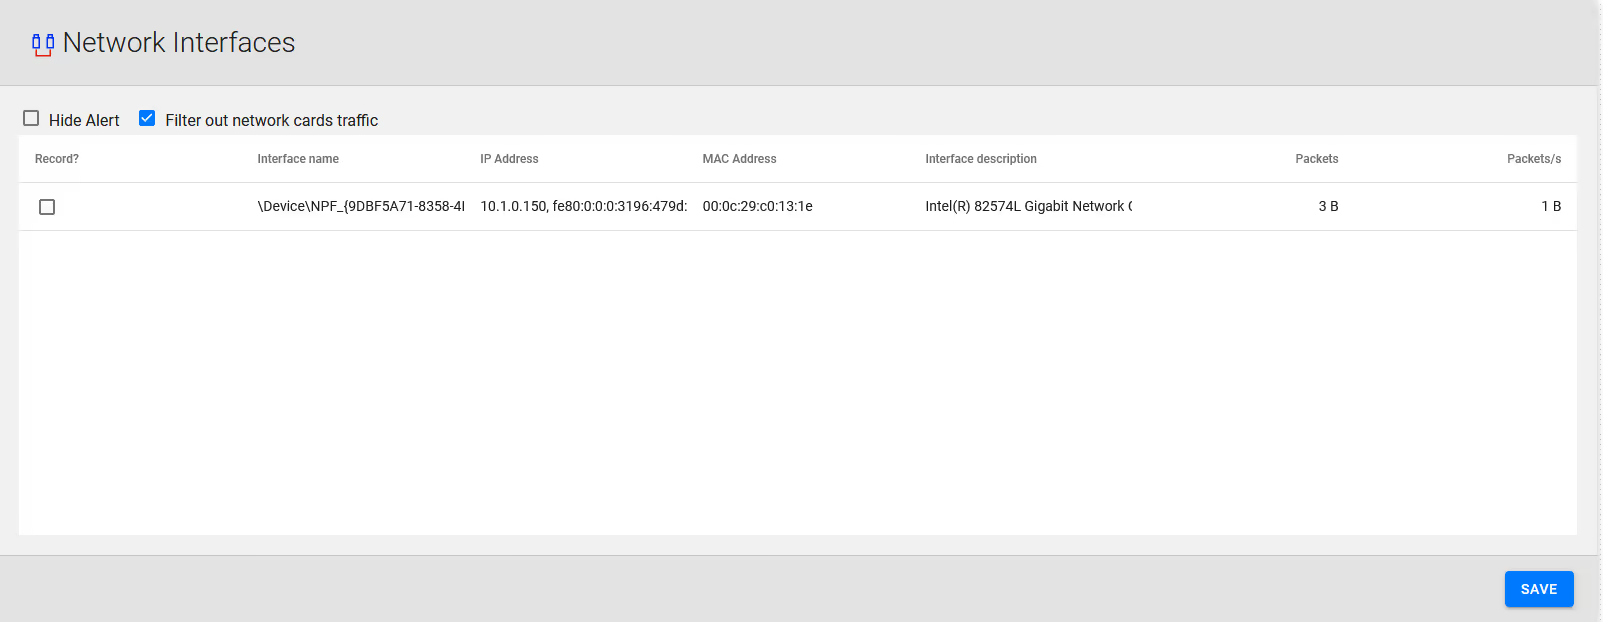
2 - Network Interface
Because monitoring ports cannot usually transmit traffic, for production setups the server you are using must have a minimum of two network cards for the application to function properly. One of them will be used for general network traffic and accessing Application Web Administration Interface and the other for listening VOIP related traffic. The NIC selected for website access should have a static IP address.
Important
The monitoring NIC should not have a routable IP address, because network switches inhibit the transmission of packets from ports used as port mirroring destinations. If the OS routes packets through this port, all sent packets will be discarded. Remove the IP address of the monitoring NIC, or set it a non-routable address, such as 1.1.1.1.
We assume that you have already configured your network switches in order to mirror all VOIP traffic from VOIP LAN to the monitoring NIC of CallReplay otherwise no calls will be recorded.
Open the Recording / Network Interfaces page, and choose which NIC is used for VOIP traffic and which one is used for web administration and general traffic.
To set NIC used for VoIP
- Go to Recording > Network Interfaces
- Click in the column Record? the NIC that would be reserved for recording
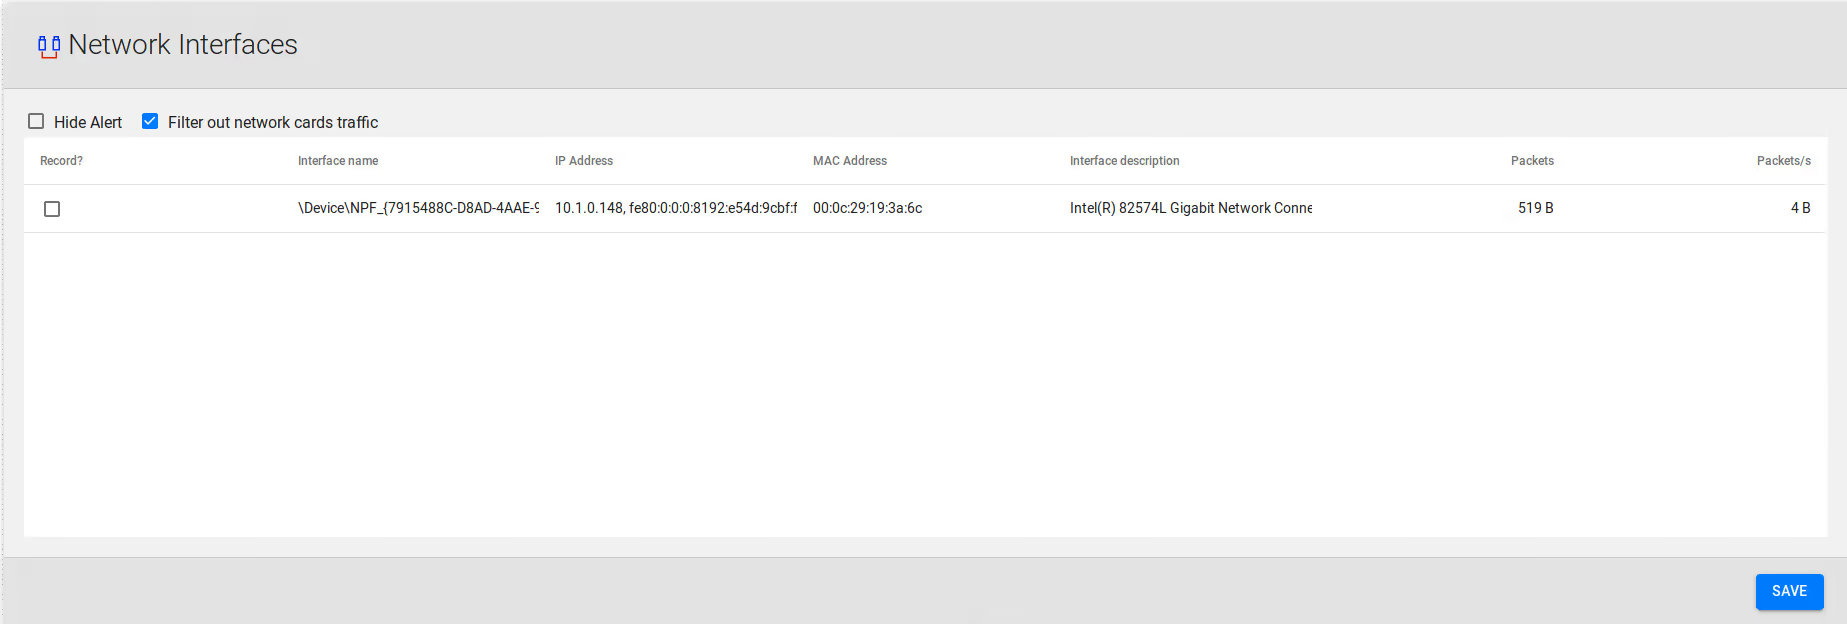
If you have configured port mirroring correctly, calls will start being recorded immediately. For CallManager Express please see the PBX Configuration chapter.
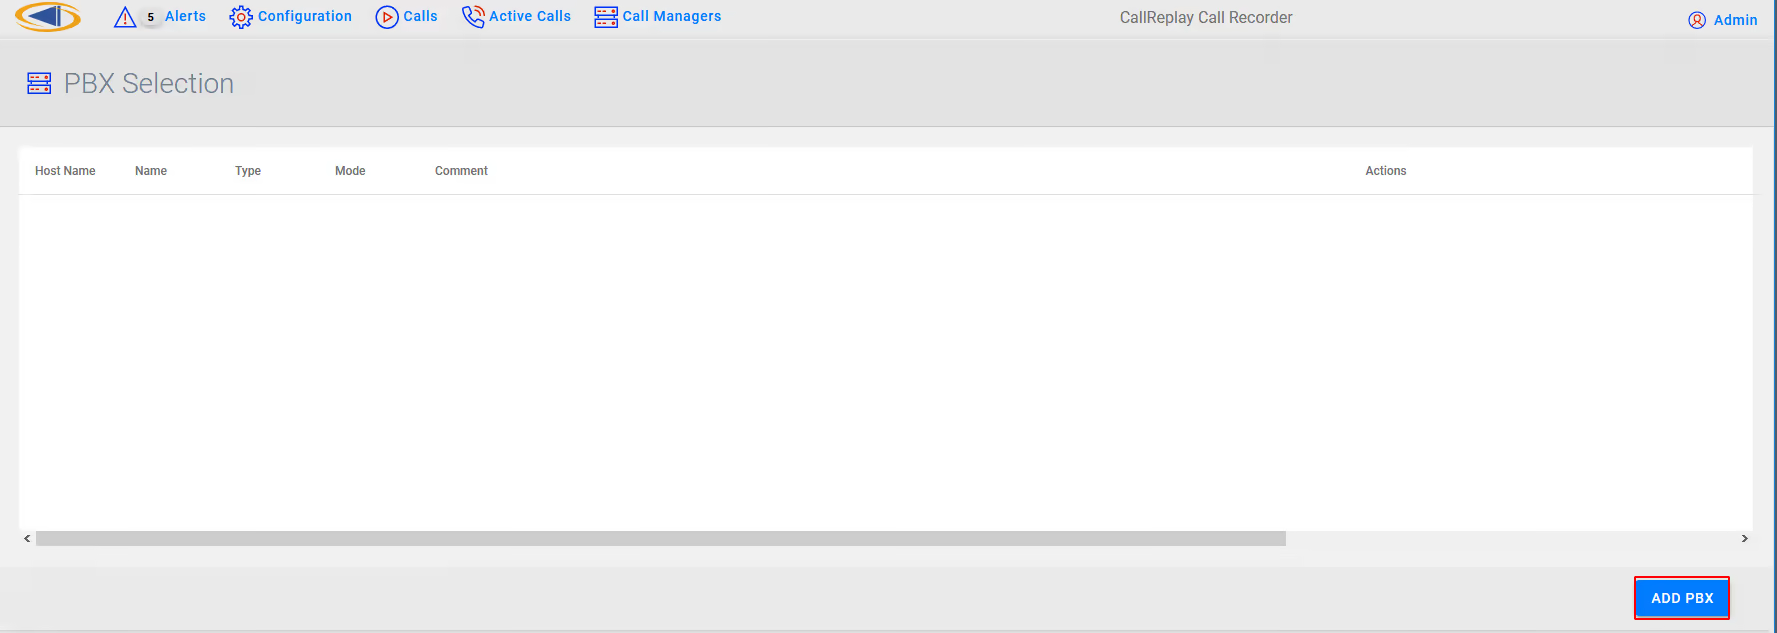
3 - Call Managers (PBX)
Call Managers page allows the management of Cisco CallManagers, Mitel, IPTrade, NEC and other supported telephony controllers.
To add a controller
- Go to
Recording > Call Managers (PBX). - Click
Add PBXbutton. - Provide all data required by Edit PBX window (see how to edit a controller)
- Click
Ok.
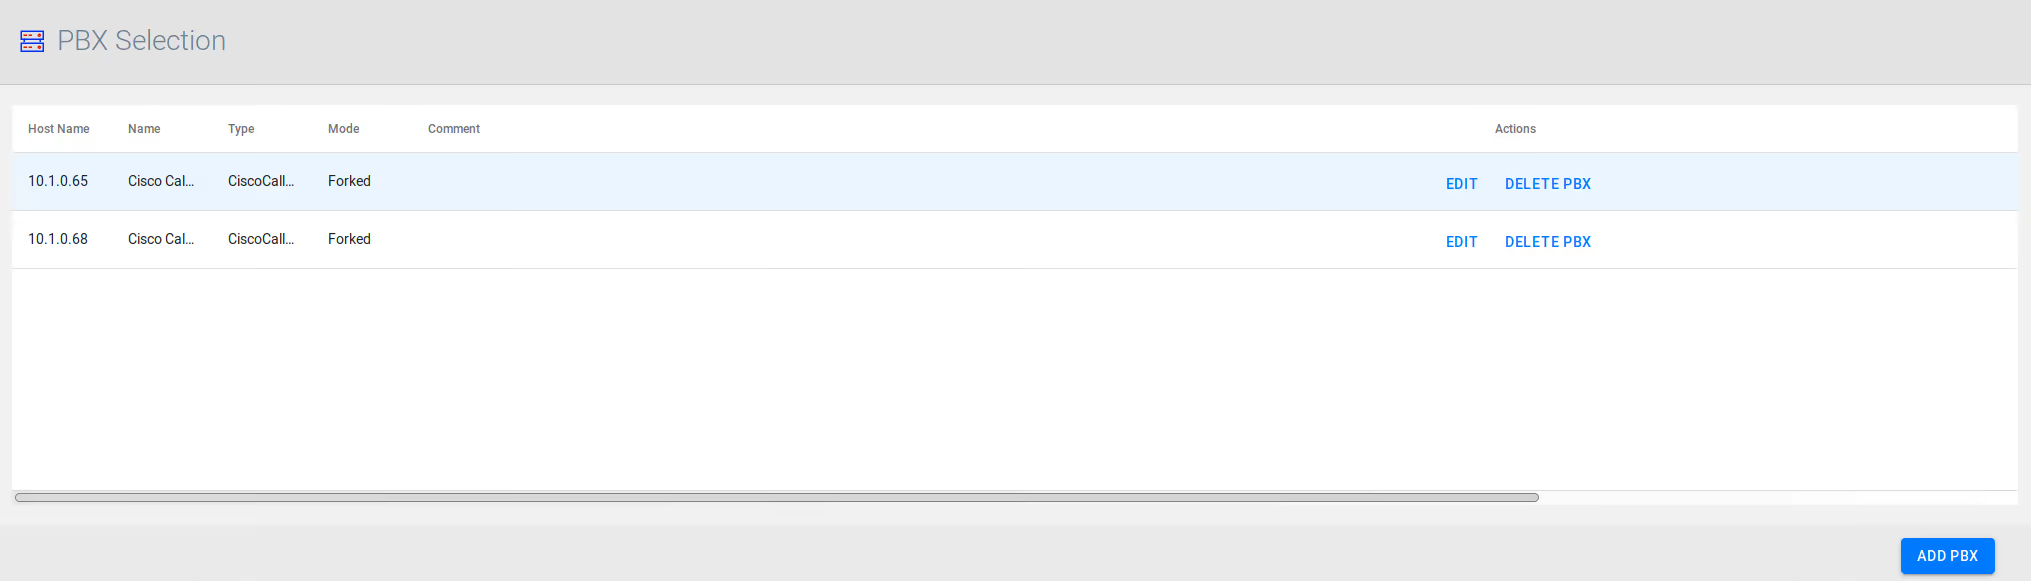
To delete a controller
- Go to
Recording > Call Managers (PBX). - Check the row(s) containing the controller(s) to delete
- Click
Delete PBXbutton. - Click
Yesto confirm deletion
To edit a controller
- Go to
Recording > Call Managers (PBX). - Click
Add PBXif you create a new cotroller, orEditto modify and existing one.

Observation: Cisco CallManager Express is a different type than Cisco CallManager.
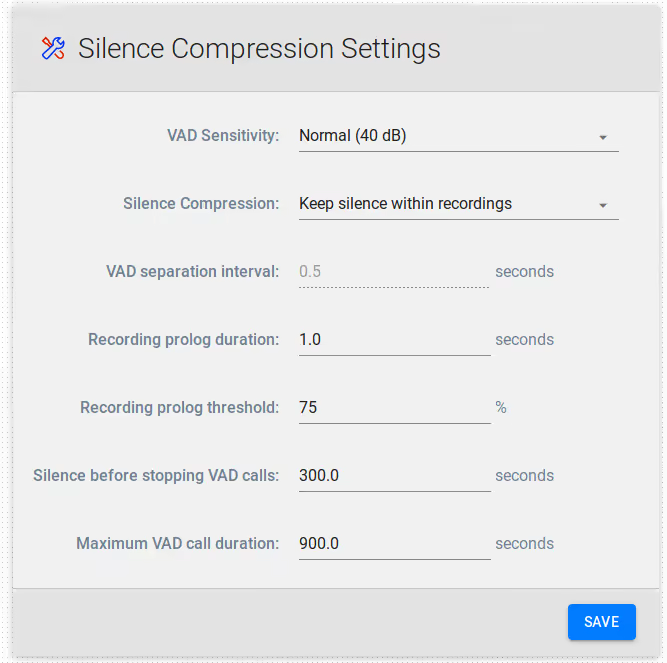
4 - Silence Compression
CallReplay has the capability to 'trim' silence allowing a significant reduction of RTP and as consequence a better usage of storage space or transmission bandwidth.
Voice Activity Detection is used with IP Trade Turrets to trigger call recording based on the voice signal intensity. It can also be used with Radio Gateways and other analog-to-IP equipment with no call signalling.
To configure silence compression:
- Go to
Recording > Silence Compression. - Change settings according with your requirements.
- Click
Save.
VAD Sensitivity: the level of voice activation detection from which the signal is not considered silence. The default value is Normal (40dB). Other values are Low (30 dB, noisy environment) and High (50 dB, Catch every breath).
Silence Compression: keep or not to-keep the silence within recordings
VAD separation interval: it is enabled when silence is removed within recordings. This is the length of the silence inserted between active signals.
Recording prolog duration: it means the length of the interval recorded before the moment of active signal.
Recording prolog threshold:
Silence before stopping VAD calls: after specified value of silence the recorded call will be stopped.
Maximum VAD call duration:
CallReplay has the capability to 'trim' silence allowing a significant reduction of RTP and as consequence a better usage of storage space or transmission bandwidth.
Voice Activity Detection is used with IP Trade Turrets to trigger call recording based on the voice signal intensity. It can also be used with Radio Gateways and other analog-to-IP equipment with no call signalling.
To configure silence compression
- Go to
Recording > Silence Compression. - Change settings according with your requirements.
- Click
Save.
- VAD Sensitivity: the level of voice activation detection from which the signal is not considered silence. The default value is Normal (40dB). Other values are Low (30 dB, noisy environment) and High (50 dB, Catch every breath).
- Silence Compression: keep or not to-keep the silence within recordings
- VAD separation interval: it is enabled when silence is removed within recordings. This is the length of the silence inserted between active signals.
- Recording prolog duration: it means the length of the interval recorded before the moment of active signal.
- Recording prolog threshold:
- Silence before stopping VAD calls: after specified value of silence the recorded call will be stopped.
- Maximum VAD call duration:
- Go to
5 - SPAN Recording
Overview
SPAN Recording is a passive technology. It is working with all Cisco CallManagers and all kind of phones as long as they are SIP or SKINNY compatible.
The application service uses a network interface card functioning in
promiscuous mode, in order to capture packets for the conversation
recording. The host computer or the server need a network connection to
voice traffic, through a non-switched hub or through a SPAN port on a
switch. For more information about configuring a mirrored port on your
switch, read the user manual of the switch.
You can also visit the following links:
- Configuring the Catalyst Switched Port Analyzer (SPAN) Feature: http://www.cisco.com/en/US/products/hw/switches/ps708/products_tech_note09186a008015c612.shtml
The application works by monitoring phone traffic. There are two types of phone traffic essential to recording:
- signaling (call control), from phones or voice gateway to CallManager
- audio streams (RTP), from phone to phone, or from phone to voice gateway
To be able to record calls, the application needs to intercept both
types of traffic, call control and audio streams.
For more information about network sniffing please read the Wireshark
FAQ: http://www.wireshark.org/faq.html
Virtual Environment
The difficulty in getting SPAN based/passive recording functional in a virtual environment is the SPAN itself. With the SPAN configured on a physical switch port, all communication will be directed to a physical NIC. This physical NIC MUST be bound on the VM. The reason behind this statement is because most virtual NIC software cannot forward the SPAN information to the VM, so the physical NIC will be required to be bound to the VM. Because of this requirement installing the application into a virtual environment may not be advisable. Allocating a physical device to a VM only requires VT-D support in the host CPU.
Implementation Options
There are two main options in configuring network monitoring:
- Record only external calls. This is the easiest. All you need to do is to have the CallManager and the voice gateway in the same switch and SPAN them to the application recording port. If you have them in different switches you need two monitoring NICs in the recording application server, one for each switch. Make sure you are mirroring all the CallManagers and voice gateways, including backup ones.
- Record all calls, external and internal. For that you will need to have all the phones' traffic monitored to the application recording port. That is, monitor all switches with phones. Usually this is done by placing all the phones in a separate VLAN, and monitoring that VLAN. Using a VLAN also has the advantage of discarding the general (PC) network traffic, which can overload the monitoring interface in both the switch and in the recording application.

Because RTP traffic (green and red in the figure) travels directly
between end points, without going through CallManager, in a large
enterprise with multiple switches only external calls (PSTN) can be
recorded in a cost effective way (one recorder for each voice
gateway).
To record internal calls also, one recorder per switch with IP phones is
required.
Server Side Network configuration
Because monitoring ports cannot usually transmit traffic, for production setups the server you are using must have a minimum of two network cards for the application to function properly. One of them will be used for general network traffic and accessing Application Web Administration Interface and the other for listening VOIP related traffic. The NIC selected for website access should have a static IP address.
Important: The monitoring NIC should not have a routable IP address, because network switches inhibit the transmission of packets from ports used as port mirroring destinations. If the OS routes packets through this port, all sent packets will be discarded. Remove the IP address of the monitoring NIC, or set it a non-routable address, such as 1.1.1.1.
We assume that you have already configured your network switches in order to mirror all VOIP traffic from VOIP LAN to the monitoring NIC of CallReplay otherwise no calls will be recorded.
Open the Recording / Network Interfaces page, and choose which NIC is used for VOIP traffic and which one is used for web administration and general traffic.
Recording > Network Interfaces
If you have configured port mirroring correctly, calls will start being recorded immediately. For CallManager Express please see the PBX Configuration chapter.
6 - Forked Recording
Overview of Forked Recording
Forked Recording (SPANless Recording) is an active recording technology, available only on Cisco CallManager platforms newer than 5.0 and selected Cisco phone models.
Benefits of Forked Recording
Ease of use and management
- Establish complex network architectures not depending on SPAN ports
- Move or reconfigure complete departments with ease
- Improve control over branch locations
Economical
- Reduce OPEX with easier administration as no configuration of SPAN ports is necessary
- Reduced CAPEX – need for fewer elements at the branches
Reliable and secure
- Free-up resources for network monitoring
- Increase reliability utilizing system resources better and more manageable
- Security: Both authenticated and encrypted mode can never be recorded.
- Geo redundancy available with high bandwidth utilization
Additionally
- Internal calls recording = RSPAN, VLAN split to meet SPAN capacity
- Cisco plans support for CUCM 8.x
- Built-in support of recording notification tones
How does it work?
The Cisco Unified Communications Manager (CUCM) interface provides two recording modes:
- Automatic recording of all calls on line appearance. This method is invoked by CUCM.
- Selective recording allowing users to record ad-hoc or also allows recording server to record based on business rules and events.
After calling-in and routing the call to an agent CUCM automatically
sends two call setup messages to the Agent device. The 1st call is the
agent stream and the 2nd call is customer stream. The Communications
Manager invites the recorder to both calls via SIP Trunk and the
recorder accepts both calls and receives RTP streams from Agent device.
Forked recording requires:
- usage of the silent monitoring and recording interface of CUCM
- CUCM version 6.0 and higher
- the usage of 3rd generation phones, as detailed here:
- https://developer.cisco.com/site/uc-manager-sip/faq/supported/
Usage notes
Usage of a SPANless configuration will bring major benefits as long as the following requirements and notes are taken into account:
- The expected increase of network traffic
- For PSTN recording only GW span works as simple trunk recording
- TAP switches are able to handle high traffic in large architectures with centralized GW
- Only 3rd generation phones are supported
- There is no support for active-active redundancy
- Interruptions in recording may occur if a failure occurs during the call
- If the WAN capacity is limited, redundant recording may be refused (due to automated network intelligence)
Further reading: http://www.cisco.com/en/US/docs/voice_ip_comm/uc_system/UC6.0.1/features_apps/CMmonrec.html
Configuration Steps
In the Recording / PBXs page, the Forked Recording wizard button appears only when the PBX type is Cisco CallManager, version is greater or equal than 5.0 and the Forked Recording Protocol is selected in the PBX options. In this case other recording protocols should be disabled.
Step 1. Add a new PBX by clicking the Add PBX button.
Menu > PBXs
Step 2. The PBX window appears allowing to edit the PBX settings.
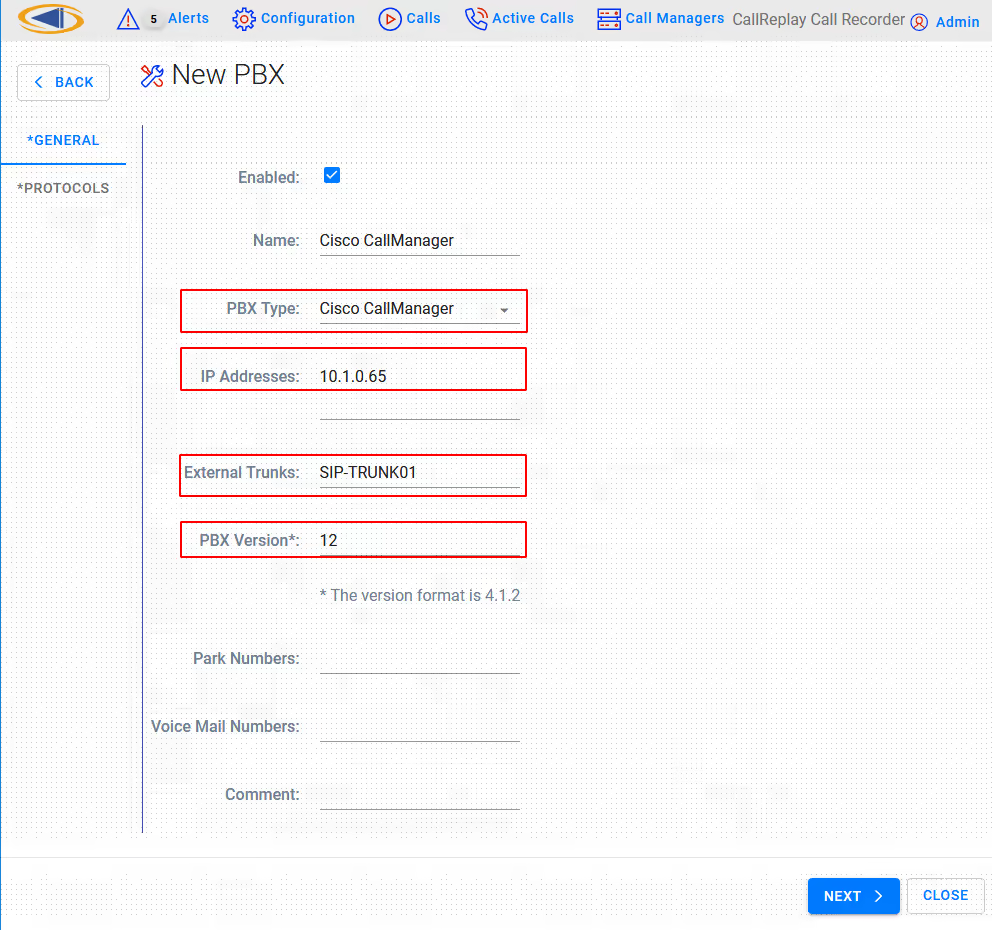
You may need to change the following fields according to the type of PBX:
- PBX Type: This drop-drown list allows the selection of the PBX type, for example CallManager or CallManager Express.
- IP Addresses: The IP address of the PBX. If there are more IPs (for example if you have a cluster) separate the IP addresses by the semi-colon character, or write each address separately on one line.
- External SIP Trunks: The names (not the IP) of your external SIP Trunks. You can enter them one per line.
- PBX Version: The version of the PBX. It is important to insert the correct version using at least the MINOR:MAJOR notation (e.g. 10.5 or 10.5.2 for CallManager 10.5.2). CallReplay takes this version into account when it communicates with CallManager (make sure to change this to the appropriate value when upgrading your CallManager).
- Park Numbers: A list of park numbers. Use the X wildcard to stand for zero or any one digit.
Step 3. Select Next to continue to the Protocols configuration
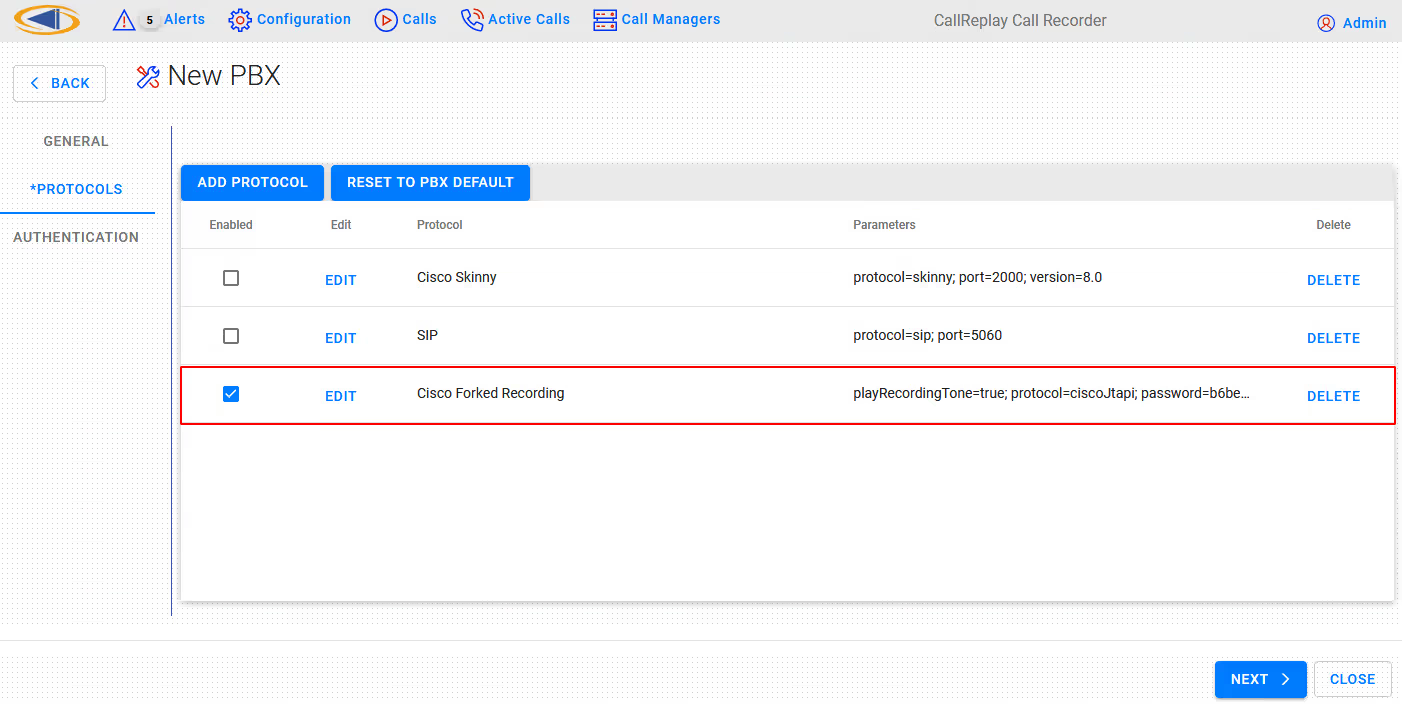
- Protocols: This list should already have Forked Recording enabled. Make sure it is checked.
Step 4 Edit Cisco Forked Recording
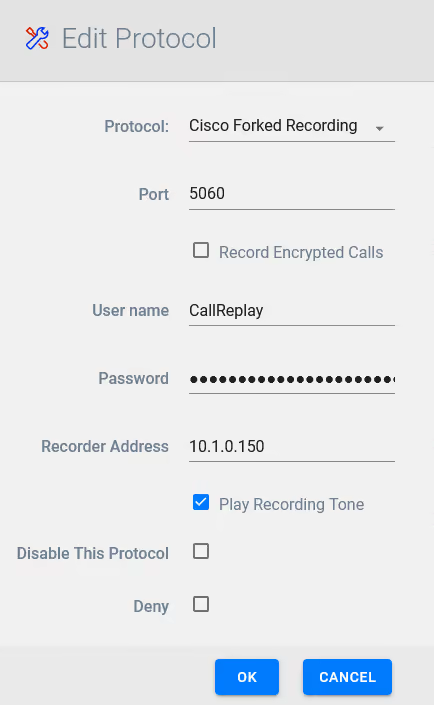
Ensure the password for CallReplay user is set correctly
One the settings are in place click OK and then click the Next button.
Step 5 Confirm CUCM Username and password and confirm Certificate Security
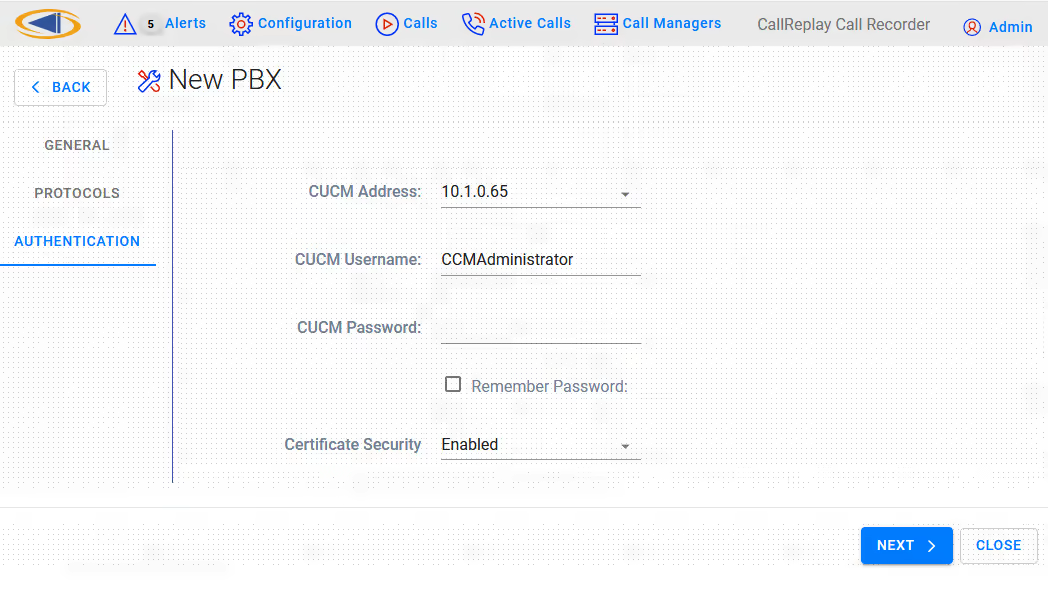
Click Next button to conitnue
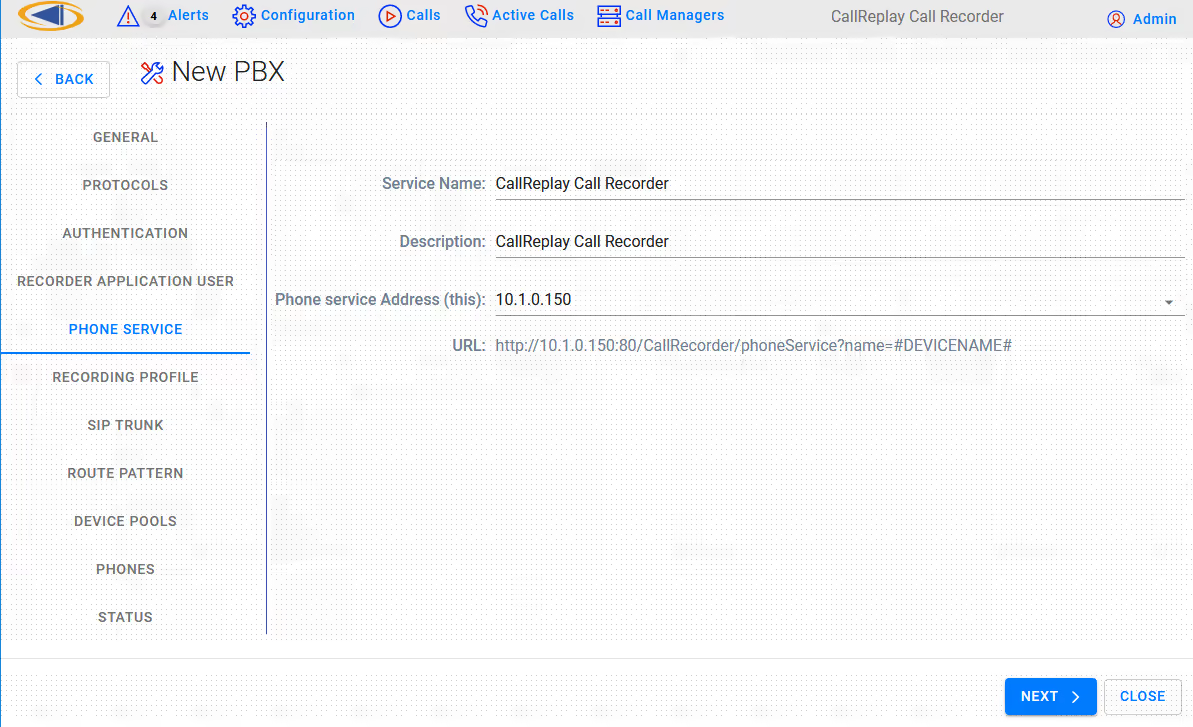
In the next page leave all the fields unchanged unless instructed by technical support. The Phone Service IP address must be routable from the phones' VLAN. Press Next button.
Step 5. Here you must select the correct CallManager Group, Recorder Extension for CallReplay, the IP address of the CallReply recorder ( also needs to be routable from a phone's IP address ), CSS and Device Pool for recorded phones, Security Profile, SIP port of Callreplay ( Syn-Apps' SA-Announce also uses a SIP trunk so make sure in that case to select another port, such as 5061 ) and the RTP port range used by CallReplay for receiving audio streams. The recorder extension must have the same number of digits as recorded extensions.
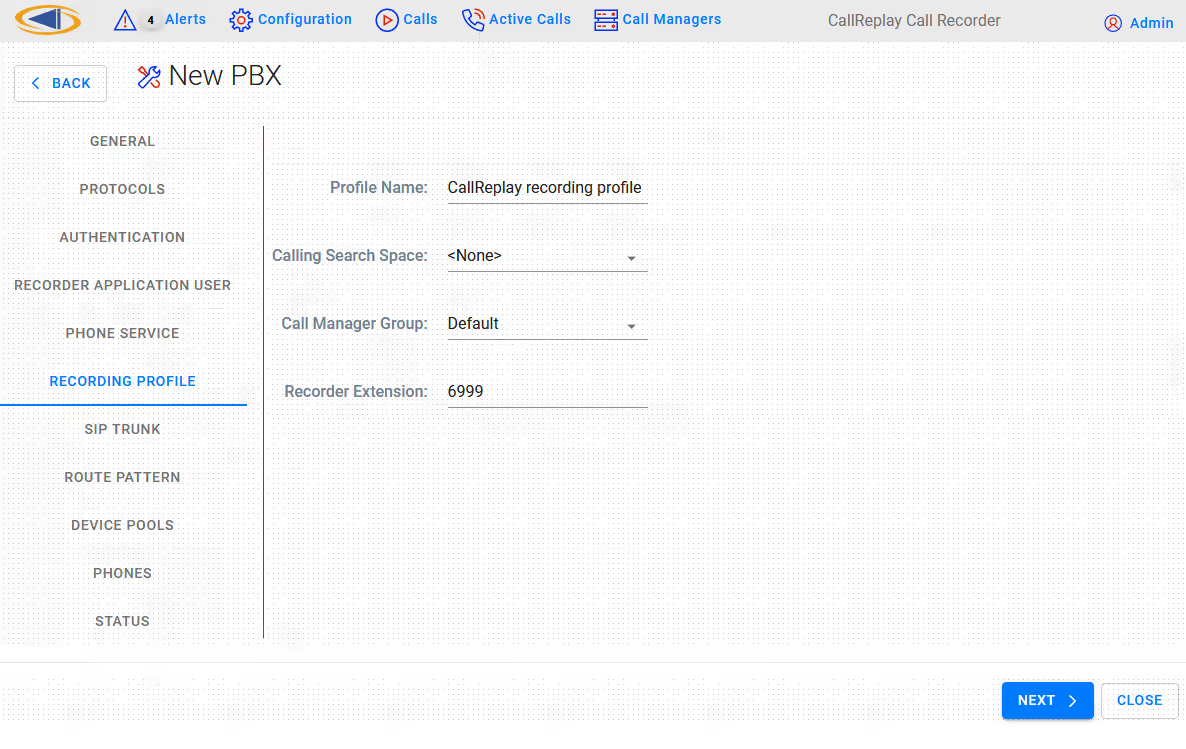
- Recording Profile > Calling Search Space: This is the CSS that will be selected for the Recording Profile. Please use a CSS setting so that the recording trunk phone number is reachable from all the phones which are to be recorded. A quick test would be to call the recording trunk extension from one of the phones to be recorded. The trunk should answer instantaneously and just silence should be heard. A fast busy tone would indicate a connection problem.
- Recording Profile > Recorder Extension: The number that will be used to send SIP invites to CallReplay in order to record. The number of digits for this extension must be the same as the number of digits of the recorded phones.
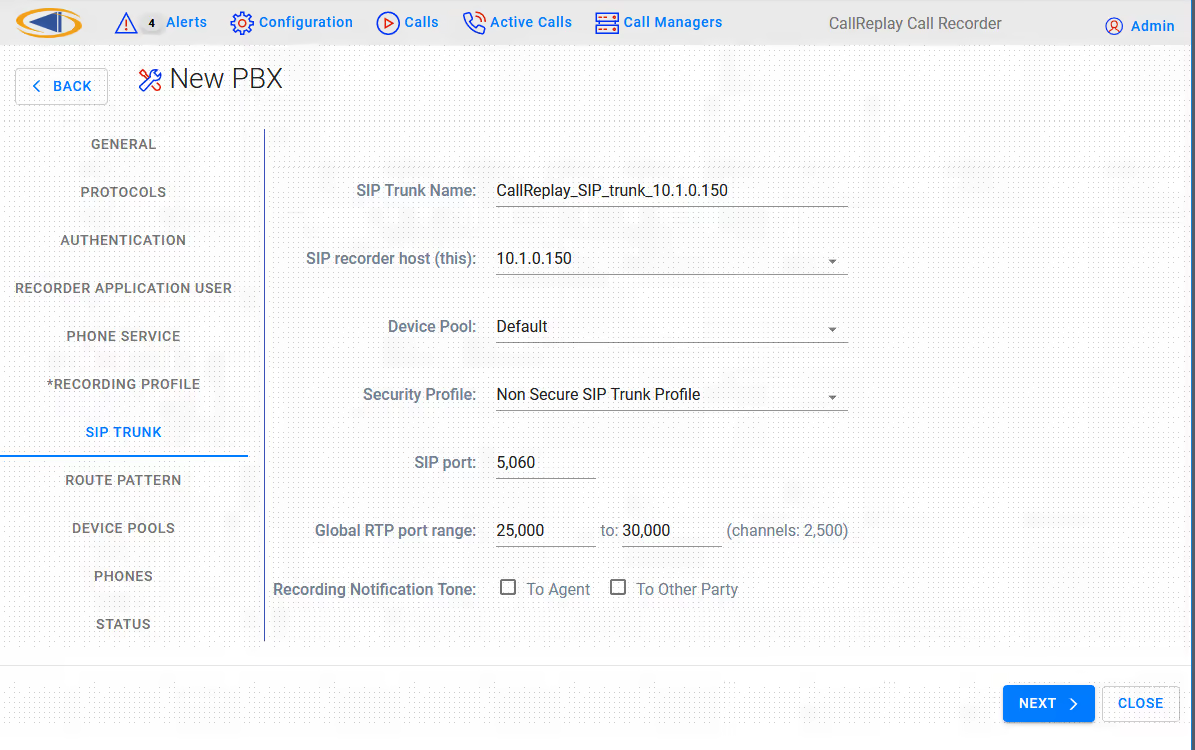
- SIP Trunk > SIP recorder host (this): Enter the IP of the CallReplay machine
- SIP Trunk > Device Pool: Choose the Device Pool that the SIP trunk will be created with. The recorder should be in a DP which matches the physical location of the recording server. It is recommended that a dedicated DP is used for the recorder so that no media transcoding is necessary.
- SIP Trunk > Security Profile: Make sure to select a Non Secure SIP Trunk Profile or a New Non Secure SIP Trunk Profile, this profile will be configured to use TCP for incoming connections.
Once the above settings are complete, press the Next button. CallReplay will tell CallManager to create all the profiles (if they already exist, they will be overwritten).
Step 6. In the Device Pools section you can select which device pool to configure. Once you selected a Device Pool, in the next tab (Phones), only the phones in the respective pool will be shown.
Step 7. Here you have a list of a phones to manage. Check all phones to record under Record column. Similarly for Service check box. When that check-box is selected, the phone will be subscribed to CallReplay Phone Service (see step 2), which will become available on the Service button (on the phone). Thus we can control recording and monitoring independently for each phone. You can filter phones by*** *Selected / Unselected (record or service) or by typing some text to search in all columns. Checking Reconfigure all controlled phones will update all phones with current shown configuration, otherwise only changed ones will be updated.

Step 8. Press the Next button and the selection will be processed. The status of processing will be shown.
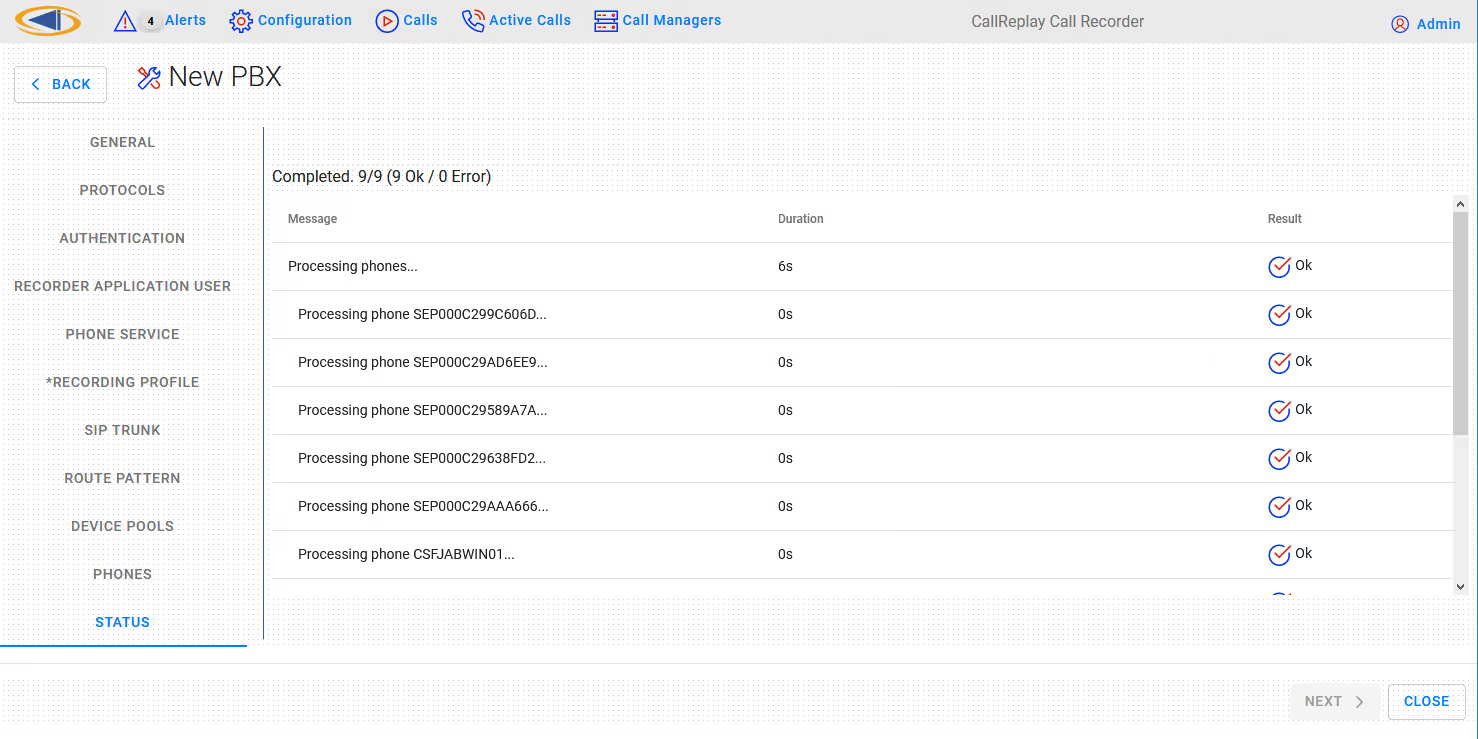
Press the Close button to close the wizard configuration utility.
Cisco CallManager - Alternative/Manual Configuration for Forked Recording
We recommend the usage of CallReplay Forked wizard for configuring your Cisco CallManager. But if you do not want to use this feature follow these steps to prepare your Cisco CallManager for recording.
1. Recording phones using forked
You need to create by hand an application user - CallReplay, a new SIP profile - CallReplay SIP profile, a recording profile - CallReplay recording profile and a new trunk - CallReplay_SIP_trunk.
CallReplay Application User
In CallManager site administration go to User Management > Application User. Press the Add New button and fill in the text fields as follows:
Application User Information
User ID*: CallReplay
** Password**: password
Confirm Password: password
** Presence Group***: select* Standard Presence group*
Device Information
Add from the list of Available Devices to the list of Controlled
Devices the phones who will be recorded.
If you use EM profiles then add from "Available Profiles" list
to the "CTI Controlled Device Profiles" list the EM profiles who will
be recorded.
Permissions Information
** Groups**: press *Add to User Group *button and in list shown
subscribe to the following groups: Standard CTI Enabled, Standard CTI
Allow CallRecording, Standard CTI Allow Control of Phones supporting
Connected Xfer and conf and Standard CTI Allow Control of Phones
supporting Rollover Mode
Press Save button to create the application user.
CallReplay SIP profile
In CallManager site administration go to Device > Device Settings > SIP Profile. Press Add New button and fill in the Name* with value CallReplay SIP profile. Save the changes
CallReplay recording profile
In CallManager site administration go to Device > Device Settings >
Recording Profile. Press Add New button and fill in the text fields as
follow:
Name*: CallReplay recording profile
Recording Calling Search Space: select a CSS
Recording Destination Address*: xxx - the extension used by
CallRecorder. The value must be an unassigned EXT and having the same
number of digits as recorded extensions. If extensions in your network
have 3 digits then this value must have 3 digits too.
Save the changes.
CallReplay SIP trunk
In CallManager site administration go to Device > Trunk and press Add
New button to define a new trunk. Fill in the text fields:
Device Information
** Device
Name***: CallReplay_SIP_trunk_xx.xx.xx.xx where xx.xx.xx.xx is
the IP of CallReplay server.
Device Pool*: select the device pool where the recorded
phones are registered
SIP information
Destination Address: the IP of the CallReplay server
Destination Port: the port where CallReplay is listening (
default value 5061 )
SIP Trunk Security Profile*: select security profile
accordingly
SIP Profile*: select CallReplay SIP profile ( created
before )
Save the changes.
2. Subscribe phones to the CallReplay Call Recorder Phone Service
Create CallReplay Call Recorder phone service
In CallManager site administration go to Device > Device Settings >
Phone Services and press Add New button to define a new phone service.
Fill in the text fields as follow:
Service Name*: CallReplay Call Recorder
** ASCII Service Name***: CallReplay Call Recorder
Service Description: CallReplay Call Recorder
Service
URL: http://IP:PORT/CallRecorder/phoneService{.external-link} (
you can get these values from CallReplay Site Configuration );
Service Category*: select XML Service
Service Type*: select *Standard IP Phone Service *
Enable: True
Save the changes.
Subscribe devices
In CallManager site administration go to Device > Phone and perform the
following operations:
-select a device;
-select from Related Links dropdown list
option Subscribe/Unsubscribe Service and press Go button;
-in the new windows select CallReplay Call Recorder service
-press Next and after that* Subscribe* button;
-close the window;
After the phone reset the CallReplay Phone Service becomes available
for use.
7 - IPTrade Turret Recording
CallReplay offers an fully integrated solution for IPTrade Turret VoIP recording, based on active recording. This means that the two platforms are directly connected, without requiring any additional hardware and a duplicate media stream of every conversation to be recorded is sent from the turret to the recorder.
Active Recording Settings
This section represents the system configuration for active recording on IPTrade turrets. Administrators must set the CallReplay as the recording server and indicate that server to the IPTrade system. The following settings have been confirmed to work on CallReplay v7.5 and IPTrade Turret Support Server (TSS) v7.4.24448.
CallReplay settings
On Recording > PBX page choose New PBX and from the PBX Type, select IPTrade Active.
Fill in the the IP Addresses field with any address (ex. 0.0.0.0).
From Protocols list choose IPTrade Active and edit the protocol settings:
- Port indicates the TCP port to listen for incoming connections. Default value is 4456. You must enable this port into the system firewall.
- VAD indicates whether or not the recording server will use Voice Activity Detection settings for silence detection.
Turret Support Server settings
Following settings are required on TSS for integration with the active recoding system.
Set turret recording engine
Go to System\Settings\FTP settings (turrets) and on Recorder - Basic Mode choose "iptrade" for Recorder compatibility.
Configure the voice recorder address
Use the same location as the one used to set the recording engine or inside user profile (Account Management\User) or shared profile (Account Management\Shared Profile) go to Settings tab and on Recorder - Basic Mode configure the voice recorder location in form <protocol>://<address>:<port> where:
- Protocol indicates the voice recording system to be considered. Valid values are: vrc.
- Address indicates the IP address or the name of the voice recording service host.
- Port indicates the TCP port to connect to the voice recording service (same as the value used to configure the IPTrade Active Recording protocol in CallReplay).
Example: vrc://192.168.0.1:4456
8 - Silent Monitoring/Recording Supported Devices
Silent Monitoring/Recording supported device reference chart for Cisco Unified Call Manager
| Device/Phone Model | SCCP | SIP | Gateway-based RTP-Unencrypted Media | Automatic Recording | Silent Selective Recording | User Selective Recording (available in UCM 9.0 or later) | Device-based (built-in-bridge) RTP- Unencrypted Media | Device-based (built-in-bridge) sRTP - Encrypted Media | Remarks |
|---|---|---|---|---|---|---|---|---|---|
| Analog Phone | N/A | N/A | N/A | N/A | N/A | N/A | N/A | N/A | Not a supported device |
| Cisco 12 S | N/A | N/A | N/A | N/A | N/A | N/A | N/A | N/A | Not a supported device |
| Cisco 12 SP | N/A | N/A | N/A | N/A | N/A | N/A | N/A | N/A | Not a supported device |
| Cisco 30 SP+ | N/A | N/A | N/A | N/A | N/A | N/A | N/A | N/A | Not a supported device |
| Cisco 3905 | N/A | N/A | N/A | N/A | N/A | N/A | N/A | N/A | Not a supported device |
| Cisco 3911 | N/A | N/A | N/A | N/A | N/A | N/A | N/A | N/A | Not a supported device |
| Cisco 6901 | N/A | N/A | N/A | N/A | N/A | N/A | N/A | N/A | Not a supported device |
| Cisco 6911 | XX | XX | Requires UCM 10.0(1) or later | Yes | Yes | Yes | Requires UCM 7.1(3) or later | Requires UCM 8.0(1) or later | CUCM 7.1(3) requires Dec 2009 firmware update 8.5(4) |
| Cisco 6921 | XX | XX | Requires UCM 10.0(1) or later | Yes | Yes | Yes | Requires UCM 7.1(3) or later | Requires UCM 8.0(1) or later | CUCM 7.1(3) requires Dec 2009 firmware update 8.5(4) |
| Cisco 6941 | XX | XX | Requires UCM 10.0(1) or later | Yes | Yes | Yes | Requires UCM 7.1(3) or later | Requires UCM 8.0(1) or later | CUCM 7.1(3) requires Dec 2009 firmware update 8.5(4) |
| Cisco 6945 | XX | XX | Requires UCM 10.0(1) or later | Yes | Yes | Yes | Requires UCM 7.1(3) or later | Requires UCM 8.0(1) or later | Requires firmware 9.1(2) or later. SIP support in 9.2(1) in July 2011. |
| Cisco 6961 | XX | XX | Requires UCM 10.0(1) or later | Yes | Yes | Yes | Requires UCM 7.1(3) or later | Requires UCM 8.0(1) or later | CUCM 7.1(3) requires Dec 2009 firmware update 8.5(4) |
| Cisco 7811 | XX | Requires UCM 10.0(1) or later | Yes | Yes | Yes | Requires UCM 6.0(1) or later | Requires UCM 8.0(1) or later | ||
| Cisco 7821 | XX | Requires UCM 10.0(1) or later | Yes | Yes | Yes | Requires SIP firmware 10.1(1) | Requires SIP firmware 10.1(1) | ||
| Cisco 7841 | XX | Requires UCM 10.0(1) or later | Yes | Yes | Yes | Requires SIP firmware 10.1(1) | Requires SIP firmware 10.1(1) | ||
| Cisco 7861 | XX | Requires UCM 10.0(1) or later | Yes | Yes | Yes | Requires SIP firmware 10.1(1) | Requires SIP firmware 10.1(1) | ||
| Cisco 7902 | N/A | N/A | N/A | N/A | N/A | N/A | N/A | N/A | Not a supported device |
| Cisco 7905 | N/A | N/A | N/A | N/A | N/A | N/A | N/A | N/A | Not a supported device |
| Cisco 7906 | XX | XX | Requires UCM 10.0(1) or later | Yes | Yes | SCCP, Yes SIP, Device-based only | Requires UCM 6.0(1) or later | Requires UCM 8.0(1) or later | |
| Cisco 7910 | N/A | N/A | N/A | N/A | N/A | N/A | N/A | N/A | Not a supported device |
| Cisco 7911 | XX | XX | Requires UCM 10.0(1) or later | Yes | Yes | SCCP, Yes SIP, Device-based only | Requires UCM 6.0(1) or later | Requires UCM 8.0(1) or later | |
| Cisco 7912 | N/A | N/A | N/A | N/A | N/A | N/A | N/A | N/A | Not a supported device |
| Cisco 7914 Sidecar | XX | Requires UCM 10.0(1) or later | Yes | Yes | SCCP, Yes SIP, Device-based only | Requires UCM 6.0(1) or later | Requires UCM 8.0(1) or later | ||
| Cisco 7915 Sidecar | XX | XX | Requires UCM 10.0(1) or later | Yes | Yes | SCCP, Yes SIP, Device-based only | Requires UCM 6.0(1) or later | Requires UCM 8.0(1) or later | |
| Cisco 7916 Sidecar | XX | XX | Requires UCM 10.0(1) or later | Yes | Yes | SCCP, Yes SIP, Device-based only | Requires UCM 6.0(1) or later | Requires UCM 8.0(1) or later | |
| Cisco CKEM Sidecar | XX | Requires UCM 10.0(1) or later | Yes | Yes | SCCP, Yes SIP, Device-based only | Requires UCM 7.1(3) or later | Requires UCM 8.0(1) or later | ||
| Cisco 7920 | N/A | N/A | N/A | N/A | N/A | N/A | N/A | N/A | Not a supported device |
| Cisco 7921 | XX | Requires UCM 10.0(1) or later | Yes | Yes | SCCP, Yes SIP, Device-based only | Requires UCM 6.0(1) or later | Requires UCM 8.0(1) or later | CUCM 6.0(1) requires Aug 2008 firmware update | |
| Cisco 7925 & 7925-EX | XX | Requires UCM 10.0(1) or later | Yes | Yes | SCCP, Yes SIP, Device-based only | Requires UCM 6.0(1) or later | Requires UCM 8.0(1) or later | ||
| Cisco 7926 | XX | Requires UCM 10.0(1) or later | Yes | Yes | SCCP, Yes SIP, Device-based only | Requires UCM 7.0(1) or later | Requires UCM 7.0(1) or later | ||
| Cisco 7931 | XX | Requires UCM 10.0(1) or later | Yes | Yes | SCCP, Yes SIP, Device-based only | Requires UCM 6.0(1) or later | Requires UCM 8.0(1) or later | ||
| Cisco 7935 | N/A | N/A | N/A | N/A | N/A | N/A | N/A | N/A | Not a supported device |
| Cisco 7936 | N/A | N/A | N/A | N/A | N/A | N/A | N/A | N/A | Not a supported device |
| Cisco 7937 | XX | Requires UCM 10.0(1) or later | Yes | Yes | SCCP, Yes SIP, Device-based only | Requires UCM 6.0(1) or later | No | Requires March 2010 firmware update 1.4(1) | |
| Cisco 7940 | N/A | N/A | N/A | N/A | N/A | N/A | N/A | N/A | Not a supported device |
| Cisco 7941 | XX | XX | Requires UCM 10.0(1) or later | Yes | Yes | SCCP, Yes SIP, Device-based only | Requires UCM 6.0(1) or later | Requires UCM 8.0(1) or later | |
| Cisco 7941G-GE | XX | XX | Requires UCM 10.0(1) or later | Yes | Yes | SCCP, Yes SIP, Device-based only | Requires UCM 6.0(1) or later | Requires UCM 8.0(1) or later | |
| Cisco 7942 | XX | XX | Requires UCM 10.0(1) or later | Yes | Yes | SCCP, Yes SIP, Device-based only | Requires UCM 6.0(1) or later | Requires UCM 8.0(1) or later | |
| Cisco 7945 | XX | XX | Requires UCM 10.0(1) or later | Yes | Yes | SCCP, Yes SIP, Device-based only | 6.0(1) or later | Requires UCM 8.0(1) or later | |
| Cisco 7960 | N/A | N/A | N/A | N/A | N/A | N/A | N/A | N/A | Not a supported device |
| Cisco 7961 | XX | XX | Requires UCM 10.0(1) or later | Yes | Yes | SCCP, Yes SIP, Device-based only | Requires UCM 6.0(1) or later | Requires UCM 8.0(1) or later | |
| Cisco 7961G-GE | XX | XX | Requires UCM 10.0(1) or later | Yes | Yes | SCCP, Yes SIP, Device-based only | Requires UCM 6.0(1) or later | Requires UCM 8.0(1) or later | End of Software Maintenance Release 2009 |
| Cisco 7962 | XX | XX | Requires UCM 10.0(1) or later | Yes | Yes | SCCP, Yes SIP, Device-based only | Requires UCM 6.0(1) or later | Requires UCM 8.0(1) or later | |
| Cisco 7965 | XX | XX | Requires UCM 10.0(1) or later | Yes | Yes | SCCP, Yes SIP, Device-based only | Requires UCM 6.0(1) or later | Requires UCM 8.0(1) or later | |
| Cisco 7970 | XX | XX | Requires UCM 10.0(1) or later | Yes | Yes | SCCP, Yes SIP, Device-based only | Requires UCM 6.0(1) or later | Requires UCM 8.0(1) or later | End of Software Maintenance Release 2009 |
| Cisco 7971 | XX | XX | Requires UCM 10.0(1) or later | Yes | Yes | SCCP, Yes SIP, Device-based only | Requires UCM 6.0(1) or later | Requires UCM 8.0(1) or later | End of Software Maintenance Release 2009 |
| Cisco 7975 | XX | XX | Requires UCM 10.0(1) or later | Yes | Yes | SCCP, Yes SIP, Device-based only | Requires UCM 6.0(1) or later | Requires UCM 8.0(1) or later | |
| Cisco 7985 | N/A | N/A | N/A | N/A | N/A | N/A | N/A | N/A | Not a supported device |
| Cisco 8811 | XX | Requires UCM 10.0(1) or later | Yes | Yes | Yes | Requires UCM 8.5(1) or later | Requires UCM 8.6(2) or later | ||
| Cisco 8831 | XX | Requires UCM 10.0(1) or later | Yes | Yes | SIP, Device-based only | Requires SIP firmware 9.3(2) | Requires SIP firmware 9.3(2) | ||
| Cisco 8841 | XX | Requires UCM 10.0(1) or later | Yes | Yes | Yes | Requires UCM 8.5(1) or later | Requires UCM 8.6(2) or later | ||
| Cisco 8845 | XX | Requires UCM 10.0(1) or later | Yes | Yes | Yes | Requires UCM 8.5(1) or later | Requires UCM 8.6(2) or later | ||
| Cisco 8851 | XX | Requires UCM 10.0(1) or later | Yes | Yes | Yes | Requires UCM 8.5(1) or later | Requires UCM 8.6(2) or later | ||
| Cisco 8861 | XX | Requires UCM 10.0(1) or later | Yes | Yes | Yes | Requires UCM 8.5(1) or later | Requires UCM 8.6(2) or later | ||
| Cisco 8865 | XX | Requires UCM 10.0(1) or later | Yes | Yes | Yes | Requires UCM 8.5(1) or later | Requires UCM 8.6(2) or later | ||
| Cisco 8941 | XX | XX | Requires UCM 10.0(1) or later | Yes | Yes | Yes | Requires UCM 7.1(5) or later | Requires UCM 8.0(1) or later | Requires firmware 9.1(2) or later. SIP support in 9.2(1) in July 2011. |
| Cisco 8945 | XX | XX | Requires UCM 10.0(1) or later | Yes | Yes | Yes | Requires UCM 7.1(5) or later | Requires UCM 8.0(1) or later | Requires firmware 9.1(2) or later. SIP support in 9.2(1) in July 2011. |
| Cisco 8961 | XX | Requires UCM 10.0(1) or later | Yes | Yes | Yes | Requires UCM 7.1(3) or later | Requires UCM 8.0(1) or later | CUCM 8.0(1) requires March 2010 firmware update 9.0(2) | |
| Cisco 9951 | XX | Requires UCM 10.0(1) or later | Yes | Yes | Yes | Requires UCM 7.1(3) or later | Requires UCM 8.0(1) or later | CUCM 8.0(1) requires March 2010 firmware update 9.0(2) CUCM 10.0(1) requires firmware update 9.4.1 | |
| Cisco 9965 | XX | Requires UCM 10.0(1) or later | Yes | Yes | Yes | Requires UCM 7.1(3) or later | Requires UCM 8.0(1) or later | CUCM 8.0(1) requires March 2010 firmware update 9.0(2) | |
| Cisco 9971 | XX | Requires UCM 10.0(1) or later | Yes | Yes | Yes | Requires UCM 7.1(3) or later | Requires UCM 8.0(1) or later | CUCM 8.0(1) requires March 2010 firmware update 9.0(2) CUCM 10.0(1) requires firmware update 9.4.1 | |
| Cisco DX650 | XX | Requires UCM 10.0(1) or later | Yes | Yes | Yes | Requires UCM 7.1(3) or later | Requires UCM 8.5(1) or later | CUCM 10.0(1) requires firmware update 10.1.1 | |
| Cisco DX70 | XX | N/A | Yes | Yes | N/A | Requires UCM 8.5(1) or later | Requires UCM 8.5(1) or later | ||
| Cisco DX80 | XX | N/A | Yes | Yes | N/A | Requires UCM 8.5(1) or later | Requires UCM 8.5(1) or later | ||
| Cisco E20 | N/A | N/A | N/A | N/A | N/A | N/A | N/A | N/A | Not a supported device |
| Cisco EX60 | N/A | N/A | N/A | N/A | N/A | N/A | N/A | N/A | Not a supported device |
| Cisco EX90 | N/A | N/A | N/A | N/A | N/A | N/A | N/A | N/A | Not a supported device |
| Cisco CTS 500 | N/A | N/A | N/A | N/A | N/A | N/A | N/A | N/A | Not a supported device |
| Cisco CTS 500-32 | N/A | N/A | N/A | N/A | N/A | N/A | N/A | N/A | Not a supported device |
| Cisco CTS (all other device models) | N/A | N/A | N/A | N/A | N/A | N/A | N/A | N/A | Not a supported device |
| Cisco ATA 186 | N/A | N/A | N/A | N/A | N/A | N/A | N/A | N/A | Not a supported device |
| Cisco ATA 187 | N/A | N/A | N/A | N/A | N/A | N/A | N/A | N/A | Not a supported device |
| Cisco ATA 188 | N/A | N/A | N/A | N/A | N/A | N/A | N/A | N/A | Not a supported device |
| Cisco IP Communicator | XX | XX | Requires UCM 10.0(1) or later | Yes | Yes | SCCP, Yes SIP, Device-based only | Requires CIPC v7.0(1) or later | No | |
| Cisco Jabber for Windows -Softphone Mode | XX | Requires UCM 10.0(1) or later | Yes | Yes | No | Requires Jabber for Windows 9.2 or later | Requires Jabber for Windows 9.2 or later | ||
| Cisco Jabber for Windows -Extend/Connect Mode | N/A | N/A | Requires Jabber for Windows 9.2 or later and UCM 10.0(1) or later | Yes | Yes | No | N/A | N/A | |
| Cisco Jabber for Windows -Remote Desktop Control Mode | N/A | N/A | Refer to the device model under remote control to determine support. | Refer to the device model under remote control to determine support. | Refer to the device model under remote control to determine support. | Refer to the device model under remote control to determine support. | Refer to the device model under remote control to determine support. | Refer to the device model under remote control to determine support. | Refer to the device model under remote control to determine support. |
| Cisco Jabber for Mac -Softphone Mode | XX | Requires UCM 10.0(1) or later | Yes | Yes | No | Requires Jabber for Mac 9.2 or later | Requires Jabber for Mac 9.2 or later | ||
| Cisco Jabber for Mac - Remote Desktop Control Mode | N/A | N/A | Refer to the device model under remote control to determine support. | Refer to the device model under remote control to determine support. | Refer to the device model under remote control to determine support. | Refer to the device model under remote control to determine support. | Refer to the device model under remote control to determine support. | Refer to the device model under remote control to determine support. | Refer to the device model under remote control to determine support. |
| Cisco Jabber for iPad (Wifi-only) | N/A | N/A | Requires UCM 10.0(1) or later | Yes | Yes | No | N/A | N/A | |
| Cisco Jabber for iPhone | N/A | N/A | Requires UCM 10.0(1) or later | Yes | Yes | No | N/A | N/A | |
| Cisco Jabber for Android | N/A | N/A | Requires UCM 10.0(1) or later | Yes | Yes | No | N/A | N/A | |
| Cisco Unified Personal Communicator - Softphone Mode | N/A | N/A | N/A | N/A | N/A | N/A | N/A | N/A | Not a supported device |
| Cisco Unified Personal Communicator - Remote Desktop Control Mode | N/A | N/A | Refer to the device model under remote control to determine support. | Refer to the device model under remote control to determine support. | Refer to the device model under remote control to determine support. | Refer to the device model under remote control to determine support. | Refer to the device model under remote control to determine support. | Refer to the device model under remote control to determine support. | Refer to the device model under remote control to determine support. |
| Cisco Unified Communications Integration for Microsoft Office Communicator/Lync -Softphone Modes | N/A | N/A | Requires UCM 10.0(1) or later | Yes | Yes | No | N/A | N/A | |
| Cisco Unified Communications Integration for Microsoft Office Communicator/Lync -Remote Desktop Control Mode | N/A | N/A | Refer to the device model under remote control to determine support. | Refer to the device model under remote control to determine support. | Refer to the device model under remote control to determine support. | Refer to the device model under remote control to determine support. | Refer to the device model under remote control to determine support. | Refer to the device model under remote control to determine support. | Refer to the device model under remote control to determine support. |
| Cisco Unified Communications for RTX (CUCRTX) -Softphone Mode | N/A | N/A | Requires UCM 10.0(1) or later | Yes | Yes | No | N/A | N/A | |
| Cisco Unified Communications for RTX (CUCRTX) - Remote Desktop Control Mode | N/A | N/A | Refer to the device model under remote control to determine support. | Refer to the device model under remote control to determine support. | Refer to the device model under remote control to determine support. | Refer to the device model under remote control to determine support. | Refer to the device model under remote control to determine support. | Refer to the device model under remote control to determine support. | Refer to the device model under remote control to determine support. |
| Cisco Web Communicator forWx Social -Softphone Mode | N/A | N/A | Requires UCM 10.0(1) or later | Yes | Yes | No | N/A | N/A | |
| Cisco Web Communicator forWx Social - Remote Desktop Control Mode | N/A | N/A | Refer to the device model under remote control to determine support. | Refer to the device model under remote control to determine support. | Refer to the device model under remote control to determine support. | Refer to the device model under remote control to determine support. | Refer to the device model under remote control to determine support. | Refer to the device model under remote control to determine support. | Refer to the device model under remote control to determine support. |
| Cisco Unified Communications Integration for WebEx Connect -Softphone Mode | N/A | N/A | N/A | N/A | N/A | N/A | N/A | N/A | Not a supported device |
| Cisco Unified Communications Integration for WebEx Connect - Remote Desktop Control Mode | N/A | N/A | Refer to the device model under remote control to determine support. | Refer to the device model under remote control to determine support. | Refer to the device model under remote control to determine support. | Refer to the device model under remote control to determine support. | Refer to the device model under remote control to determine support. | Refer to the device model under remote control to determine support. | Refer to the device model under remote control to determine support. |
| VGC Phone | N/A | N/A | N/A | N/A | N/A | N/A | N/A | N/A | Not a supported device |
| VG224 | N/A | N/A | N/A | N/A | N/A | N/A | N/A | N/A | Not a supported device |
| VG248 | N/A | N/A | N/A | N/A | N/A | N/A | N/A | N/A | Not a supported device |
| CTI Port | N/A | N/A | Requires UCM 10.0(1) or later | Yes | Yes | Yes | N/A | N/A | |
| CTI Remote Device (Extend & Connect) | N/A | N/A | Requires UCM 10.0(1) or later | Yes | Yes | Yes | N/A | N/A | |
| CTI Route Point | N/A | N/A | N/A | N/A | N/A | N/A | N/A | N/A | Not a supported device |
| CTI Route Point (Pilot Point) | N/A | N/A | N/A | N/A | N/A | N/A | N/A | N/A | Not a supported device |
| ISDN BRI Phone | N/A | N/A | N/A | N/A | N/A | N/A | N/A | N/A | Not a supported device |
| Carrier Integrated Mobile | N/A | N/A | Requires UCM 10.0(1) or later | Yes | Yes | No | N/A | N/A | |
| IMS Client | N/A | N/A | Requires UCM 10.0(1) or later | Yes | Yes | No | N/A | N/A | |
| Mobile Communicator | N/A | N/A | N/A | N/A | N/A | N/A | N/A | N/A | Not a supported device |
| Nokia S60 | N/A | N/A | Requires UCM 10.0(1) or later | Yes | Yes | Yes via DTMF | N/A | N/A | |
| Remote Destination Profile (Single Number Reach) | N/A | N/A | Requires UCM 10.0(1) or later | Yes | Yes | Yes via DTMF | N/A | N/A |
9 - JTAPI Encrypted Call Support
To enable support of encrypted calls the following actions will need to be performed
From within the CallReplay administration GUI
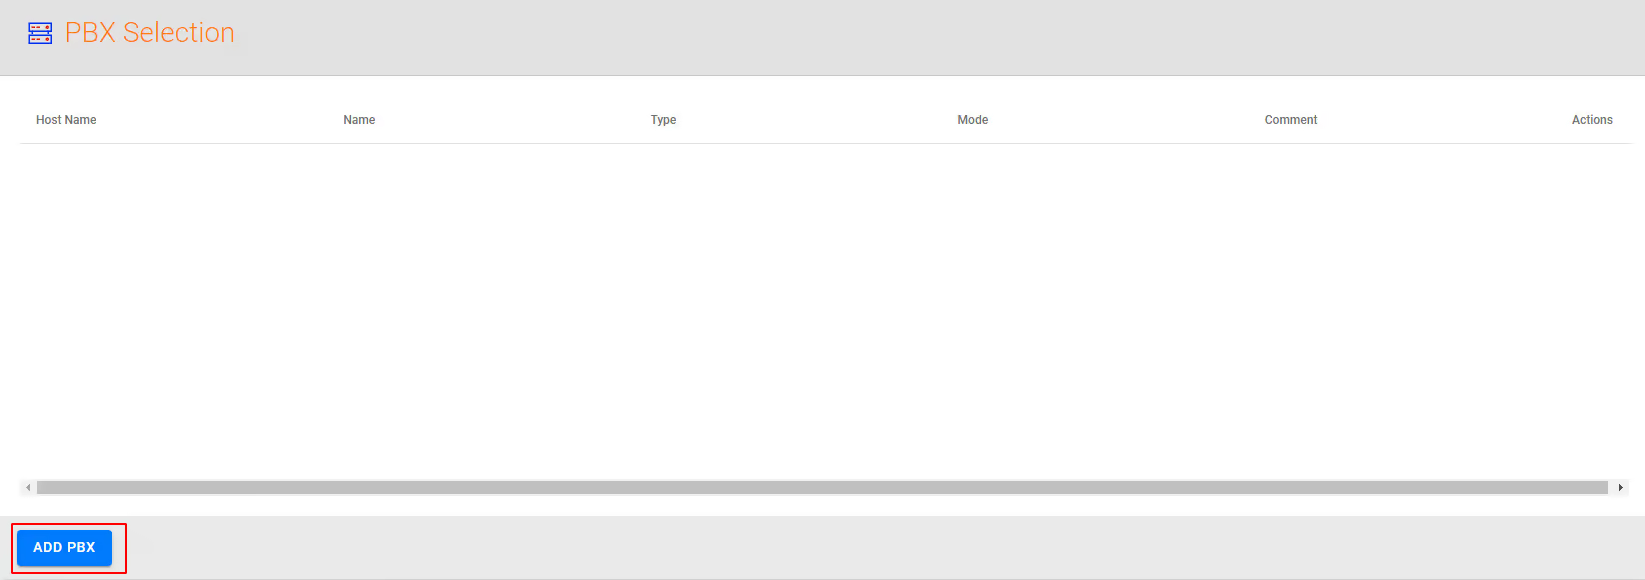
- Navigate to Call Managers and Add a PBX

- Add the appropriate details for the highlight boxes in the image
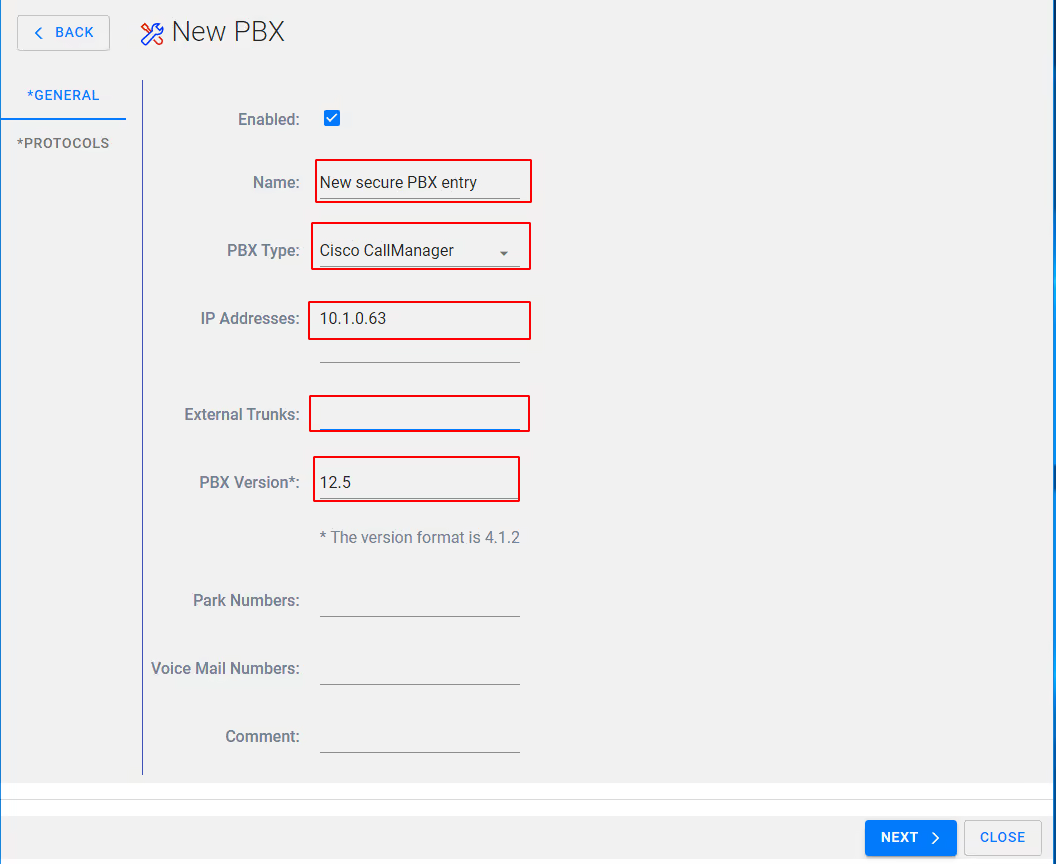
NOTE: Ensure IP addresses include Publisher and all subscribers, FQDN can be used but are not recommended.
Select Next, You will then be presented with the following protocols screen
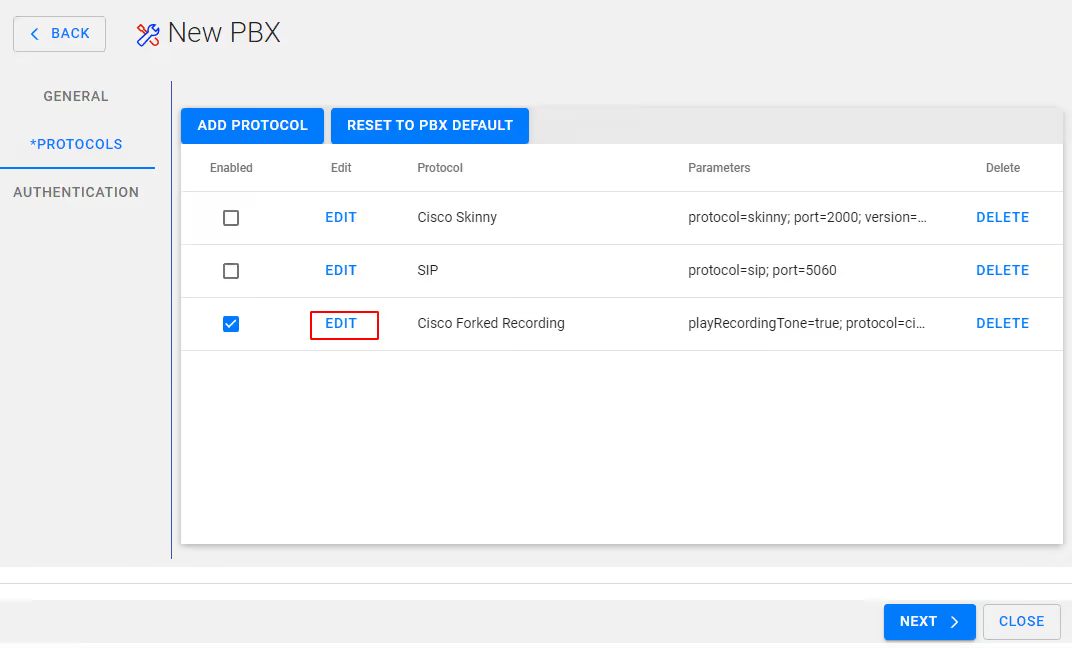
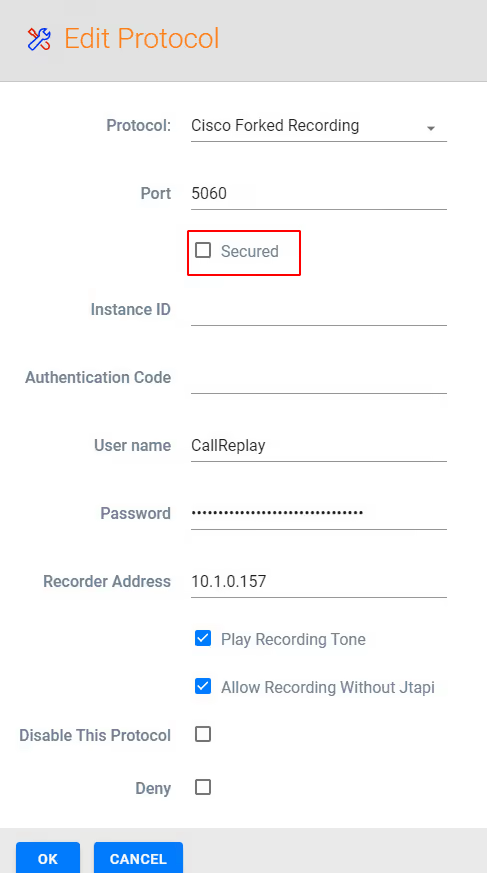
On Cisco Forked Recording - Select Edit and ensure Secured is enabled/checked
Select OK and Next
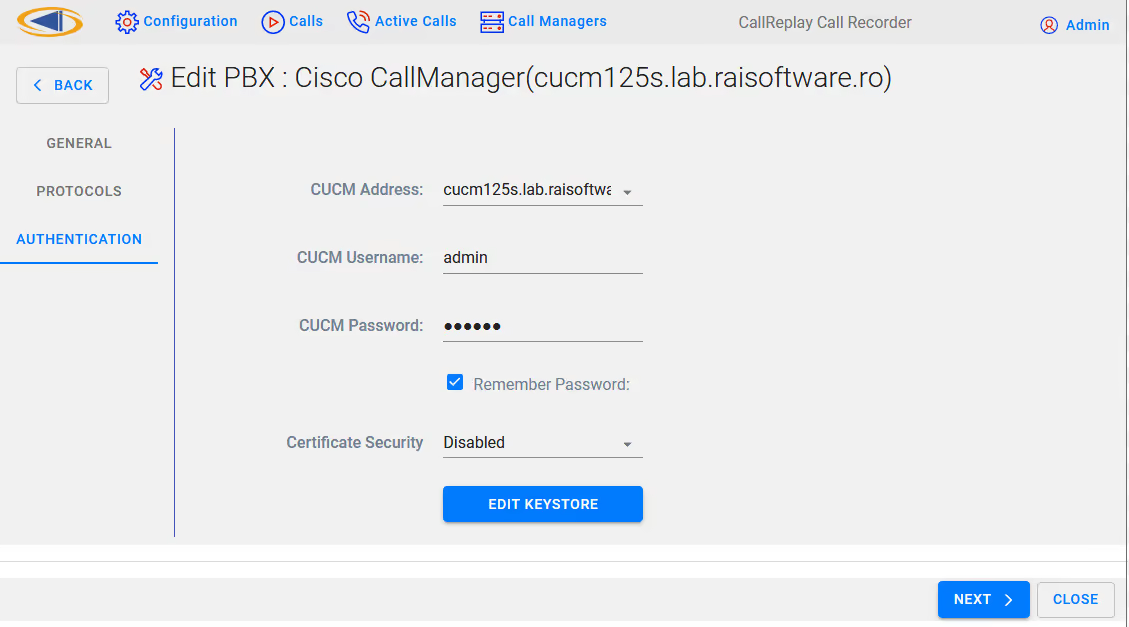
Fill out the connection details for your CUCM
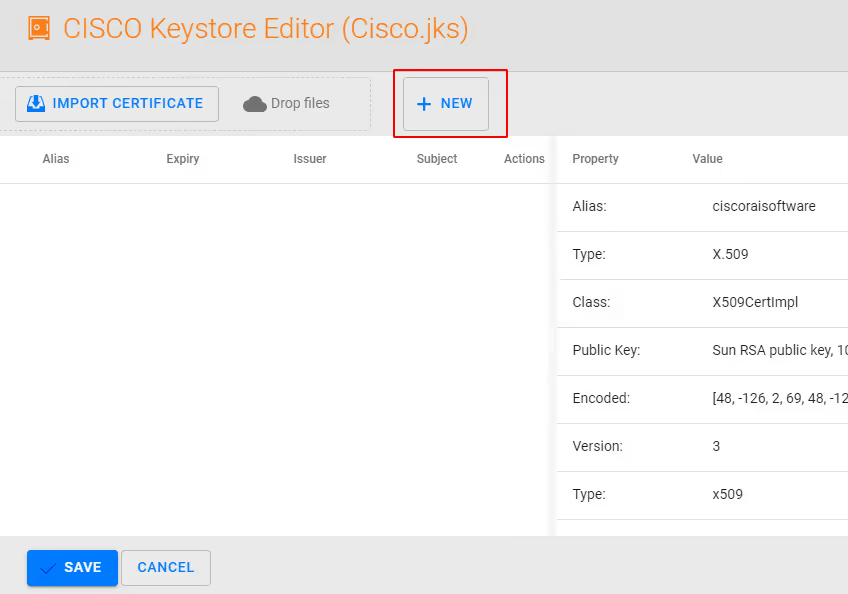
select EDIT KEYSTORE,
Within Keystore Editor select + NEW to create a self sign certificate
NOTE: you may also import your own certificate here from a trusted Certificate Authority in X.509 .PEM format
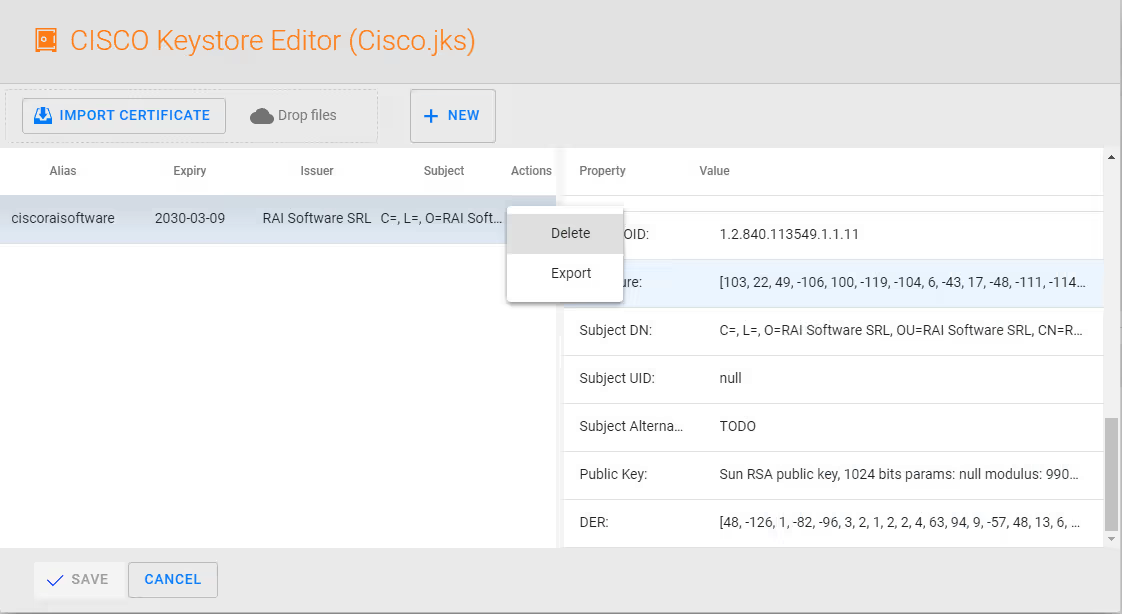
Next export the certificate, and return to Authentication page by selecting SAVE and then select NEXT.
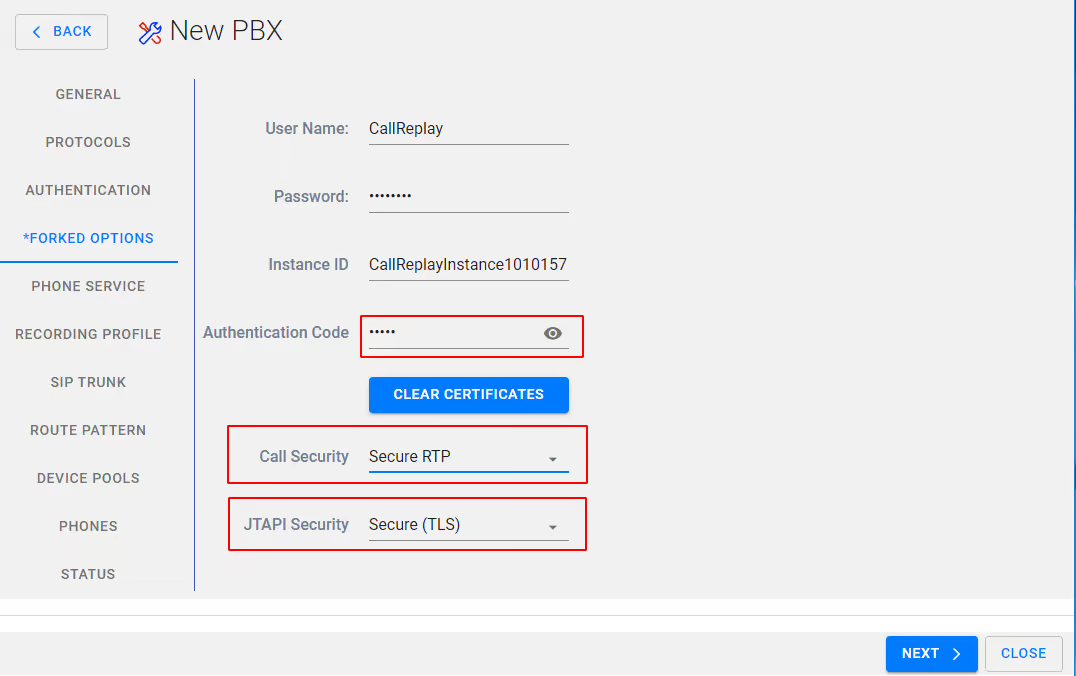
On the FORKED OPTIONS page ensure you have the required Call Security (Secure RTP) and that JTAPI security is set to Secure (TLS). Also make a note of the Instance ID and the Authentication Code by clicking the eye icon.
Select NEXT
If required Modify the Service Name and Description and verify the Phone service Address (this) is correct – this should be the IP address of the CallReplay server, then Select NEXT

If required modify the Profile name or leave as default, modify Call Search Space and Call Manager Group as required or leave as default,
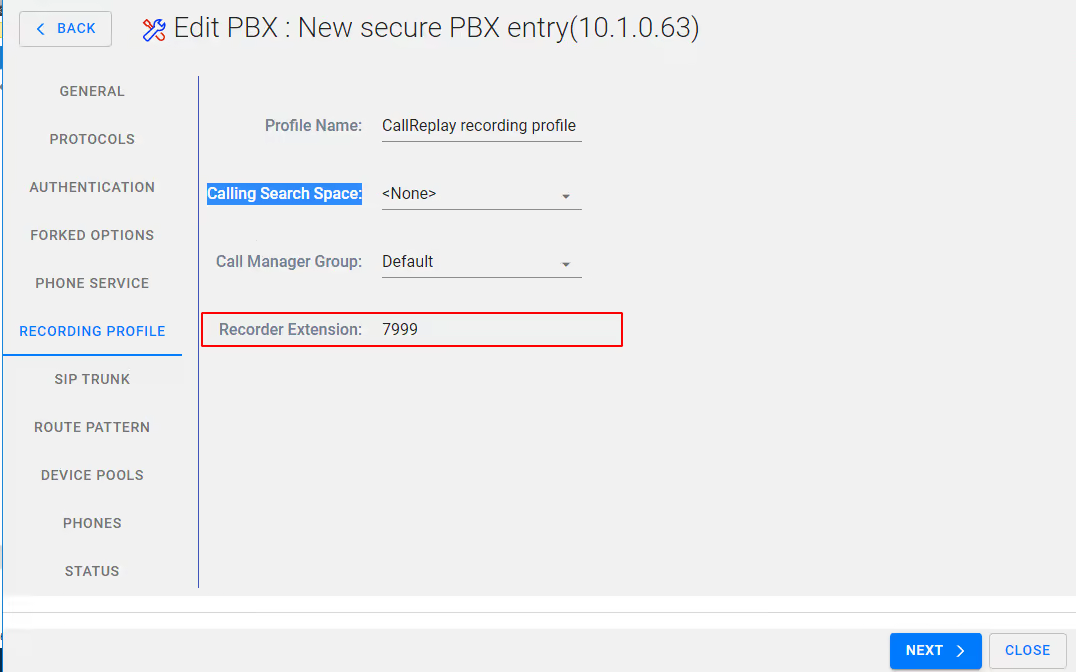
Leave Recording profile as default or modify if required, select Next
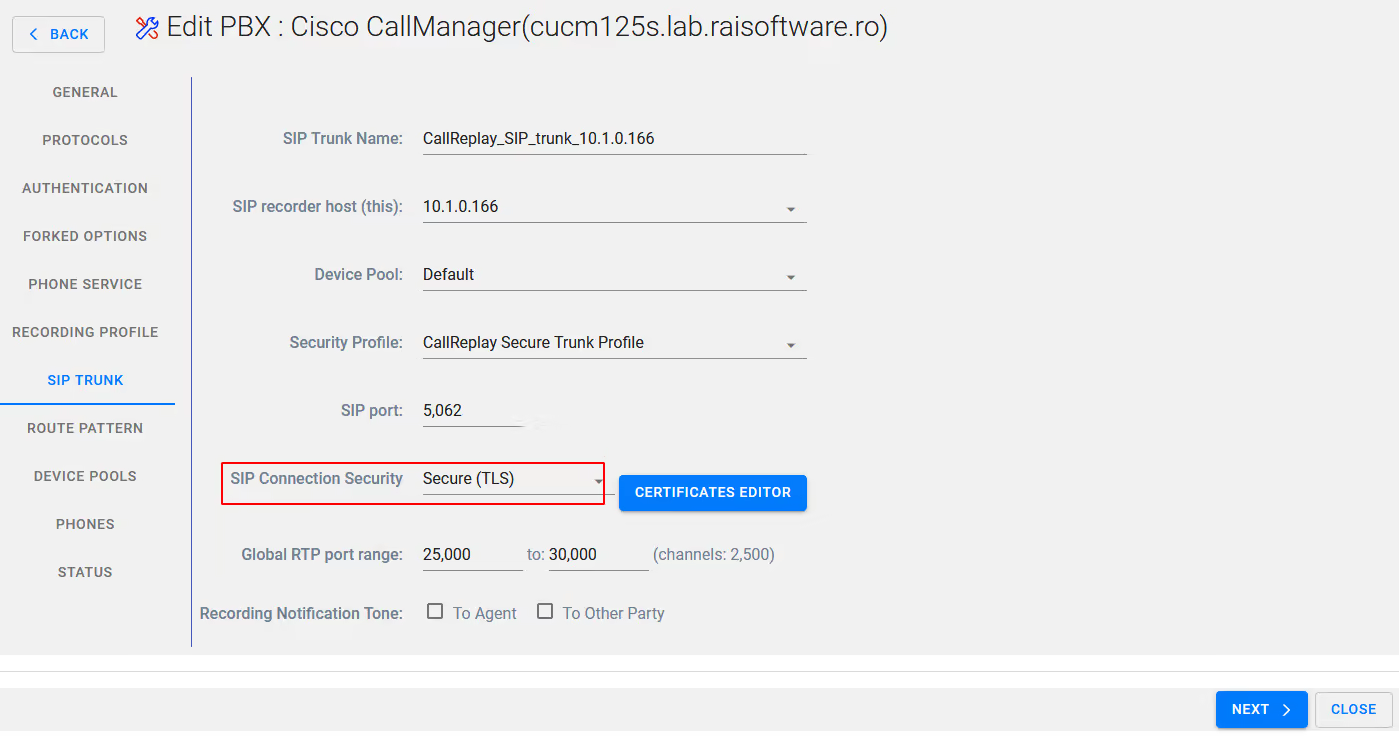
On the SIP trunk tab ensure that you have selected Secure (TLS) - you do not need to be concerned with Certificate editor if yu followed the earlier instructions.
Make any other requried modifications here or leave as default
Select Next
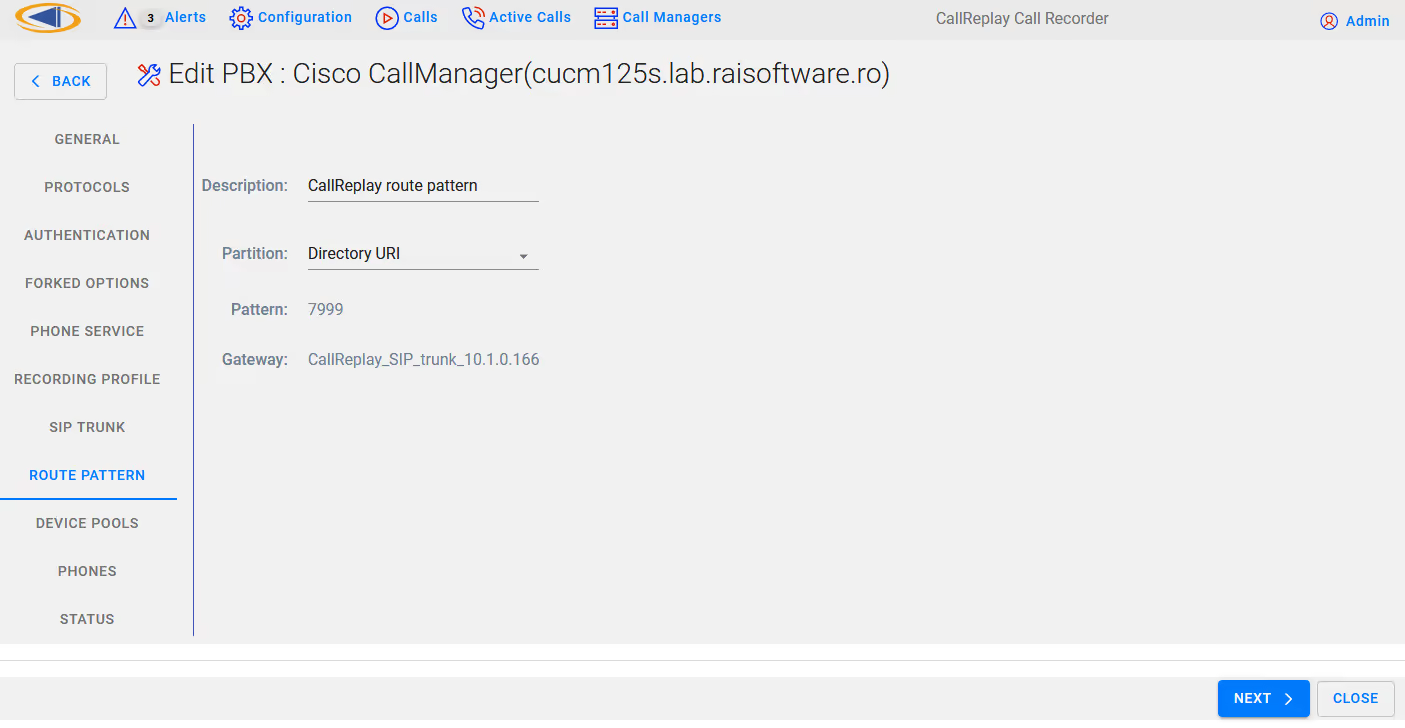
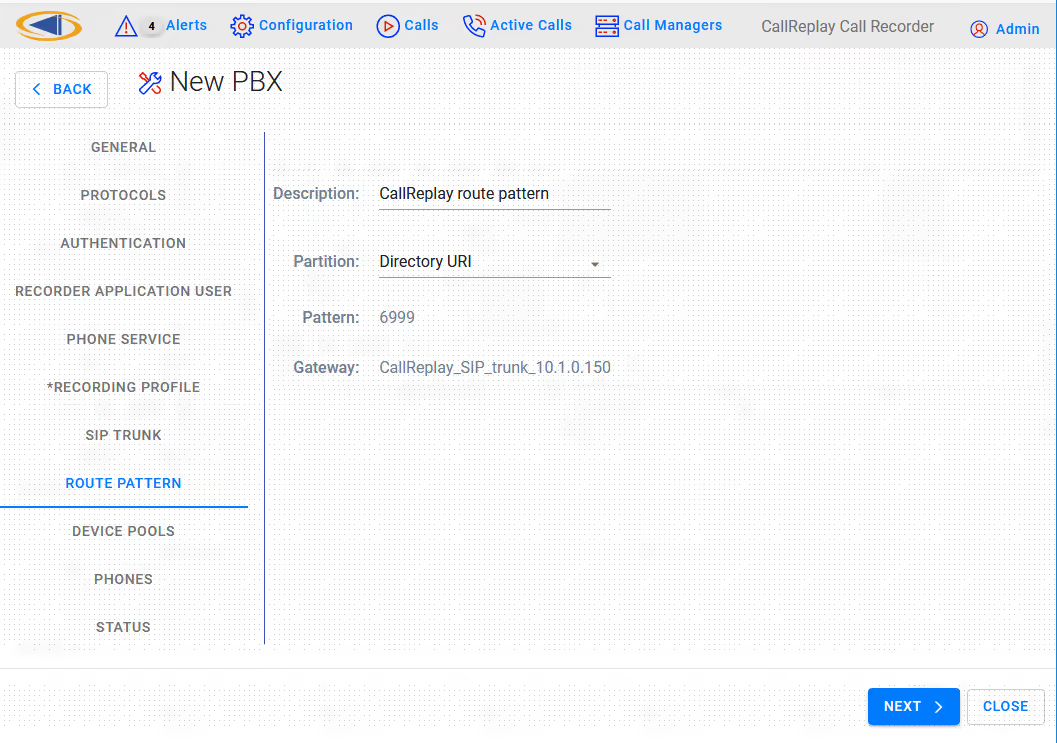
On the Route Pattern tab leave as default or make modifications if required
Select Next
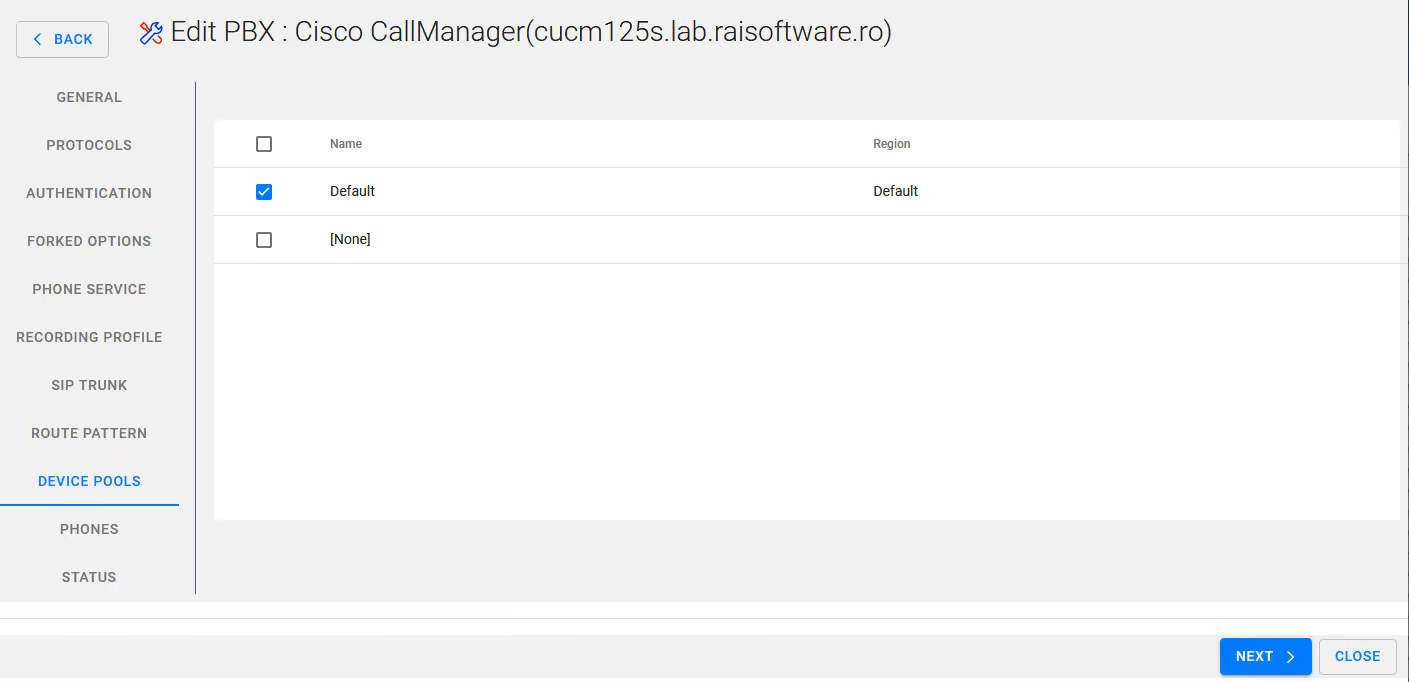
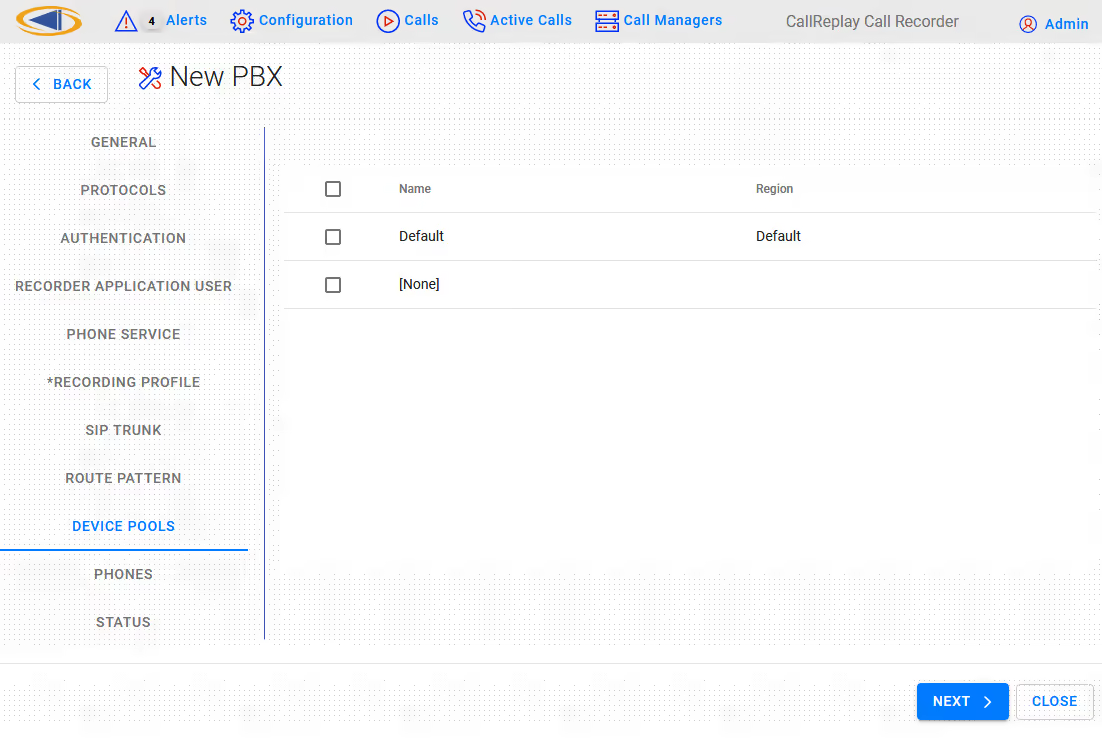
Selecrt your device Pool
Select Next
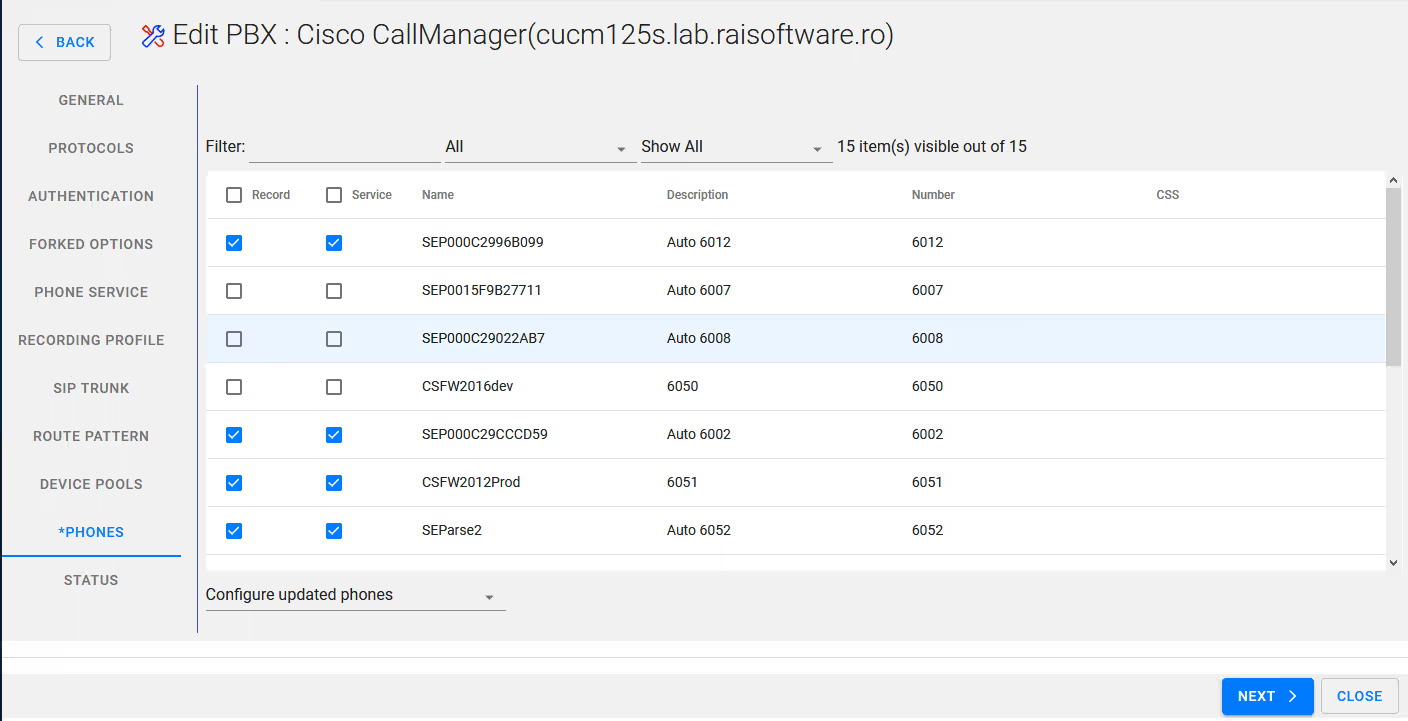
Select the desired phones / extensions for inclusion for recording
Select Next
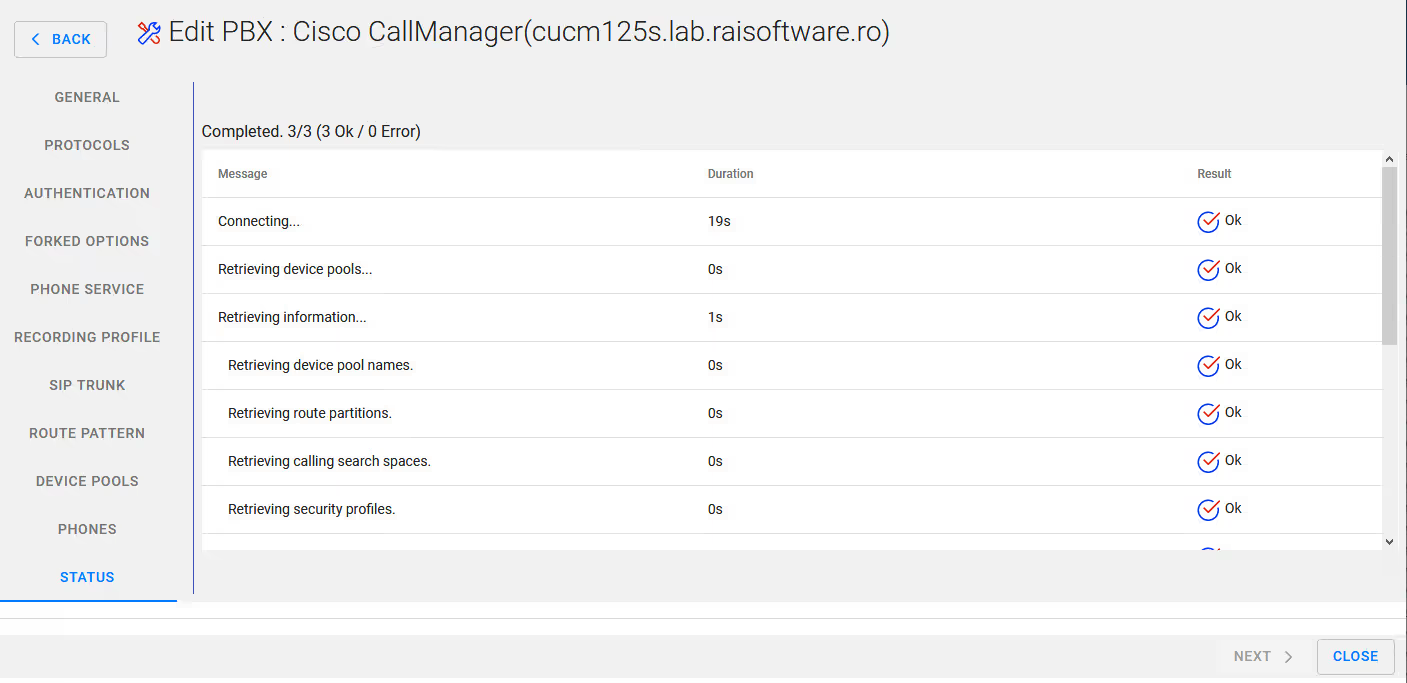
Close the wizard
Then launch the web interface for CUCM (Cisco Unified Communications Manager)
And select Operating System Administration
Login into the interface as an administrator
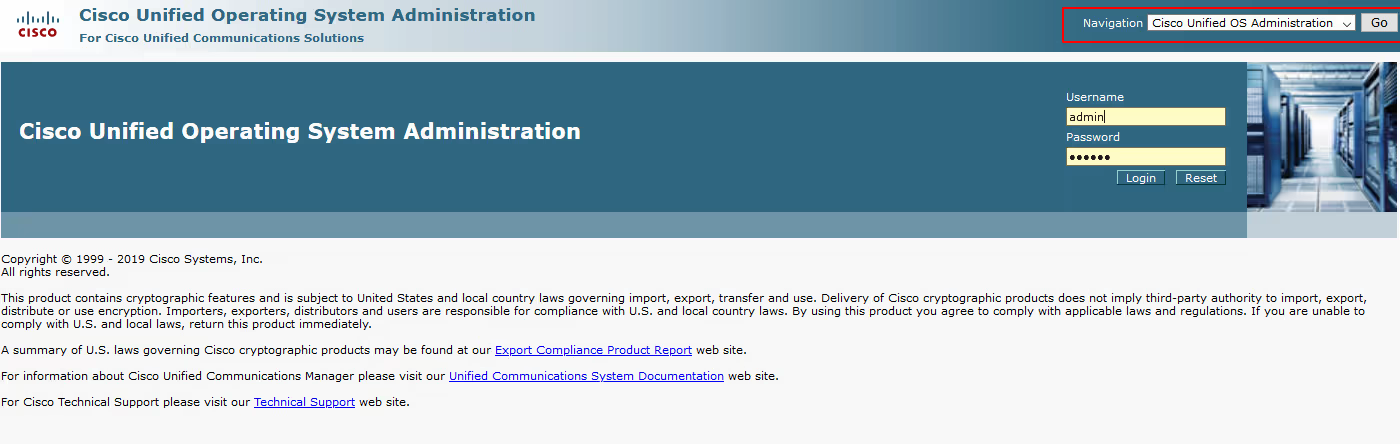
Then select Security / Certificate Management
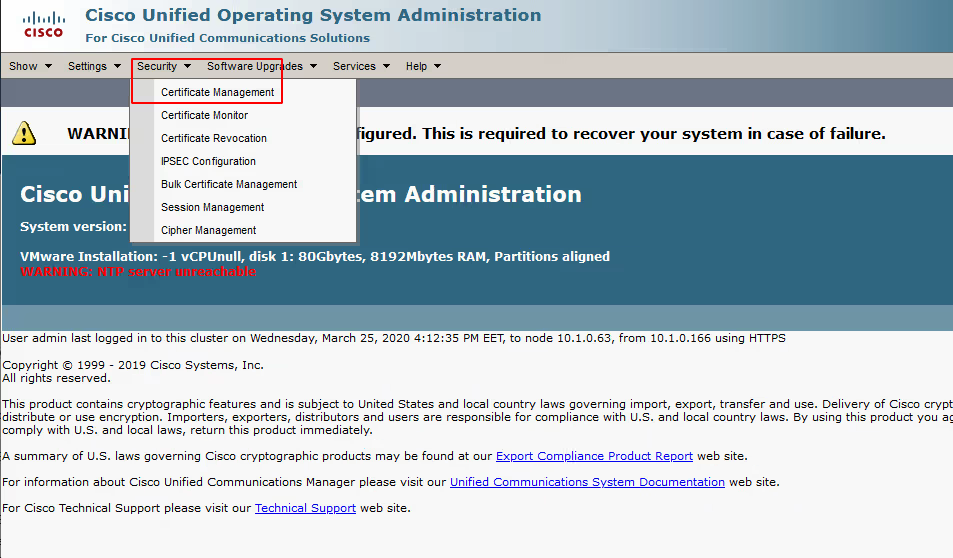
Select Upload Certificate/Certificate chain

Select Upload Certificate/Certicate chain
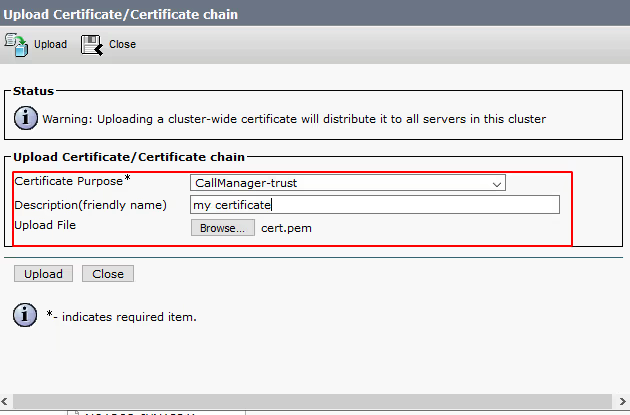
For Certificate Purpose* ensure to select CallManager-trust
Provide a freindly name for example : servername-callreplay
Select Browse from Upload File and locate the certificate you exported from the CallReplay keystore earlier or one that you have created from your own CA which is also imported to the CallReplay keystore store.
Select Upload
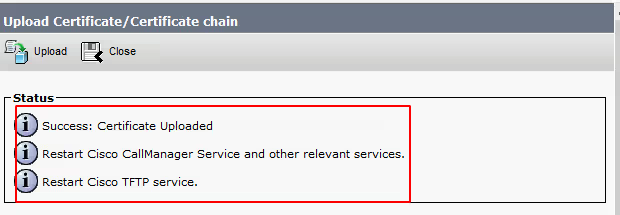
Once uploaded please note the requirement to restart CallManager and TFTP service on CUCM