This is the multi-page printable view of this section. Click here to print.
How-to and Troubleshooting
- 1: Optimizations
- 2: Configuring Speed Dial Buttons
- 3: Testing The Setup
- 4: Forked Recording Compatible Devices
- 5: Storage Volumes Best Practices
- 6: CallReplay Firewall Ports
- 7: Interfacing with CallReplay
- 8: CallReplay Cloud Server
- 9: Localization
- 10: Download Files from Our FTP Server
- 11: Upload Files Manually to Our SFTP Server
- 12: Send Logs
- 13: Adding new Phone Services
- 14: Editing Protocol Settings in PBXs
- 15: LDAP Authentication
1 - Optimizations
Software Optimizations
The Windows system cache is by default too large. Go to Control Panel / System / Advanced / Performance Settings / Advanced:
- set memory usage for best performance of Programs
- set processor scheduling for best performance of background services
2 - Configuring Speed Dial Buttons
Steps to follow to configure a speed dial button for using a phone service
1. Define a phone service ( Call Manager: Device> Device Settings> Phone Services ), as described in Chapter 19, for this URL:
http://CallRecorderServer(:port)/CallRecorder/phoneService/onDemandPhoneDemandThisCall
2. Create a new phone button template for your phones ( Call Manager: Device> Device Settings> Phone Button Template ) and select "Service URL" for button which will be used as a speed dial for our phone service.
![https://wiki2.raisoftware.ro/uploads/images/gallery/2016-08-Aug/service[_image_not_found]](/images/image-placeholder.avif)
3. Go to Device> Phone and select new defined template on phones
4. Subscribe the phone to the phone service
5. The last step is to assign the new subscribed phone service to the phone button ( configured on step 2 ).
After phone reset, the speed dial is ready for use.
3 - Testing The Setup
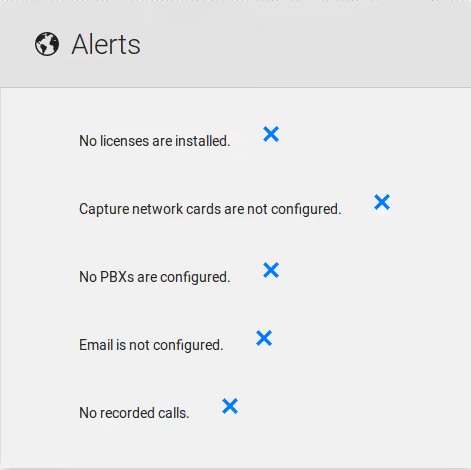
Make sure there are no pending alerts below the menu bar, by clicking on each alert and solving them.
Make a test call
Place a call to an external number. Recording internal calls with SPAN requires the traffic between the two devices must be spanned as well.
Playing a call
1. From the menu, choose Recordings / Replay Calls as shown below:
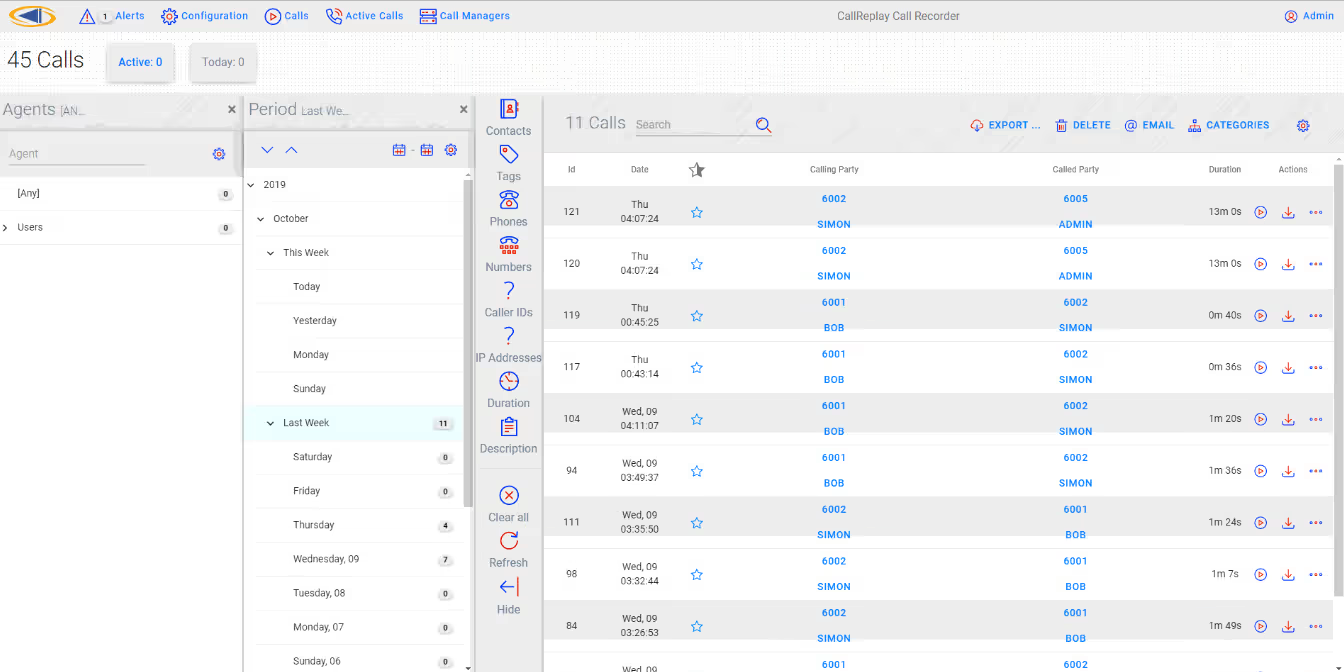
2. If there are no calls displayed please skip to the
"Troubleshooting" chapter.
3. Click the More button (three lines sign on the right side of every
call), choose Properties and a new window, named "Call Details" will
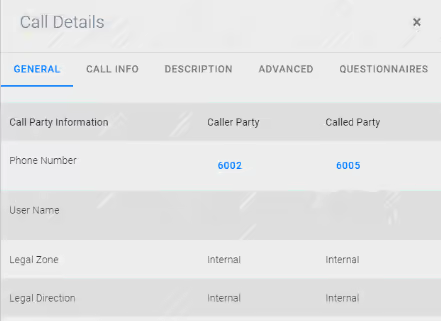
appear, as shown below.
This page contains all information about a call like caller party,
called party, duration of call, file size, file format. In the Advanced
tab, you will get information about RTP traffic (ip address and port
used in recording call).
In the Description tab, you can provide a description for that call. In
the Export tab by pressing "Save Call" you can save the call under Wav
format or speex format. You can email that call by pressing "Send
Email" button.
Replay Calls > More button > Properties

- Click on Play Button.
- A pop-up will be open and the recording will start playing.

Attention: You must have a valid G.729 license to play a G.729 recording, otherwise an error will be displayed.
4 - Forked Recording Compatible Devices
| Device/Phone Model | Forked Recording | Requirements |
|---|---|---|
| Analog Phone | No | N/A |
| Cisco 12 S | No | N/A |
| Cisco 12 SP | No | N/A |
| Cisco 30 SP+ | No | N/A |
| Cisco 3905 | No | N/A |
| Cisco 3911 | No | N/A |
| Cisco 6901 | No | N/A |
| Cisco 6911 | Yes | Requires UCM 7.1(3) or later |
| Cisco 6921 | Yes | Requires UCM 7.1(3) or later |
| Cisco 6941 | Yes | Requires UCM 7.1(3) or later |
| Cisco 6945 | Yes | Requires UCM 7.1(3) or later |
| Cisco 6961 | Yes | Requires UCM 7.1(3) or later |
| Cisco 7811 | Yes | Requires UCM 6.0(1) or later |
| Cisco 7821 | Yes | Requires SIP firmware 10.1(1) |
| Cisco 7841 | Yes | Requires SIP firmware 10.1(1) |
| Cisco 7861 | Yes | Requires SIP firmware 10.1(1) |
| Cisco 7902 | No | N/A |
| Cisco 7905 | No | N/A |
| Cisco 7906 | Yes | Requires UCM 6.0(1) or later |
| Cisco 7910 | No | N/A |
| Cisco 7911 | Yes | Requires UCM 6.0(1) or later |
| Cisco 7912 | No | N/A |
| Cisco 7914 Sidecar | Yes | Requires UCM 6.0(1) or later |
| Cisco 7915 Sidecar | Yes | Requires UCM 6.0(1) or later |
| Cisco 7916 Sidecar | Yes | Requires UCM 6.0(1) or later |
| Cisco CKEM Sidecar | Yes | Requires UCM 7.1(3) or later |
| Cisco 7920 | No | N/A |
| Cisco 7921 | Yes | Requires UCM 6.0(1) or later |
| Cisco 7925 & 7925-EX | Yes | Requires UCM 6.0(1) or later |
| Cisco 7926 | Yes | Requires UCM 7.0(1) or later |
| Cisco 7931 | Yes | Requires UCM 6.0(1) or later |
| Cisco 7935 | No | N/A |
| Cisco 7936 | No | N/A |
| Cisco 7937 | Yes | Requires UCM 6.0(1) or later |
| Cisco 7940 | No | N/A |
| Cisco 7941 | Yes | Requires UCM 6.0(1) or later |
| Cisco 7941G-GE | Yes | Requires UCM 6.0(1) or later |
| Cisco 7942 | Yes | Requires UCM 6.0(1) or later |
| Cisco 7945 | Yes | 6.0(1) or later |
| Cisco 7960 | No | N/A |
| Cisco 7961 | Yes | Requires UCM 6.0(1) or later |
| Cisco 7961G-GE | Yes | Requires UCM 6.0(1) or later |
| Cisco 7962 | Yes | Requires UCM 6.0(1) or later |
| Cisco 7965 | Yes | Requires UCM 6.0(1) or later |
| Cisco 7970 | Yes | Requires UCM 6.0(1) or later |
| Cisco 7971 | Yes | Requires UCM 6.0(1) or later |
| Cisco 7975 | Yes | Requires UCM 6.0(1) or later |
| Cisco 7985 | No | N/A |
| Cisco 8811 | Yes | Requires UCM 8.5(1) or later |
| Cisco 8831 | Yes | Requires SIP firmware 9.3(2) |
| Cisco 8841 | Yes | Requires UCM 8.5(1) or later |
| Cisco 8845 | Yes | Requires UCM 8.5(1) or later |
| Cisco 8851 | Yes | Requires UCM 8.5(1) or later |
| Cisco 8861 | Yes | Requires UCM 8.5(1) or later |
| Cisco 8865 | Yes | Requires UCM 8.5(1) or later |
| Cisco 8941 | Yes | Requires UCM 7.1(5) or later |
| Cisco 8945 | Yes | Requires UCM 7.1(5) or later |
| Cisco 8961 | Yes | Requires UCM 7.1(3) or later |
| Cisco 9951 | Yes | Requires UCM 7.1(3) or later |
| Cisco 9965 | Yes | Requires UCM 7.1(3) or later |
| Cisco 9971 | Yes | Requires UCM 7.1(3) or later |
| Cisco DX650 | Yes | Requires UCM 7.1(3) or later |
| Cisco DX70 | Yes | Requires UCM 8.5(1) or later |
| Cisco DX80 | Yes | Requires UCM 8.5(1) or later |
| Cisco E20 | No | N/A |
| Cisco EX60 | No | N/A |
| Cisco EX90 | No | N/A |
| Cisco CTS 500 | No | N/A |
| Cisco CTS 500-32 | No | N/A |
| Cisco CTS (all other device models) | No | N/A |
| Cisco ATA 186 | No | N/A |
| Cisco ATA 187 | No | N/A |
| Cisco ATA 188 | No | N/A |
| Cisco IP Communicator | Yes | Requires CIPC v7.0(1) or later |
| Cisco Jabber for Windows -Softphone Mode | Yes | Requires Jabber for Windows 9.2 or later |
| Cisco Jabber for Windows -Extend/Connect Mode | No | N/A |
| Cisco Jabber for Windows -Remote Desktop Control Mode | Refer to the device model under remote control to determine support. | Refer to the device model under remote control to determine support. |
| Cisco Jabber for Mac -Softphone Mode | Yes | Requires Jabber for Mac 9.2 or later |
| Cisco Jabber for Mac - Remote Desktop Control Mode | Refer to the device model under remote control to determine support. | Refer to the device model under remote control to determine support. |
| Cisco Jabber for iPad (Wifi-only) | No | N/A |
| Cisco Jabber for iPhone | No | N/A |
| Cisco Jabber for Android | No | N/A |
| Cisco Unified Personal Communicator - Softphone Mode | No | N/A |
| Cisco Unified Personal Communicator - Remote Desktop Control Mode | Refer to the device model under remote control to determine support. | Refer to the device model under remote control to determine support. |
| Cisco Unified Communications Integration for Microsoft Office Communicator/Lync -Softphone Modes | No | N/A |
| Cisco Unified Communications Integration for Microsoft Office Communicator/Lync -Remote Desktop Control Mode | Refer to the device model under remote control to determine support. | Refer to the device model under remote control to determine support. |
| Cisco Unified Communications for RTX (CUCRTX) -Softphone Mode | No | N/A |
| Cisco Unified Communications for RTX (CUCRTX) - Remote Desktop Control Mode | Refer to the device model under remote control to determine support. | Refer to the device model under remote control to determine support. |
| Cisco Web Communicator forWx Social -Softphone Mode | No | N/A |
| Cisco Web Communicator forWx Social - Remote Desktop Control Mode | Refer to the device model under remote control to determine support. | Refer to the device model under remote control to determine support. |
| Cisco Unified Communications Integration for WebEx Connect -Softphone Mode | No | N/A |
| Cisco Unified Communications Integration for WebEx Connect - Remote Desktop Control Mode | Refer to the device model under remote control to determine support. | Refer to the device model under remote control to determine support. |
| VGC Phone | No | N/A |
| VG224 | No | N/A |
| VG248 | No | N/A |
| CTI Port | No | N/A |
| CTI Remote Device (Extend & Connect) | No | N/A |
| CTI Route Point | No | N/A |
| CTI Route Point (Pilot Point) | No | N/A |
| ISDN BRI Phone | No | N/A |
| Carrier Integrated Mobile | No | N/A |
| IMS Client | No | N/A |
| Mobile Communicator | No | N/A |
| Nokia S60 | No | N/A |
| Remote Destination Profile (Single Number Reach) | No | N/A |
5 - Storage Volumes Best Practices
The following guide outlines some considerations to take into account when setting up your recording storage volume. In practice the application administrator should tahe into account the specific needs, available hardware and any other limitations.
The best and recommended way to set the CallReplay storage volume is on a dedicated partition, on RAID (1 and above) protected drives.
Provisioning the total available space should be done considering the number of calls you want to store. You can estimate that each 1GB will hold approximately 160 hours of recordings using the speex format. That is, you can keep 96,000 calls of 10 minutes on one 100 GB HDD.
For setting the volumes in CallReplay we will consider 2 examples:
Example 1: A dedicated 500GB partition
In this case, you might want to have both the recordings and the data folder on the same partition. The quota setting, which sets the maximum ammount of space that the recordings may take should leave enough room on the partition for upgrade backups, logs, the database, and various misc files. Therefore, a 450GB quota will leave a 50GB available space for the rest of the data folder, and various operations. If the data folder is actually on another partition, you can set a quota even higher, leaving only 2-3 GB of free space. The free space we consider even on a purely recording storage partition might be necessary at some moment if large file operations are necessary (archiving of a few days of recordings).
The reserved setting will keep you informed when the available space for recordings (that is free space available + the size of current recordings) drops below the specified amount. Use this to make sure that the database and other operations (database backup on the same partition, logs archiving on the same partition, etc) doesn't take up the space needed for recording. In this case, setting the reserved space just 2 GB smaller than the quota should achieve this purpose.
Example 2: A shared 100GB partition (OS partition)
For a partition that is shared between CallReplay and other applications and most notably the OS, it is necessary to leave enough space available for other uses. In this particular case, setting a quota of 40GB will leave 60GB available for the OS and other applications, which should suffice. The reserved space, in this case should be set lower, as it's quite possible that the OS and the other applications will take more space over time than initilaly envisioned. A 30 GB reserved space will allow the other disk users to take up to 10GB of the planned CallReplay storage space before sending notifications to the administrator.\
The default 1GB Reserved freee space should also be increased for such a partition, 4GB should suffice.
6 - CallReplay Firewall Ports
Ports opened on the CallReplay server
| Protocol | Port | Purpose | Configurable |
|---|---|---|---|
| UDP | 1026 | Database | No |
| TCP/UDP | 5060 | SIP default port | Yes |
| TCP | 5432 | Database | Yes |
| TCP | 8080 | Jetty web server | Yes |
| TCP | 8081 | Monitoring calls | No |
| TCP | 8079 | Software update | No |
| TCP | 9000 | Licensing | No |
| TCP | 9853 | Replication | No |
| UDP | 25000-30000 | RTP port range (even values) | Yes |
CallManager Ports Required by Forked Recording
These ports must be opened on the CM server, or Forked will not work.
| Protocol | Port | Purpose |
|---|---|---|
| TCP | 2748 | CTI |
| TCP | 2749 | JTAPI |
| TCP | 2789 | SIP default port |
| TCP | 8443 | AXL |
| TCP | 443 | HTTPS |
| UDP/TCP | 5060 | SIP |
Reference: http://www.cisco.com/en/US/docs/voice_ip_comm/cucm/port/7_0/CCM_7.0PortList.pdf
7 - Interfacing with CallReplay
CallReplay uses an embedded Postgres 9.0 database. To connect to it you can use PgAdmin III (Start / Programs / CallReplay / Support / PgAdmin III). It is also accesible from Java, C# and all programming languages which can access Postgres.
Port: Set during setup process, default 5432
User name: callreplay
Password: set during setup process, default CallReplay_2005
- Automatic Login URL {#InterfacingwithCallReplay-2.AutomaticLoginURL}
http://SERVER:PORT/CallRecorder/?user=USER&password=PASSWORD&tenant=TENANT&lang=LANGUAGE
where SERVER is the call recorder ip/address, PORT is the configured server port ( see CallReplay Site Configuration ), TENANT is the registered name of the tenant ( if not provided, the "default" tenant will be considered ), USER is the login name and PASSWORD is the password in clear text.
If you do not want to provide clear password, you may discard &password=, in that case CallReplay will ask you for password and use provided TENANT and USER.
Also, you can use the base URL with POST method, using the same keys and values as in normal URL:
- Call Details {#InterfacingwithCallReplay-3.CallDetails}
http://SERVER:PORT/CallRecorder/?callDetails=CALL_UUID&user=USER&password=PASSWORD&tenant=TENANT
where call_uuid is the uuid of the call, found in Advanced tab of Call Details.
Example:
Sometimes you may want to show only the Call Details dialog, in this case use the following url (note 'nomenu'):
http://< server : port >/CallRecorder/?callDetails=< call uuid > &user=< user_name >&password=< clear_password >&tenant=< tenant_name >&nomenu
Observation: this is best used inside of an IFRAME
Example:
- Call Playback {#InterfacingwithCallReplay-4.CallPlayback}
http://SERVER:PORT/CallRecorder/?player=CALL_UUID&user=USER&password=PASSWORD&tenant=TENANT
Observation: this is best used inside of an IFRAME

- File Storage URL
http://HOST:PORT/CallRecorder/Storage/STORAGE_VOLUME_ID/CALL_PATH
where STORAGE_VOLUME_ID is the volume index number in the table storage_volumes and CALL_PATH is the path to the required file relative to storage volume, which can be found in the **Call **detail dialog.
The storage web URL is protected by a password which is random by default but can be configured from the Storage > Advanced > Player Access Password. The user name is "player".
If you need to, you may construct and send HTTP Basic Authorization Header yourself. To do this you need to perform the following steps:
- Build a string of the form username:password{.external-link}, e.g. "player:123"
- Base64 encode the string, e.g. "cGxheWVyOjEyMw=="
- Supply an "Authorization" header with content "Basic " followed by the encoded string, e.g. "Basic cGxheWVyOjEyMw==" so the header will look like "Authorization: Basic cGxheWVyOjEyMw==".
Note: HTTP error code 401 is sent when the password is missing or incorrect, letting the browser prompt you for user/password. User name is 'player'.
- Transcoding URL {#InterfacingwithCallReplay-6.TranscodingURL}
Searches the call in the database, then transcode it to the desired output format, and send a redirect response to the temporary URL. If there is more than one call matching the query, the first one is used.
Parameters below are optional, that is searches can be made using any subset of parameters, so there is no longer any need to connect directly to the CallReplay database:
http://host:port/CallRecorder/Transcoder?callId=GUID&wireCallId=x{.external-link}
&beginTime=yyyy.mm.dd-hh.mm{.external-link}.ss&endTime=yyyy.mm.dd-hh.mm{.external-link}.ss
&callerIP=x&callerPort=x&callerMAC=x&callerNumber=x&callerName=x
&calledIP=x&calledPort=x&calledMAC=x&calledNumber=x&calledName=x
&format=x&password=x&lang=x
Parameters:
- Format:
- spx or wav - redirects to audio files; when multiple callIds were requested, their audio files are concatenated and the response redirects to the resulted file
- png - redirects to an image of audio file
- json - returns a list of details for all calls matching the query, in json format
- beginTime and endTime - calls will be searched for start time between these values (if provided).
- pbxCallId is the SKINNY call ID or SIP call ID
- callId is the database call GUID; multiple callIds may be requested
- numbers and names are searched for text [containing]{.underline} provided values
- IPs, ports and MACs are searched for exact match
- password is the password set in Storage > Advanced > Player Access Password. Instead of using this parameter, you can send a HTTP Basic Authorization Header instead.
- lang - one of the 2 char language identifier supported by CallReplay (see login dialog in administration site); used to display error messages; can be omitted for english
Notes:
- if the requested format is the same as storage format (see Storage > Advanced), you will receive a redirect to a File Storage URL for the file to be delivered straight from the storage. You need to supply a HTTP Basic Authorization Header in order to successfully download the file, as described in paragraph 5 File Storage URL.
- since the same user/password is used for Transcoding URL and File Storage URL, you may prefer sending HTTP Basic Authorization Header to the Transcoding URL instead of 'password' parameter.
- HTTP error code 401 is sent when the password is missing or incorrect, letting the browser prompt you for user/password. User name is 'player'.
- HTTP error code 412 is sent when other errors occur, along with an error message.
- External Replication API {#InterfacingwithCallReplay-7.ExternalReplicationAPI}
Downloads call details using HTTP requests.
Prerequsites:
To use this feature, you must add a replication branch and configure it
for Replication API. This means go to the HQ/Branch Replication page,
then to the Branch tab, where you add a new HQ. That is, add here the IP
address of the computer from which you want to download calls.
This is necessary for two reasons:
- CallReplay has to maintain a replication queue for this HQ like it does for all HQ-s. This is, in fact, a real HQ, more precisely, a 3rd party HQ (a computer where the calls will finally arrive).
- This allows you to have multiple 3rd party HQ-s as well as CallReplay HQ-s.
URL Format:
Parameters:
- tenant - the tenant id from which to download call details; can be omitted for default tenant
- replicationQueueName - must contain the exact HQ name (case sensitive) or the IP address entered for this HQ; it may be anything, even a fake IP - it is used just to find the queue with the not-replicated calls for this HQ.
- lastReplicationId - the last confirmed replication id - first time should be 0, the subsequent invocations should contain the last received replication id in order to be deleted from the database and advance to next operations; these IDs are in ascending order, but not necessarily contiguous;
- chunkSize - how many operations to return; can be omitted for default which currently is 50
- deletePrevious - whether to delete the row with lastReplicationId or not; when false, it will be retrieved again and again until deleted
- password - connection password set in the HQ dialog. Please configure CallReplay server to use HTTPS in order to hide the clear text password from a network analyzer. Instead of using this parameter, you can send a HTTP Basic Authorization Header, similar to the one in paragraph 5 File Storage URL. The user name is "replicator".
- lang - one of the 2 char language identifier supported by CallReplay (see login dialog in administration site); used to display error messages; can be omitted for english
Response for new call:
http://HOST:PORT/CallRecorder/Replicator?...&lastReplicationId=5
<!-- sample respone for a Cisco SIP call -->
<CallRecording>
<ReplicationId>3711</ReplicationId>
<Action>Create</Action>
<origLegcallIdentifier>17083749</origLegcallIdentifier>
<destLegIdentifier>17083750</destLegIdentifier>
<origLegSipCallId>0017e014-1e45000b-9d89d8c8-883d5c8c@10.1.0.61</origLegSipCallId>
<destLegSipCallId>38fe6b00-44510457-27e-6900010a@10.1.0.105</destLegSipCallId>
<globalCallID_callId>8062</globalCallID_callId>
<globalCallID_callManagerId>1</globalCallID_callManagerId>
<CallRecordingId>95a21ee8-adb5-2d5e-c208-6727e663e65f</CallRecordingId>
<StartTime>2014-10-22 16:35:36.746 +0300</StartTime>
<DurationMS>7300</DurationMS>
</CallRecording>
<!-- sample respone is for a Cisco SCCP call -->
<CallRecording>
<ReplicationId>3721</ReplicationId>
<Action>Create</Action>
<origLegcallIdentifier>17083687</origLegcallIdentifier>
<destLegIdentifier>17083688</destLegIdentifier>
<origLegSipCallId/>
<destLegSipCallId/>
<globalCallID_callId/>
<globalCallID_callManagerId/>
<CallRecordingId>3a07f1fb-9dd5-c60f-c2fc-5b14a3597a50</CallRecordingId>
<StartTime>2014-10-22 16:41:30.146 +0300</StartTime>
<DurationMS>6000</DurationMS>
</CallRecording>
<!-- sample response for a deleted call -->
<[CallRecording]{.start-tag}>
<[ReplicationId]{.start-tag}>24</[ReplicationId>]{.end-tag}
<[Action]{.start-tag}>Delete</[Action]{.end-tag}>
<[CallRecordingId]{.start-tag}>ed29894d-4a34-2944-b827-a76e00bd6b6a</[CallRecordingId]{.end-tag}>
</[CallRecording]{.end-tag}>
</[CallRecordings]{.end-tag}>
Response when there are no more operations at this moment:
http://HOST:PORT/CallRecorder/Replicator?…&lastReplicationId=654 <CallRecordings>
</CallRecordings>
Response in case of error:
<Error>
<Code>errorCode
<Message>error message
</Error>
Possible error codes:
1 - unknown error
2 - 'replicationQueueName' parameter was not set
3 - password parameter is missing or the password is wrong
4 - specified replication queue name was not found
5 - specified replication queue name was not configured for replication API - please go to HQ/Branch Replication page, edit HQ and check 'Only for Replication API'.
Notes:
- HTTP error code 401 is sent when the password is missing or incorrect, letting the browser prompt you for user/password. User name is 'replicator'.
- HTTP error code 412 is sent when other errors occur, along with an error message.
- Error messages will be returned in the chosen supported language (default is English).
Deleting Calls
The Replicaton API can also be used to delete calls. You will need to follow the steps from the Prerequsites section of the *External Replication API
URL Format:
Parameters:
- command - use the value 'delete' to delete calls
- replicationQueueName - must contain the exact HQ name (case sensitive) or the IP address entered for this HQ; it may be anything, even a fake IP - it is used just to find the queue with the not-replicated calls for this HQ.
- callGuid - the GUID(Globally Unique Identifier) of the call to delete
- recursive - if true, the call will be deleted from any replication branches it is found on. The default value is false.
- password - connection password set in the HQ dialog. Please configure CallReplay server to use HTTPS in order to hide the clear text password from a network analyzer. Instead of using this parameter, you can send a HTTP Basic Authorization Header, similar to the one in paragraph 5 File Storage URL. The user name is "replicator".
Response in case of successfully deleting a call (non-recursively):
http://HOST:PORT/CallRecorder/Replicator?command=delete&replicationQueueName=Replication&password=PWD&callGuid=7d0b6426-ceaa-9012-4106-2d25f25dccfa

<?xml version="1.0" encoding="UTF-8" standalone="no"?>
<CallRecording>
    <LocalServerStatus>Call not found.</LocalServerStatus>
    <LocalServerMessage>Call not found.</LocalServerMessage>
    <Status>Call not found.</Status>
    <Action>Delete</Action>
    <CallRecordingId>7d0b6426-ceaa-9012-4106-2d25f25dccfa</CallRecordingId>
    <Servers/>
</CallRecording>
Response in case the call doesn't exist or has already been deleted (non-recursively):
<?xml version="1.0" encoding="UTF-8" standalone="no"?>
<CallRecording>
    <LocalServerStatus>Call not found.</LocalServerStatus>
    <LocalServerMessage>Call not found.</LocalServerMessage>
    <Status>Call not found.</Status>
    <Action>Delete</Action>
    <CallRecordingId>7d0b6426-ceaa-9012-4106-2d25f25dccfa</CallRecordingId>
    <Servers/>
</CallRecording>
Response in case the call exists on the main server and on two other replication branches
http://10.1.0.131:80/CallRecorder/Replicator?command=delete&replicationQueueName=Replication&password=PWD&callGuid=835f6c9a-bca9-8b82-05e6-76b1d9b2a7d9&recursive=true

<?xml version="1.0" encoding="UTF-8" standalone="no"?>
<CallRecording>
    <LocalServerStatus>Success</LocalServerStatus>
    <LocalServerMessage>Success</LocalServerMessage>
    <Status>Success</Status>
    <Action>Delete</Action>
    <CallRecordingId>835f6c9a-bca9-8b82-05e6-76b1d9b2a7d9</CallRecordingId>
    <Servers>
        <ServerStatus>
            <Status>Success</Status>
            <IpPort>10.1.0.117:80</IpPort>
            <Msg>Success</Msg>
        </ServerStatus>
        <ServerStatus>
            <Status>Success</Status>
            <IpPort>10.1.0.113:80</IpPort>
            <Msg>Success</Msg>
        </ServerStatus>
    </Servers>
</CallRecording>
8 - CallReplay Cloud Server
Introduction
The Cloud Server is a feature of CallReplay which allows you to record calls and upload them on a properly configured CallReplay Cloud Server.
The Cloud Server can be used as a Replication HQ for other CallReplay servers or mobile recorders.
You can make use of this feature in two ways:
- Uploading to the public CallReplay Cloud Server located at http://cloud.call-replay.com{.external-link};
- Configure your own CallReplay Cloud Server - this way you have all features of CallReplay Call Recorder.
Supported mobile phones: Android 2.3.3 or higher; other operating systems may be supported in the future.
Configuring your own CallReplay Cloud Server
First of all, you should acquire a license for this. The license should contain how many tenants you need (i.e. cloud accounts) and how many phones and mobiles you want to record and upload calls.
Upload this license in your CallReplay installation using System -> Licensing.
Add Tenants
then go to System -> Tenants page. You can add your tenants here.
System > Tenants
First enter the company name and fill the TLD field with your domain name / website if any.
You can assign a number of Replication Branches, if you want to make this tenant a Replication HQ. In this case, you should allocate a number of channels to those branches and assign them individually from HQ/Branch Licensing page. That is, if you want branches A, B and C to upload calls to this tenant, write 3 in 'Branch' edit box. Then, if you want A to have 5 channels, B and C have 10, write 25 in 'Channels' edit box, then later go to HQ/Branch Licensing and assign each of them the corresponding channel number. Here you will introduce the total number of channels allocated to the group of branches associated with this tenant.
In 'Mobile Phones' you will write the total number of mobile phones that can upload calls to this tenant (cloud account).
'Storage Quota' - how much of storage space will be allocated to this tenant from the total storage pool. Older records will be deleted when the quota is reached. Enter 0 if you want to use global cleaning.
'Active' - use this checkbox to activate / deactivate the tenant.
'Validity' - if you want to automatically deactivate the tenant after a period of time.
After pressing 'OK' button, a new tenant will be generated and you can see it in the main list. There you can find the generated Tenant ID used for tenant identification.
Add Tenant Admin
You may create multiple user accounts for each tenant, at least one of them should have administrative rights. You can quickly create such an administrative account using 'Add Admin' button from 'Tenants' page.
A password will be randomly generated for the tenant administrator and it will be sent to the specified e-mail address.
Public Tenant Creation
This feature is available only on public CallReplay Cloud Server located at http://cloud.call-replay.com.{.external-link} Anybody can create a trial tenant for itself. This trial tenant will expire after 1 month and its storage quota is limited to 200MB.
To convert a trial tenant to a permanent tentant, please contact sales or support.
Tenant Login
Upon creation of the its account, the administrator will receive an e-mail containing the login credentials. In order to access the Cloud Server, the administrator (and users created subsequently) must enter the Tenant ID along with the login name and password.
After login, you have access to all recorded and uploaded calls. You can playback them (if not encrypted), e-mail them and so on.
9 - Localization
Requirements
For creating a custom localization of CallReplay you need at least version 7.1.10 of application installed using a full setup.
Creating/editing CallReplay localization
CallReplay CallRecoder has two major components who need to be translated separately. One component is recorder service and other is site administration.
First thing which must be done is to create a copy of entire Translations folder into CallReplay data folder. Translations folder can be found in installation path, usually c:\Program Files\CallReplay\System\Translations. Data folder is the folder where the database is kept, default value is C:\CallReplay.
Once we have new Translations folder we can start to create/edit translations. All customizations must be done in this new Translations folder otherwise will be lost after first running of CallReplay Software Update or after a full setup.
The tools used for translation are "translate_site.cmd" and "translate_server.cmd".
Create a new translation for CallReplay site
Go to the new Translations folder created using indications from previous paragraph.
Duble-click on "translate_site.cmd" file. If this is the first time when the translation tool is used you must select a language for translation tool interface:
language_selection_image_not_found
After language selection the main window of translation tools is shown:
Press the add language button:
Select desired language from the list:
The result is a new Language node:
Now select the new language and translate every key from the master file to the new language. Next picture show how to do translate "All rights are reserved" to Korean.
The untranslated keys are shown with blue color. So it is easy to know which keys are translated and which not.
For saving the new language press "CTRL+S" which is a shortcut for File>Save option and a new file having name* "site_xx.properties"* will be created where xx is the language code.
Create a new localization for CallReplay service
Go to new Translations folder and double-click on "translate_server.cmd". The same tool as for translating site will be shown excepting that the keys are for CallReplay service.
Create a new localization for CallRecoder service following the same steps as for CallReplay site. The name of the new translation will be "server_xx.properties" where xx is the language code.
Activate a new localization
A new localization becomes active after including in file "locale.properties" the line: *xx=Language *and restarting of CallReplay service.
e.g.: ko=[[한국의]{.hps}]{.short_text lang=“ko”}
Editing an existing localization for CallReplay site and service
Run the translation tool ( "translate_site.cmd" for site and "translate_server.cmd" for service ), select the language and edit the keys accordingly. Save the changes ( CTRL+S or File > Save ).
10 - Download Files from Our FTP Server
You can download releases from our FTP server, which is located at this
address{.external-link}, using the
following credentials:
User: anonymous
Pass: anonymous
Our FTP server can use the passive mode for data transfer on ports in
the range of 50000-51000, or active mode on port 20, so make sure to
allow connections on those ports in your firewall.
In order to download installation setup kits from our FTP server,
you can use a web browser such as Firefox or Google Chrome (but not
Internet Explorer), or a FTP client such as
WinSCP or
FileZilla.
Use no encryption when connecting to the server.
Below is a screenshot showing how to configure WinSCP. In this case, the
Passive mode is used, so ports in the range of 50000-51000 will be used.
If you uncheck the passive mode, then port 20 will be used in Active
mode.
Once logged in, you may proceed downloading the file of your choice:
Note that if you are using a web browser and point it
to ftp://ftp.call-replay.com/, then passive mode will be used by
default.
11 - Upload Files Manually to Our SFTP Server
To upload logs manually to our FTP server, first you need to locate the
log files which correspond to the time when the issue occurred, archive
them using a program such as 7-Zip, and then upload them to the FTP
server using the credentials shown below. Please notice that it helps us
if you set the Tracing Priority to All inside the
CallReplay -> Help -> Service Debug Settings menu before the
issue occurs, so that additional information gets included in the log.
Also, the most important logs are the ones ending in the .trx
extension, so make sure to include them as well.
By default, the log files can be found in the following location:
On Windows: C:\CallReplay\Logs
On Linux: /var/lib/callreplay
The FTP server has been terminated and replaced by the SFTP server
To obtain a SFTP account, open this link in a browser:
https://sftp.call-replay.com/UploadRequest?email=your@email.com
To upload the archive, you can use a SFTP client such as FileZilla, available on both Windows and Linux, which can be downloaded from here{.external-link}, or WinSCP, available on Windows only, which can be downloaded from here{.external-link}.
Please make sure that the SFTP client settings are set on SFTP (not FTP), using encryption. SFTP is not the same as FTPS.
You must use the port, account and password displayed by the account creation page.
Port 1025 must be open for outbound data transfer.
Please tell us in an email message the name of the file that you
uploaded.
12 - Send Logs
AI Software is dedicated to its customer and willing to deliver best user and business experience through the products and services. Therefore, CallReply comes with a convenient and easy to use problem reporting coponent that you can use to report, manually or automatically, when something is not working.
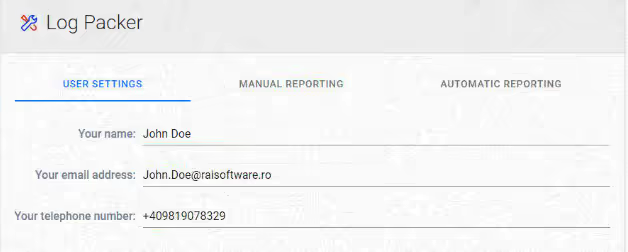
Before using this feature it is important to provide contact information that will help RAI Software support people to connect with you.
To configure contact information:
- Go to
Help > Send Logs. - Provide a name for the contact and that will be used for communication
- Introduce the prefered e-mail address to be used in connection with CallReplay problem
- Introduce the preferend telephone number
- Click
Save.
To report a problem manually:
- Go to
Help > Send Logs. - Select
Manaual Reportingtab - Introduce requested information
- Click
SubmitReport.
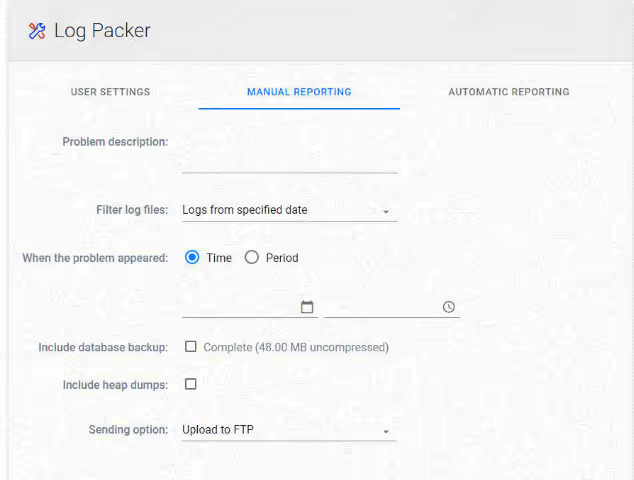
- Problem description:
- When the problem appeared:
- Filter log files:
- Include detabase backup:
- Sending option:
Giving more detail int he description helps us to determine cause of a problem much faster. Reporting issues when they happen helps make CallReplay better, and we appreciate the time it takes to give us this information
To report problem automatically:
- Go to
Help > Send Logs. - Select
Automatice Reportingtab - Check
Automatic Upload Enabled. - Introduce requested information.
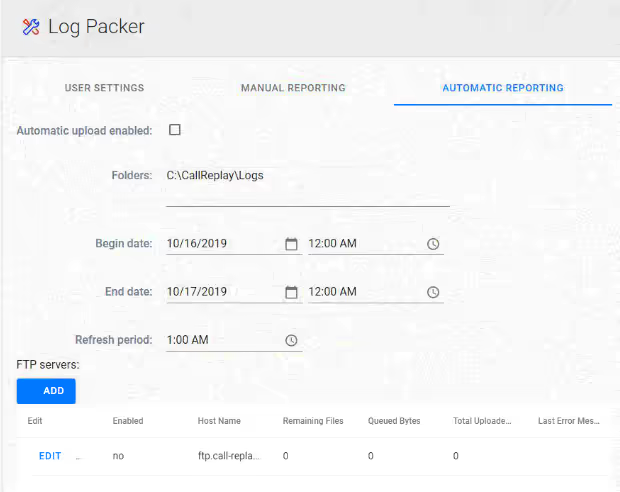
By default CallReplay provides a precofigured FTP connection, but you can configure custome ones according with your needs or as per support people recommendation.
To add FTP connection
- Go to
Help > Send Logs. - Select
Automatice Reportingtab - Click
Add. - Introduce requested information.
To delete FTP connection
- Go to
Help > Send Logs. - Select
Automatice Reportingtab - Check the row(s) containing the FTP connection(s) you want to remove.
- Click
Delete.
13 - Adding new Phone Services
1. Customizing the Phone Services
The default CallReplay Phone Service will display a menu where
different functions can be selected. However, you can customize the
Phone Service URL so that you can access a specific function with a push
of a button. The different functions and their URL's are displayed in
Table 1.
Table 1
| Service | Description | URL |
|---|---|---|
| Main Service | Provides users with a menu with extensions | http://x.x.x.x:80/CallRecorder/phoneService?name=#DEVICENAME# |
| Recordings | Listen to audio recordings, according to user’s access rights | http://x.x.x.x:80/CallRecorder/phoneService/replayPhoneListOfExtensions?name=#DEVICENAME# |
| Monitoring | Listen to live calls, according to user’s access rights | http://x.x.x.x:80/CallRecorder/phoneService/monitoringPhoneListOfExtensions?name=#DEVICENAME# |
| Record this call | Demands recording of current call | http://x.x.x.x:80/CallRecorder/phoneService/onDemandPhoneDemandThisCall?name=#DEVICENAME# |
| Pause this call | Pauses the recording of current call | http://x.x.x.x:80/CallRecorder/phoneService/recordPause?name=#DEVICENAME# |
2. Adding a new Phone Service
Log in Cisco Unified CM Administration, then go to Device -> Device
Settings -> Phone Services and add a new service
Enter the new name of the service and the URL (which can be found in
Table 1) and then check Enable
3. Subscribe your phone to the new service
In the Phone Configuration window, select Subscribe/Unsubscribe Services
and click go, then select the new service in the pop-up window, click
next and subscribe.
4. Add the Service to a softkey button
On the right-hand side, look for add new SURL, click it and add the new
service. Attention: if the Add new SURL is in the Unassigned Associated
Items list, you will need to create a custom Phone Button Template, to
add
the service URL to one of your available softkeys (see section 5).
5. Creating a new Phone Button Template
If you need to assign Service URL to softkeys, you will need to create a
new Phone Button Template. Go to Device -> Device Settings -> Phone
Button templates, find the one you are using for your phone, select it,
press copy and set a new name for it.
Search for the new template, select it, and configure the softkeys you
wish with the Service URL option.
Finally, go back to the phone's configuration, select the new button
template and apply the new configuration.
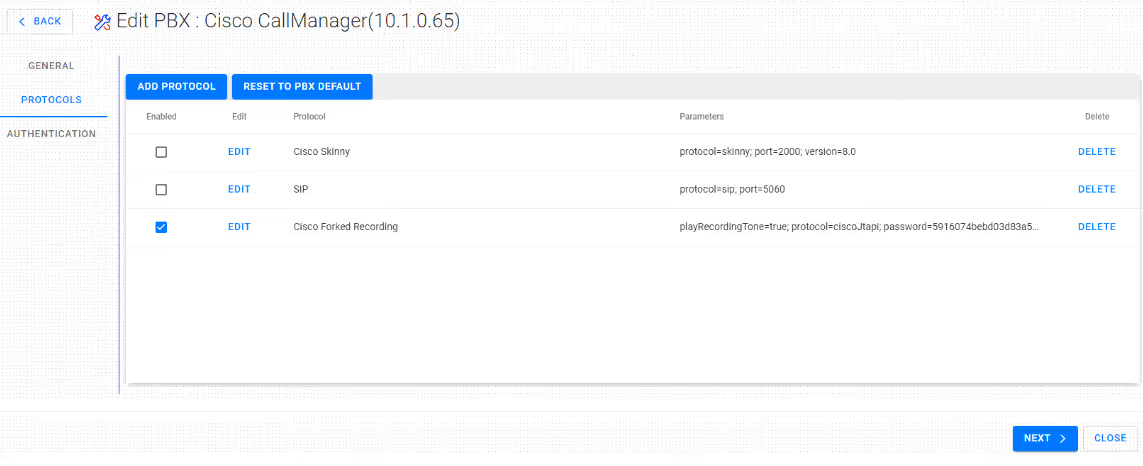
14 - Editing Protocol Settings in PBXs
By default, the three protocols listed in a Cisco CallManager PBX are Skinny, SIP and Forked Recording, which come with default settings to record enabled. However, each of these protocols can be configured further by clicking the Edit button on the respective protocol.
Recording > CallManager (PBXs) > Edit PBX
Edit Cisco Skinny
Recording > CallManager (PBXs) > Edit PBX > Edit Protocol
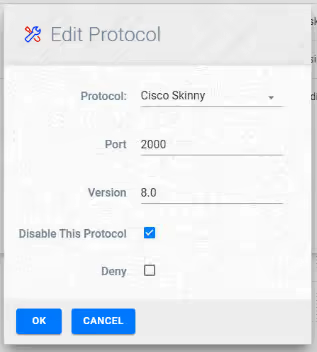
Version: Protocol version, depends on the Skinny versions supported by the firmware of the phones, the default (8.0) should work for most phones.
Port: The Skinny port used by the phones to communicate with CallManager.
Disable This Protocol: Check this if you want to disable this protocol for this PBX.
Deny: Ignore calls and do not record calls using this protocol for this PBX.
Edit SIP
Recording > CallManager (PBXs) > Edit PBX > Edit Protocol
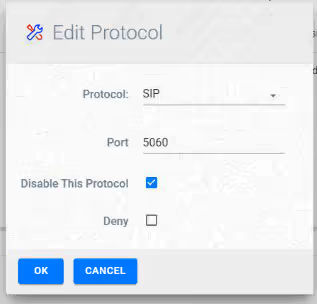
Port: The SIP port used by the phones to communicate with CallManager.
Disable This Protocol: Check this if you want to disable this protocol for this PBX.
Deny: Ignore calls and do not record calls using this protocol for this PBX.
Edit Cisco Forked Recording
Recording > CallManager (PBXs) > Edit PBX > Edit Protocol
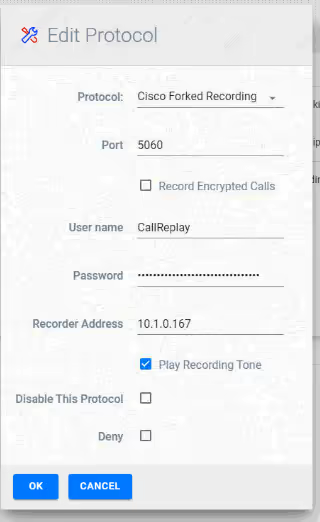
Play Recording Tone: Enable this option so that users will hear a recording tone in their phones whenever the call is getting recorded.
Recorder Address: The IP of CallReplay.
Password: The password of the CallReplay username.
Username: The username which is used for the Recording Profile.
Record Encrypted Calls: Check this to be able to record encrypted calls.
Port: The port used for SIP communication.
Disable This Protocol: Check this if you want to disable this protocol for this PBX.
Deny: Ignore calls and do not record calls using this protocol for this PBX.
15 - LDAP Authentication
Introduction
To be able to login in CallReplay with an LDAP account, the connection to LDAP server needs to be configured in CallReplay
Overview for LDAP connection and configuration
To have the best integration for LDAP server, we recommend Microsoft Active Directory.
Requirements
We recommend the forest and domain level to be at least Windows Server 2012 R2
Connection settings steps
Step 1. Go to System→ LDAP Authentication
Insecure Microsoft Active Directory Configuration example:
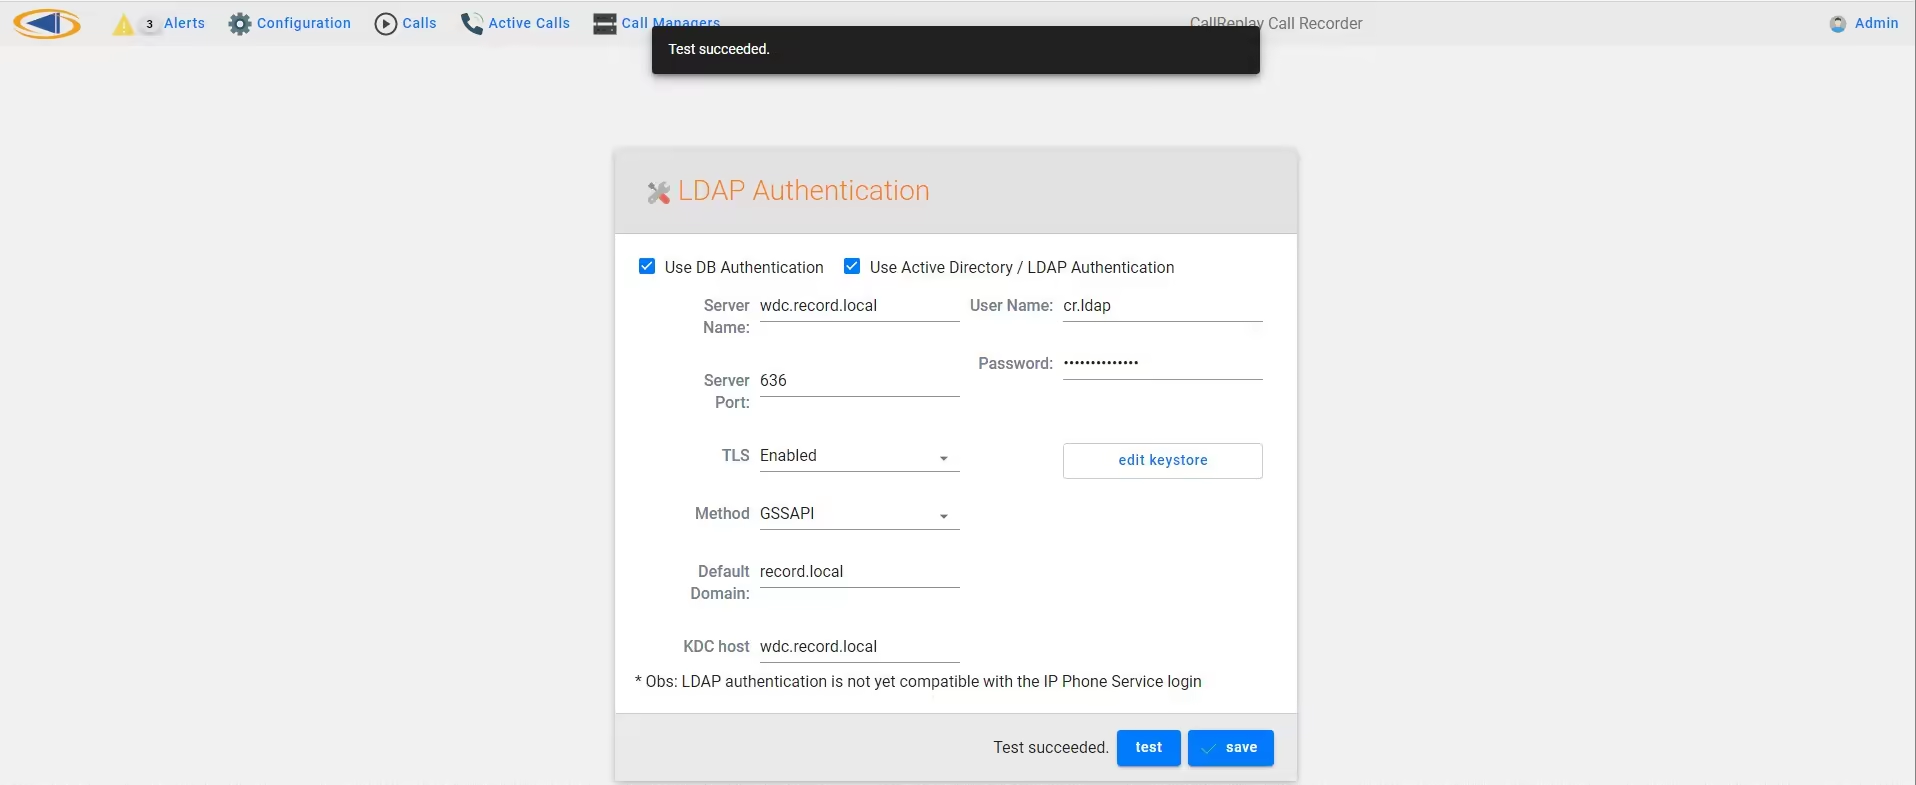
Step 2. Check “Use Active Directory / LDAP Authentication” and enter the bellow settings
Server Name: LDAP Server FQDN (Fully Qualified Name) as example DC FQDN
(wdc.record.local)
Server Port: LDAP server Port Number, for insecure connection (389,3268) and
for secure connection (636, 3269)
TLS: Enabled for secure LDAP, Disabled for insecure LDAP
Method: Type of LDAP connection Methods. Available Methods are simple
DIGEST-MD5 and GSSAPI
Default Domain: Default domain used for user login as example (record.local)
KDC host: Kerberos host FQDN as example DC FQDN (wdc.record.local)
User Name: LDAP bind username. For Microsoft Active Directory can be normal
domain user account. The username can be sAMAccountName or UPN
for Microsoft Active Directory
Password: LDAP bind username password
If you want to enable secure LDAP, then select “edit keystore” button and import the secure LDAP certificate, in PFX format as recommendation
Secure Microsoft Active Directory Configuration example:

Step 3. After you have entered the needed settings, please press the test button. If you receive a “Test Succeeded” message then if you have configured the LDAP connection from CallReplay server. If the message it is different, please review your settings.
Step 4. After the configuration it is tested with success, please press the save button.Make sure to have both “Use DB Authentication” and “Use Active Directory / LDAP
Authentication” enabled when you press the save button. We recommend having both methods of authentication enabled, to Use DB Authentication as fallback to LDAP Authentication.
Use DB authentication it is the default method of CallReplay which has at least one user. It is the method used by CallReplay when it is installed.