CallRecorderTM is an easy to use VoIP call recording solution that
implements the corporate call recording keeping policy and provides
secure and easy access to call records.
Call recording is now an essential business function for all
organizations for which phone calls and direct vocal communication mean
a voice-assumed contract and request liability and money protection, as
well as damage control, better trained and staff retention. This is why
RAI Software offers a complete solution, providing with:
Safety (business liability) - record and backup discussions,
contacts and verbal contracts, orders and business processes of the
institution, without any risk of losing specific details in verbal
communication;
Customer satisfaction - monitor and improve interaction between
customer and staff; register and solve possible complaints before
they become "larger issues";
Improve staff quality - train, monitor and coordinate staff by
training sales, communication and interaction skills;
CallReplay allows managers to review and score phone calls according
to their work group, listen the conversation, discuss, analyze,
train, take decisions; Users are empowered by providing them with
accurate records of their calls.
Better quality operations and cost effective services - all details
are centralized and recorded on an electronic file, no more lost
details or info, wrong address deliveries, etc.
CallReplay is a self-contained software recorder which includes
everything necessary to record VoIP calls (besides the Operating System
and server hardware): database, web server, Java VM, etc.
It supports active recording for most major PBXs, having an XML phone
service which allows replaying calls directly on the phone, and can be
deployed in virtual machines (VMs).
It works perfectly with Cisco & NEC & Mitel & IPTrade VoIP PBXs (no
proprietary hardware required) and can scale up from 1 to 1,200 marked
devices in a single box configuration.
CallReplayTM is now at its 9th generation and we are proudly present
on the international market (the United States, Asia, Europe) through a
network of partners, distributors, Telecom integrators and direct
customers.
Main Features and Benefits
Automatically Record Phone Calls - Damage control and increased
accountability in your personnel, suppliers and customers.
Manual (On-Demand) Control: Recording can also be initiated by
the user using the browser or IP Phone Service. Both Full Call and
Partial Call recording modes are supported.
Multiple Recording Methods: CallReplay supports both port
mirroring (SPAN) and forked recording (SPANless). Hardware recording
coming soon!
Monitor Live Calls: Listen to a call in progress, through the
browser or IP phone service. You can also whisper to the agent
without being heard by the external party (IP phone service).
Browse Recordings by Agent: Superb browsing interface tracks
agents across multiple phone numbers.
Search by caller ids, phone numbers, annotations, time,
description, tags, etc.
Replay, Annotate and e-Mail phone call recordings. Easy, secure
access to call recordings, using a web audio player, desktop audio
player or IP Phone Service.
Tagging & Searching calls with customized hierarchical tags has
never been easier.
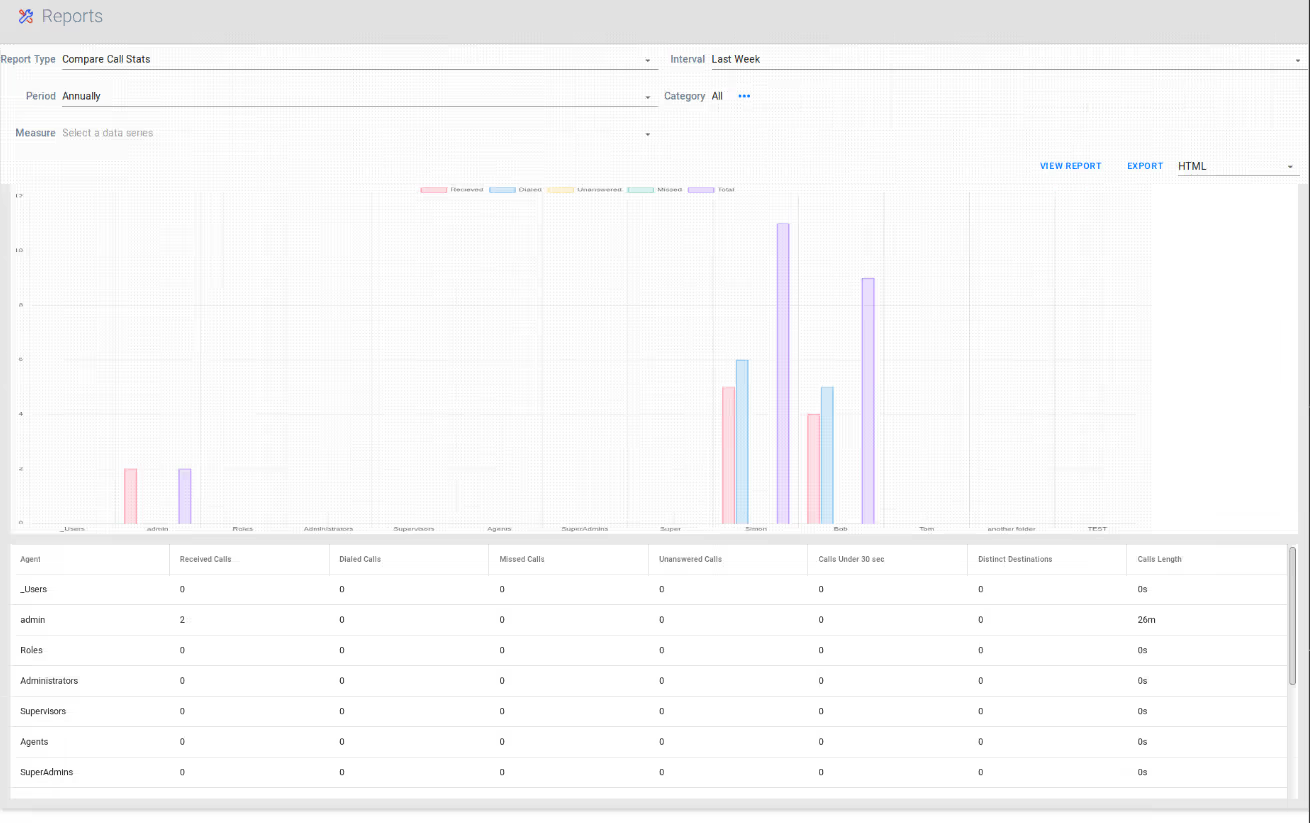
Agent Call Statistics Reports: The number of calls made,
received, etc by each agent.
Email Notifications: Automatically send email when a predefined
number appears in a call.
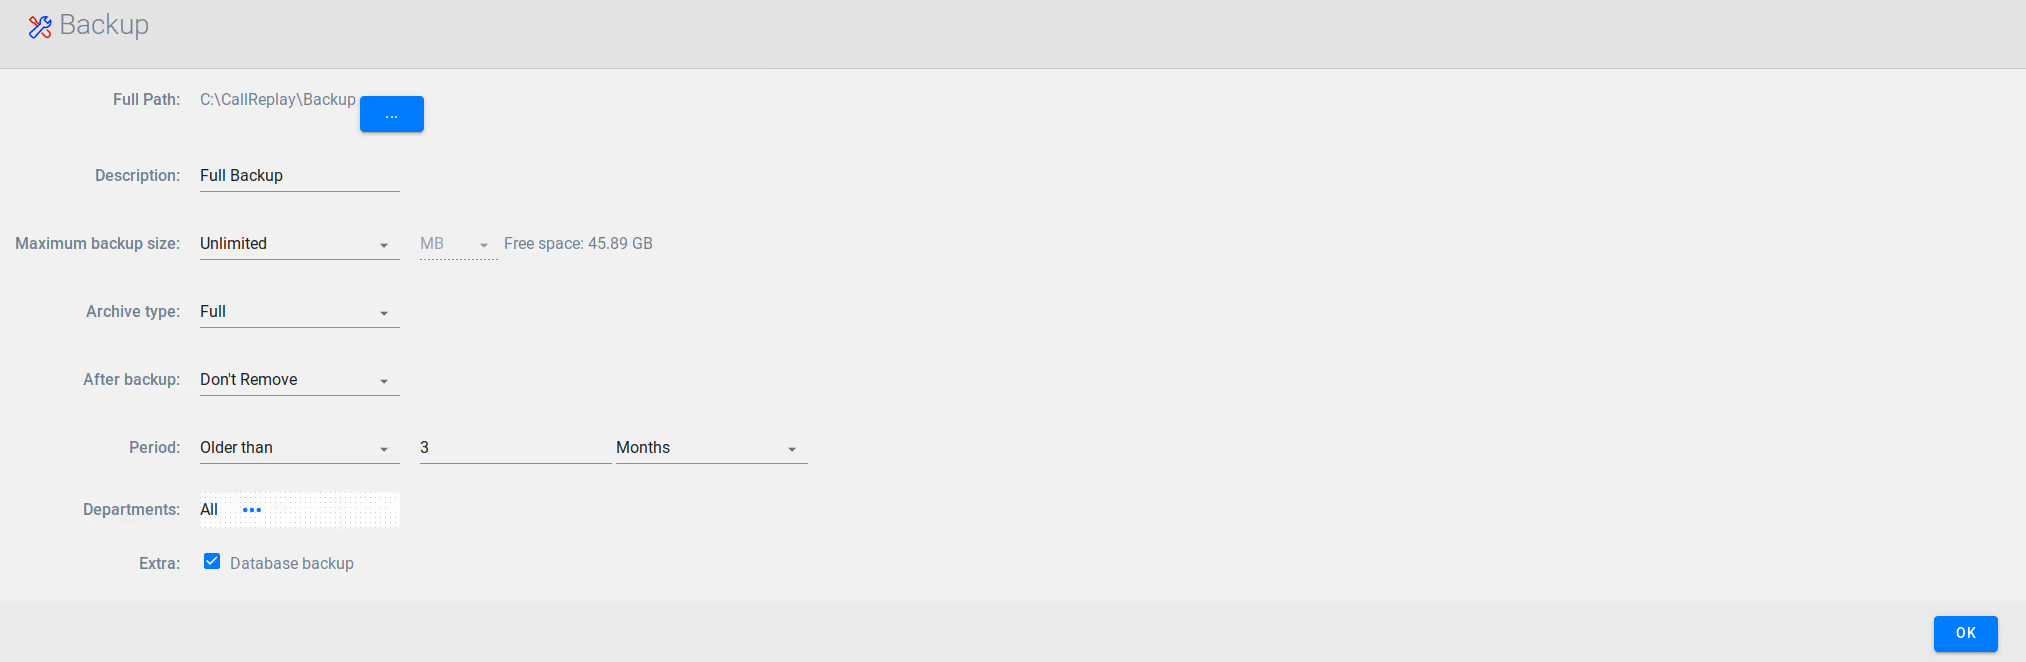
Backup & Restore: Archive calls on DVDs, HD-DVDs, BluRays or
SANs. A single DVD can store up to 15,000 calls of 5 minutes each,
due to the state-of-the-art voice compression technology
incorporated in CallReplay.
Reverse Caller Lookup: Displays the caller name and business
unit using the company Phone Directory.
Multi Site Replication: Using queued replication, you can record
many network partitions and centralize recordings at the HQ.
Recording and replication survive a downed WAN link.
Specialized Speech Compression lowers the storage requirements 8
times over MP3 and allows 18,000 hours of phone calls storage on one
120 GB hard drive.
Call History: Follow a call as it is transferred, put on hold or
parked.
Audit Replays: Prevent recordings abuse by browsing the list of
accesses to a call.
XML Phone Service: Handily review your past calls from your XML
enabled phone (Cisco IP Phones 7940, 7960 & 7970). Authenticate,
Browse, Play, Rewind, e-mail, mark important. You can also assign
calls to folders.
Access Control Lists: Fine grained permission system to allow
listening and acting on calls.
Automatic Software U
Try Before You Buy: Download a fully-featured evaluation version
with a friendly configuration wizard from
www.call-replay.com
1.2 - What's New
Please refer to the Release Notes chapter for more details.
1.3 - Requirements
Hardware Requirements
Server
Virtual Machines: VMs are supported in all recording modes.
Forked Recording mode works directly, while SPAN recording requires
additional configuration to enable network cards to work in
promiscuous mode.
CPU: any modern quad core CPU will support 200+ simultaneous
calls, the limits are in the RAM and disk IO subsystems. For virtual
CPUs please multiply the number with 1.5, ie the minimum
configuration for a VM should be 6 vCPUs or 10 for larger
configurations.
RAM: 8 GB of RAM for the system + 1GB for each million call
records stored in the database. For example, if you intend to store
2 million calls in the database, provision at least 10GB of RAM for
the server.
Storage: audio compression rate of 1.7 KB/s means that each GB
on the drive can keep about 160 hours of recordings (voice
compression is 8 times better than MP3). That is, you can keep
96,000 calls of 10 minutes on one 100 GB HDD. One month of typical
call center recordings (160,000 calls) takes about 55 GB.
Network
SPAN recording requires:
Managed network switch with port-mirroring capability (SPAN)
At least two network interface cards are required on the recording
server, one for each monitored switch, and another for the site (a
monitoring port can only receive packets). Using one interface card
is possible, but the administration site will only be accessible
from the physical console.
Forked recording requires:
One network interface card on the recording server, for
administration site and recording
Cisco CallManager platforms newer than 5.0. For Cisco CallManager
Express please use SPAN recording.
Selected Cisco phone models.
Software Requirements
Server Side
Operating System: Any Windows Server. Desktop Windows OSes
(Professional, XP, Vista, 7, 10) can also be used, but TCP
connection on these platforms are limited to 10 simultaneous
sessions, limiting the number of users which can replay calls using
the web site or a phone service.
Firewall
The Windows Firewall must be completely disabled in order to not
block RTP packets, which use dynamically allocated ports
Important
It is recommended not to run any other server software on a production
recording server! Call recording is essentially real-time. Failing to
keep up with the traffic can result in lost calls. Other software can
unpredictably use critical processor and memory resources which are
necessary for packet capture. The application allocates computing
resources according to priorities so an uncontrolled processing spike of
another program may disrupt recording.
Warning
Most ANTIVIRUS software brands are incompatible with CallReplay for the
following reasons:
CallReplay has many hundreds of megabytes of executable JAR
archives, which are scanned by AV at every service restart. Many
times the service times out before it can report succes because the
AV tries to scan every JAR file.
The recorder software writes and manages hundreds of GBs of audio
data. Scanning the recorded data by AV is tremendously slow and
resource consuming.
Some AV offer active network protection and block or disable the
incoming SIP and RTP connections.
We cannot offer support for any problem caused by the interaction with
AVs
Client Side
Any operating system, with an ever green browser for example
Chrome, Firefox or Microsoft Edge (Chromium based).
1.4 - Specifications
Editions
There are two CallReplayTM editions available: Evaluation and
Production.
The Production edition is commercial and provides all the outstanding
features packaged into an easy to install kit. The Evaluation edition
is a 30 calendar days time limited version (or based on license
granted), that contains all the benefits available for
Production edition.
You can find the latest versions of CallReplayTM including the
Evaluation edition on our website at CallReplay
Download{.external-link} page.
Technical Specification
VoIP PBX
- Cisco CallManager (all versions)
- CallManager Express
- NEC Univerge - SV8000 series, IP only
- generic SIP
- IPTrade turrets
IP Phones
- All Cisco IP Phones
- All SIP phones
Operating System
- Any Windows OS 64 bit
- VM compatible
Hardware Requirements
- Software only recording system, no proprietary cards
- Industry-standard Intel compatible server supplied by customer
- At least 8 GB RAM and 4 CPUs (6 vCPUs)
- Network connection to voice traffic, using a hub or a mirrored port for promiscuous mode network sniffing
Recording Capacity
- Up to 400 simultaneous calls on a single quad core CPU
Retention Capacity
- Speech compression, VBR, Stereo, 170 hours per GB
- ~ 18,000 compressed talk hours on one 120GB HDD
Supported codecs
- G.711 A-law and μ-law
- G.722
- G.729 (extra options: G.729A, G.729B, G.729AB)
- Opus
Recording Architecture
- Passive network sniffer, Skinny Protocol
- SIP trunk recorder compatible with newer Cisco phones
- Stereo, each party is heard in a different channel
Embedded Database
PostgreSQL 12
Security
- Secure access to recordings
- Managers have access to calls based on logical departments filters
Call records access
- Modern evergreen browsers: Chrome, Firefox, (new) Edge
- Phone Service interface (on Cisco IP Phones 7940, 7960, 7970)
Support
- Technical Support includes Software Upgrades
- TeamViewer software included
2 - Install and Setup
2.1 - Installing on Windows
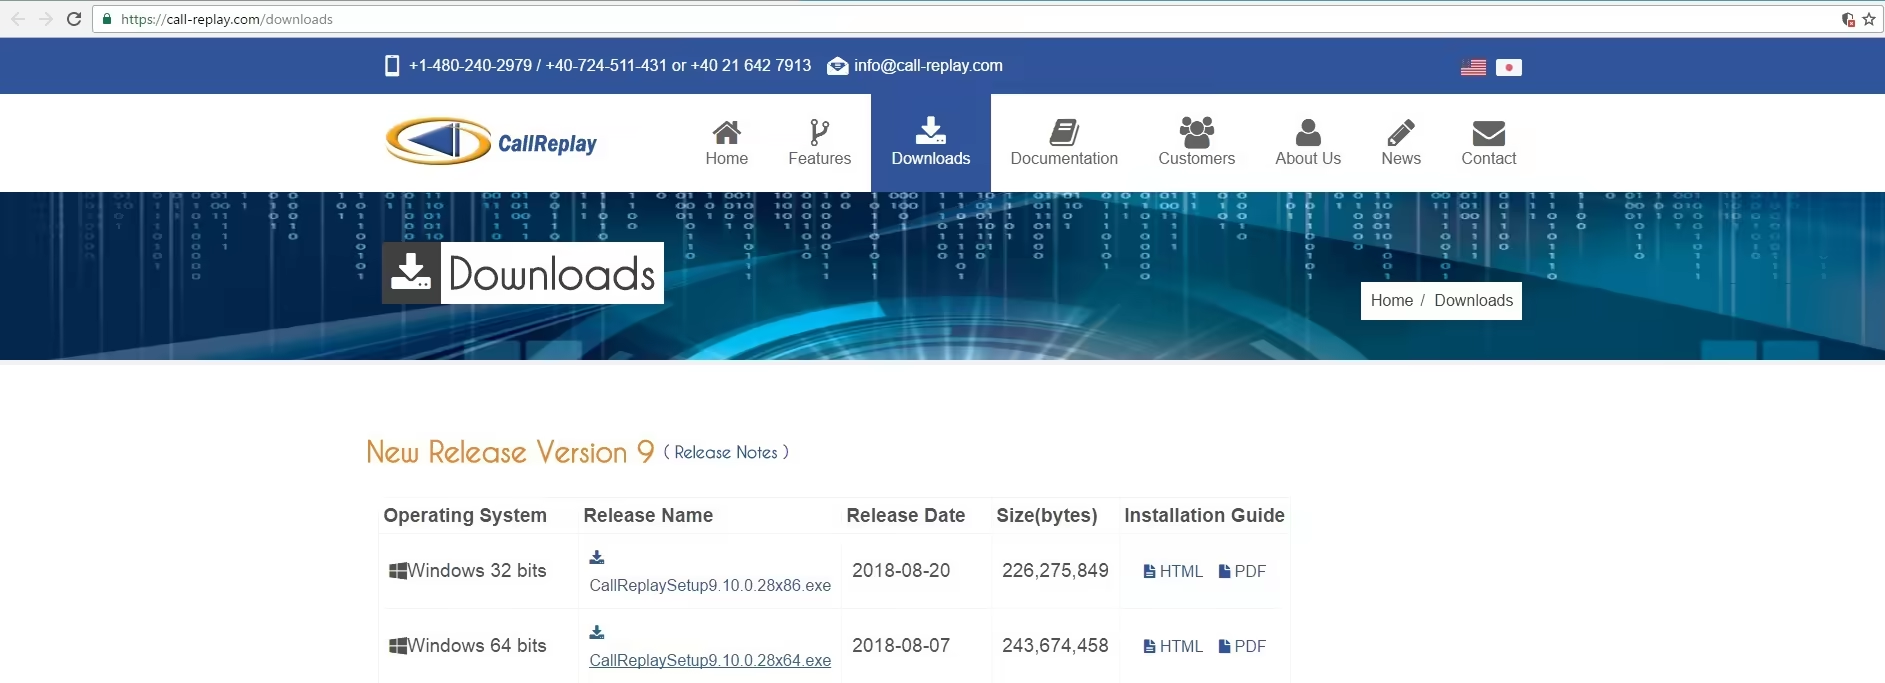
You can download the latest version of CallReplayTM from the
CallReplay Download website.
Earlier versions of CallReplay can be found at the same location.
To install CallReplay v.10 you need to download and run
CallReplaySetup10.0.0.xx.exe
The installation is straight forward and the package contains everything
is required by the system to run without any further intervention. Just
follow the screens.
Welcome Screen
Check if the setup version you are running is the latest available
from our web site.
Launch the setup executable
Select a language and OK
Make sure you have read the
Requirements
chapter before proceeding further.
License Agreement
Click "I Accept" if you agree with our license. You may not use
the software if you do not agree.
Click Next
Destination Folder
Select the destination folder for the application binaries (calls
are stored separately);
Click Next.
Data folder for storing call recordings and database files
This is the folder where all the user data, including audio files, the
database, logs and licenses will be stored. Please select the disk with
the maximum available free space. Use a RAID protected disk for this
folder.
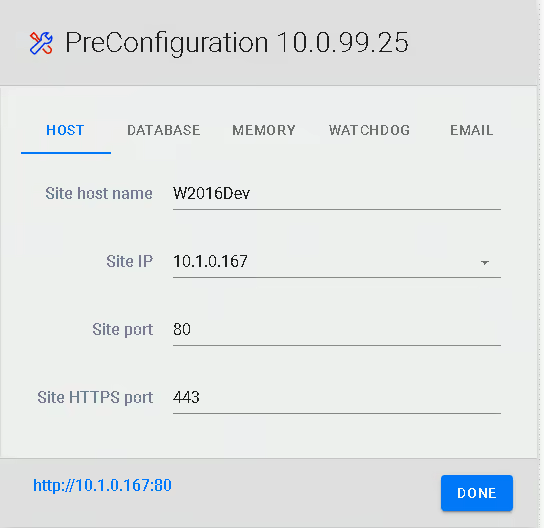
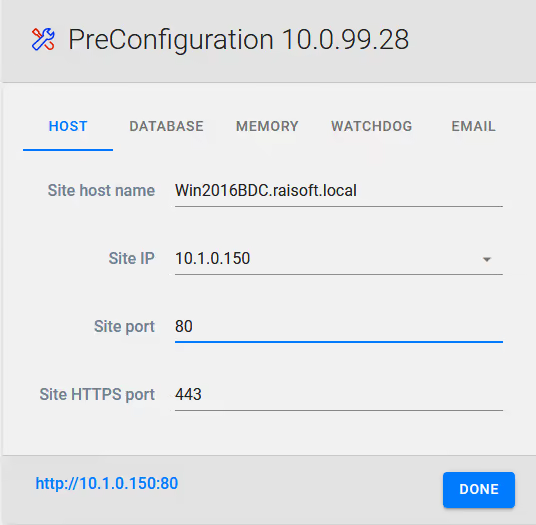
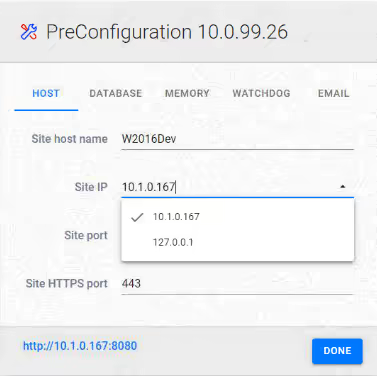
PreConfiguration
At the end of the setup, the Site configuration application will launch
the PreConfiguration web page to assist configuring of the name/IP and
port of the administration web site. The IP of the website is also used for licensing purposes. You can select the minimum version of TLS protocol to use in securing the web interface and services of CallReplay from. v1.0 to v1.3 are available, to allow for backwards compatibility, especially with old phones.
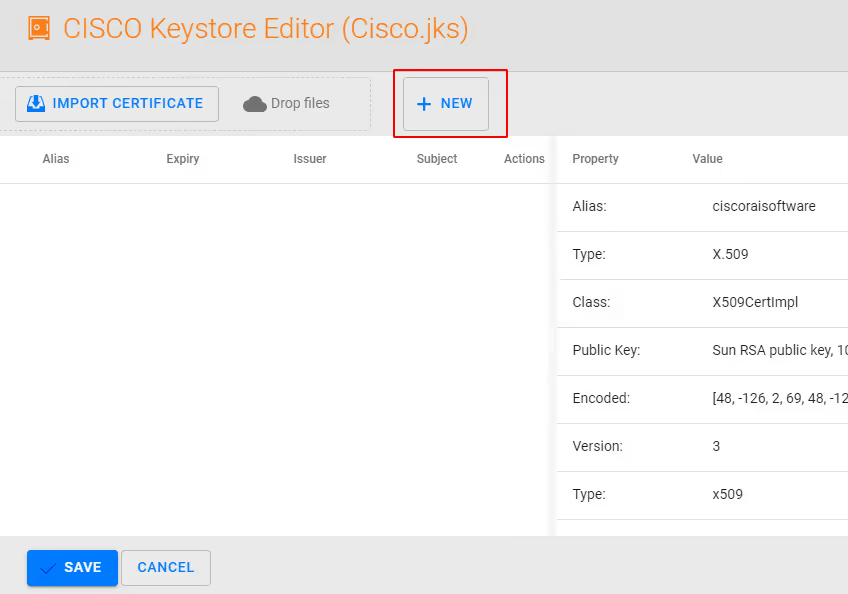
Next, open the keystore page, where you can add a new self-signed certificate, or import an existing certificate, if you wish. Note: if you use a self-signed certificate, the CA will contain the declared FQDN so if it changes, you will have to reissue the certificate..
Press done to start the administration web site.
Database Setup
The default setting for the database password is Automatic (system controlled), so if you need direct acces to the database, you will need to set it on manual and input your password.
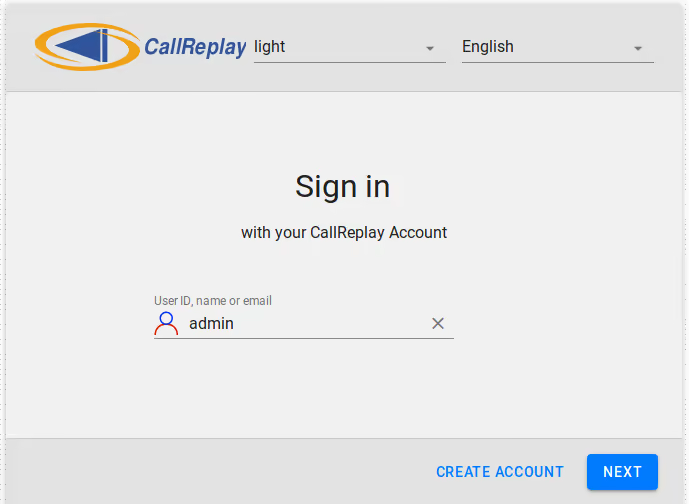
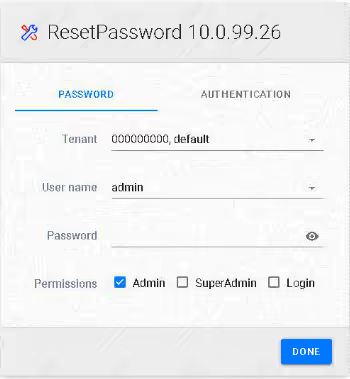
Login page
Enter the user name and password. When running with an evaluation
license, this page always displays the name of an administrator and a
public password "eval" which works for every user.
2.2 - Firewall Setup
Please use the below table as a reference for setting up your firewall rules, according to your security policies.
Port number/range
Transport
Direction
Port description and usage
443
TCP
Inbound
Https Web Interface
21
TCP
Both
Default FTP port for CDR verifier and sending logs
2000
TCP
Inbound
Cisco Skinny
5060
TCP
Both
Default SIP trunk
5061
TCP
Both
Default Secure SIP trunk
4456
TCP
Inbound
IPTrade default port
25000-30000
UDP
Both
RTP voice streams
389
TCP
Outbound
Default LDAP port for login integration
5432/5433
TCP
Both
Default PostgreSQL ports
2.3 - Upgrading CUCM
After upgrading CUCM to a newer version, follow these steps:
Update CUCM version ( PBXs page -> press Edit button on the
upgraded PBX -> update **PBX Version **field )
2. If forked recording is active on the upgraded CUCM, re-run
the forked wizard by pressing
the
button on the required
PBX, from PBXs page grid view.
2.4 - Migrate To A New Server
When you want to move your existing installation to a new server but
preserve all data, please follow the steps:
I. Easiest Procedure
On the old server, shut down the CallReplay and CallReplayDb
services and set their Startup Mode to Disabled.
Copy or move the CallReplay Data Folder (by default, C:\CallReplay)
to the new server. The CallReplay Data Folder is configured once at
installation time and contains the sub-folders Database, Calls,
Licenses, Logs, etc.
Then run CallReplay Setup on the new server. When asked about the
Data Folder to use, point it to the copied folder containing old
data.
After setup completes, you should be able to see the old calls and
play them.
Cleanup the old server. Do not start the old server again after the
license was re-activated on new server.
Note: The Data Folder in Linux is the /var/lib/callreplay/
directory.
Things to take into consideration after the migration:
Forked PBX Reconfiguration
After the migration you may need to run the Forked PBX configuration
again, and make sure that:
* Under the Auth & Service tab, make sure you modify the Phone
service Address (this) field, and fill it with the IP of the new
machine:
* Under the Recording Trunk tab, make sure you fill in again the
Device Pool and the Security Profile fields (if they were
reset):
Different IPs for the Old Server and New Server
In case you migrated between machines with two different IPs, you may
need to run the CallReplay Site Configuration again (from the Start
menu), and make sure you update the Site Host Name and Site IP
entries with the new values of the server.
II. Minimum Downtime Procedure
Install and configure CallReplay on the new server. Verify that
recording works.
Copy or move the CallReplay Calls folder to the new server, into a
new folder. Exclude from copying/moving the sub-folder of current
day.
On the old server, shut down the CallReplay and CallReplayDb
services and set their Startup Mode to Disabled.
Copy/Move the Database folder to the new server, then copy/move the
folder left un-copied at step 2.
On the new server, shut down the CallReplay and CallReplayDb
services.
In the CallReplay Data Folder, move the Database and Calls folders
to a backup folder.
Move in their place the Database and Calls folders copied at steps 2
and 4.
Start the CallReplay and CallReplayDb services.
Review recording configuration (it has the config from the old
server) and verify functionality.
If necessary, Restore the Calls folder backed-up at step 6.
Cleanup the old server. Do not start the old server again after the
license was re-activated on new server.
NOTE
For every migration procedure, both CallReplay server versions must be
exactly the same.
2.5 - Upgrade CallReplay
1. Upgrade CallReplay in Windows
This is a short guide which explains how to upgrade CallReplay to the
most recent version. Please notice that you do not need to uninstall
your current version of CallReplay, nor do you need to delete the calls
history or logs which reside by default inside C:\CallReplay. You
can perform a full upgrade and keep all your current settings and logs
at the same time.
Compatible Windows Versions
CallReplay is known to run on Windows versions starting with, and
including, Windows XP. However, for the server, the recommended Windows
Server version is 2012.
Method #1: Upgrade CallReplay in Windows Manually
You can use this method to upgrade CallReplay or to install CallReplay
freshly, on a system on which it wasn't installed before. In the second
case, just skip the first step below. Follow the next few steps:
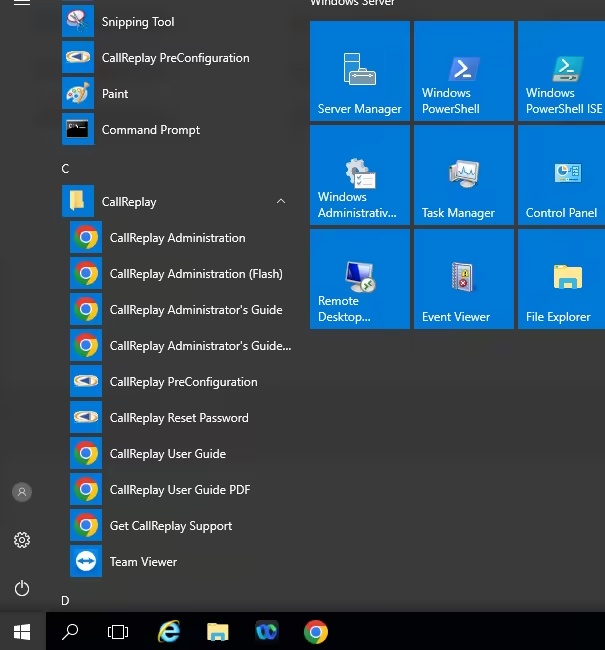
Step 1. Stop the associated Windows services
First, stop the following Windows services, which belong to the
CallReplay platform: CallReplay Call Recorder andCallReplayDB.
An example is shown in the image below:
In the case that the CallReplay Call Recorder service doesn't stop,
you may need to hit Alt+Ctrl+Del, start the Task Manager and end the
task CallRecorder.exe before you stop the services.
2. Download the CallReplay installer
The CallReplay setup program is an executable file. You can download the
latest version from
here. Save it
somewhere on the hard-disk.
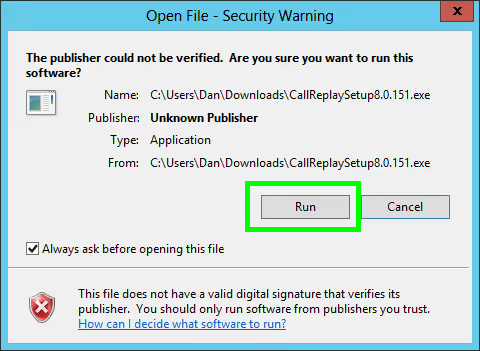
3. Run the CallReplay setup program
Note: Before performing this step, make sure you are logged in as a
Local Account Administrator and any antivirus software is disabled.
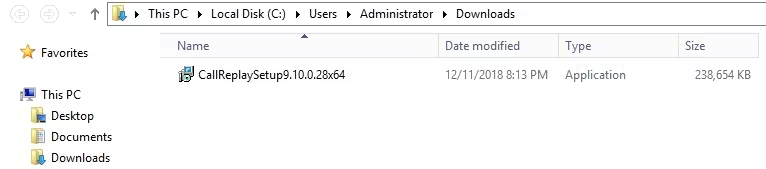
Now you need to run the installer, which may be called something like
CallReplaySetup9.10.0.28x64.exe. You can do so clicking on it in the web
browser downloads window or by opening the file manager, going to where
the setup installer was saved (usually Downloads) and after
that double-clicking the executable setup program.
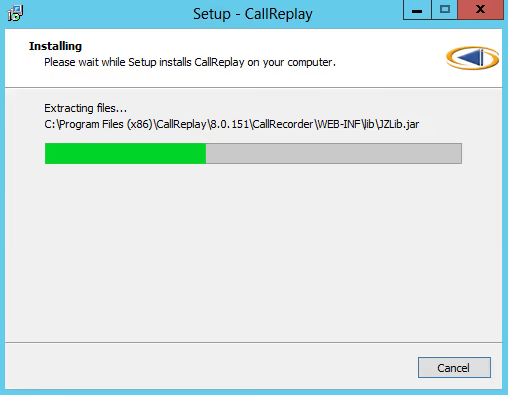
4. Let the setup wizard follow its course
The installer is automated, and you will need only to press Next
throughout the wizard until the installation is complete.
You should leave the values from the Site Configuration window
untouched, and then press OK:
5. Finishing the installationCallReplay v10
Once CallReplay finishes the configuration, it will open a web browser
to allow you to login. If you are installing for the first time, you
will need to pick an administrator username and a password. If you are
upgrading, you can proceed and login with the existing account
credentials.
6. Run the Forked wizard again
If CallReplay is using Forked recording, after the upgrade it may be
needed to run the Forked wizard (Active recording button on the PBX)
again, manually going through each tab starting with the second one
(Auth & Service), using instructions from
here{.external-link}.
Method #2: Installing CallReplay in Windows Using the CallReplay
Software Update Utility
Important: The CallReplay Software Update Tool has been retired.
Please use only the latest full .exe setups
3 - Getting started
3.1 - Your User
Login
To connect to the CallReplay web interface you need to open the URL in
a modern evergreen browser (Chrome, Firefox or new Edge). Classic Edge
or Internet Explorer are no longer supported. The CallReplay URL is:
http://HOST/callreplay
To open the application just enter your user name and password
associated with it, then click Login.
Enter your user name
Enter the associated password
Select language in which you like to see the application
If you forgot your user name or password, contact the system
administrator
3.2 - User Interface
The user interface is divided between the menu area and the working
area.
The menu are consists of a menu with drop-down lists, linking to all
the pages in CallReplay and immediately below, a ribbon with shortcuts
to the most important and commonly-used
pages.
Immediately below is the working area, which displays the pages. Some
pages will divide this area further into 2 zones, with a left tab
showing the categories tree and the right one showing the different
configuration options for the selected
item.
You can resize the interface and font size by holding the Ctrl key and
using your scroll
wheel.
3.3 - Main Menu
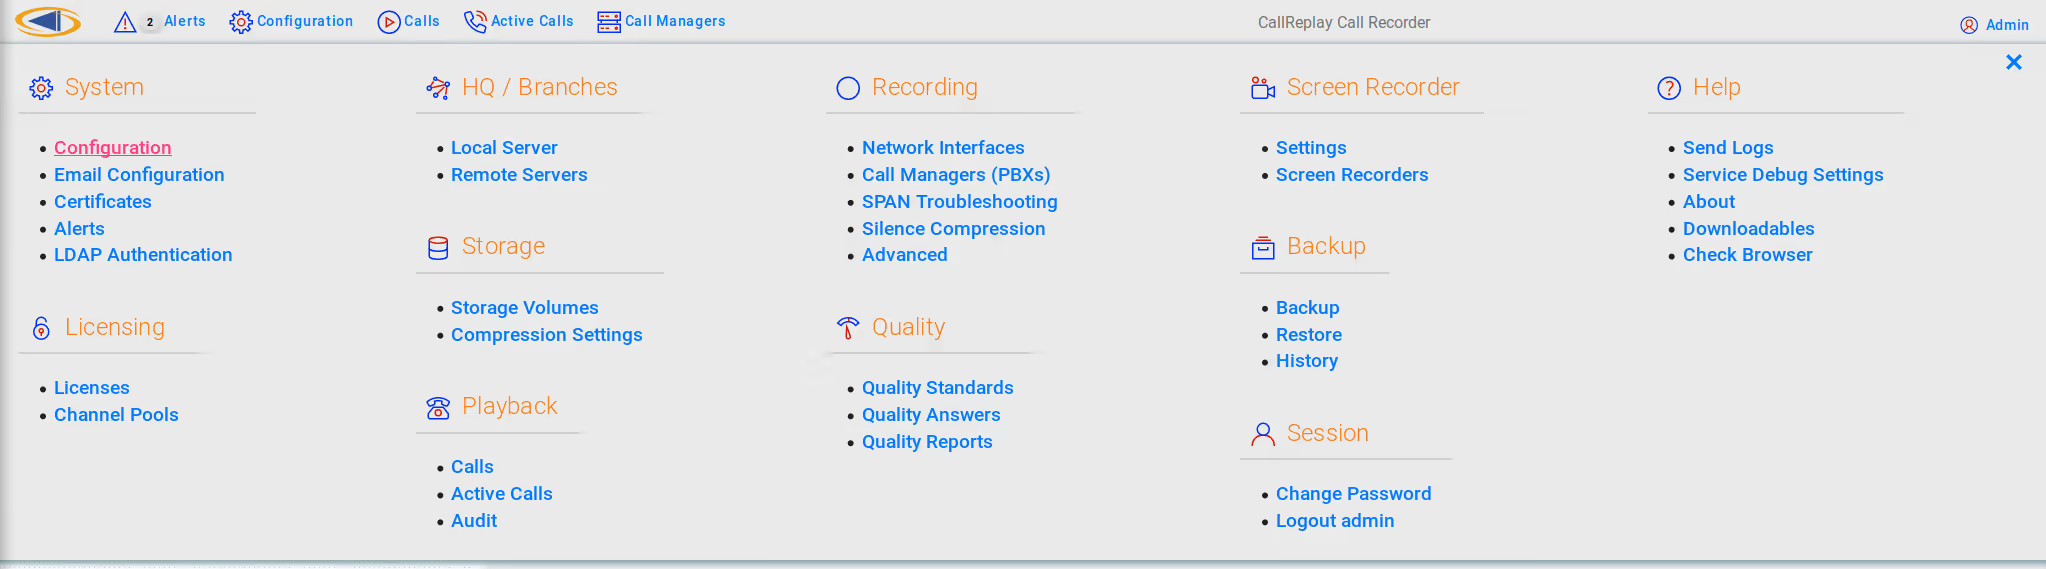
The main menu in CallReplay is accessed my clicking on the CallReplay logo, at the top-left corner of the web interface. From here you can access all the various screens used to configure and run CallReplay.
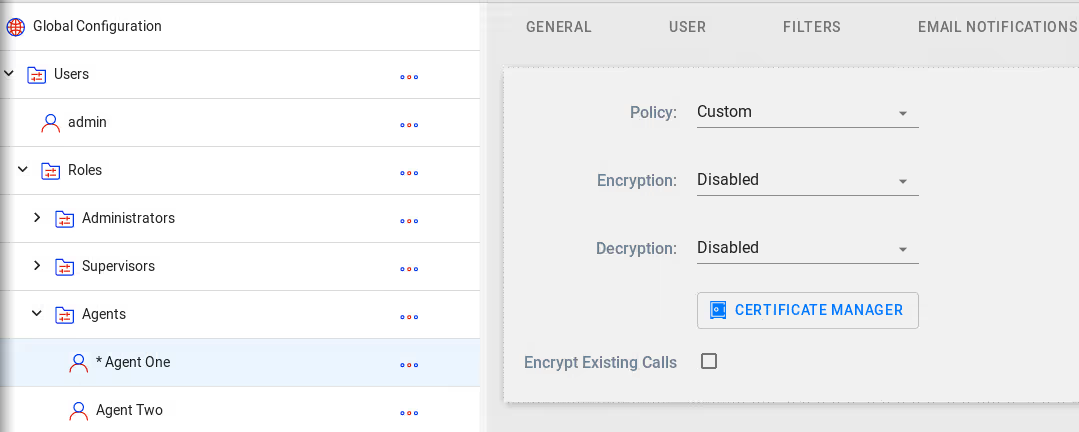
4 - Unified Configuration
4.1 - Configuration Overview
CallReplay v9 uses a new, hierarchical system of adding new users and
roles, with the possibility to configure all the settings related to
these users in a new, Unified Configuration panel.
This system allows inheritance for permissions and recording policies,
with the ability to edit settings on a per-user basis, grouping of users
by folders and management of tags and customers.
This chapter covers the available settings in the Unified
Configuration module, available from the System | Configuration menu.
4.2 - Global Settings
Tags represent an additional method to classify calls and to give
special attributes to selected calls. By using the filters, you
determine which calls are assigned to a tag, irrespective of any other
category they may be assigned to (another tag, or user).
By setting the recording policy you may alter the recording behaviour of
a certain call to a user (for example recording all calls from specific
external numbers, irrespective of the policy that may otherwise apply).
Setting up the Email Notifications enables you to send emails when such
a call starts and ends, so you can, for example make sure e-mails are
sent to the appropriate persons when important calls are being made,
irrespecrive of the usual settings.
Calls assigned to such a tag can also have different retention policy
settings.
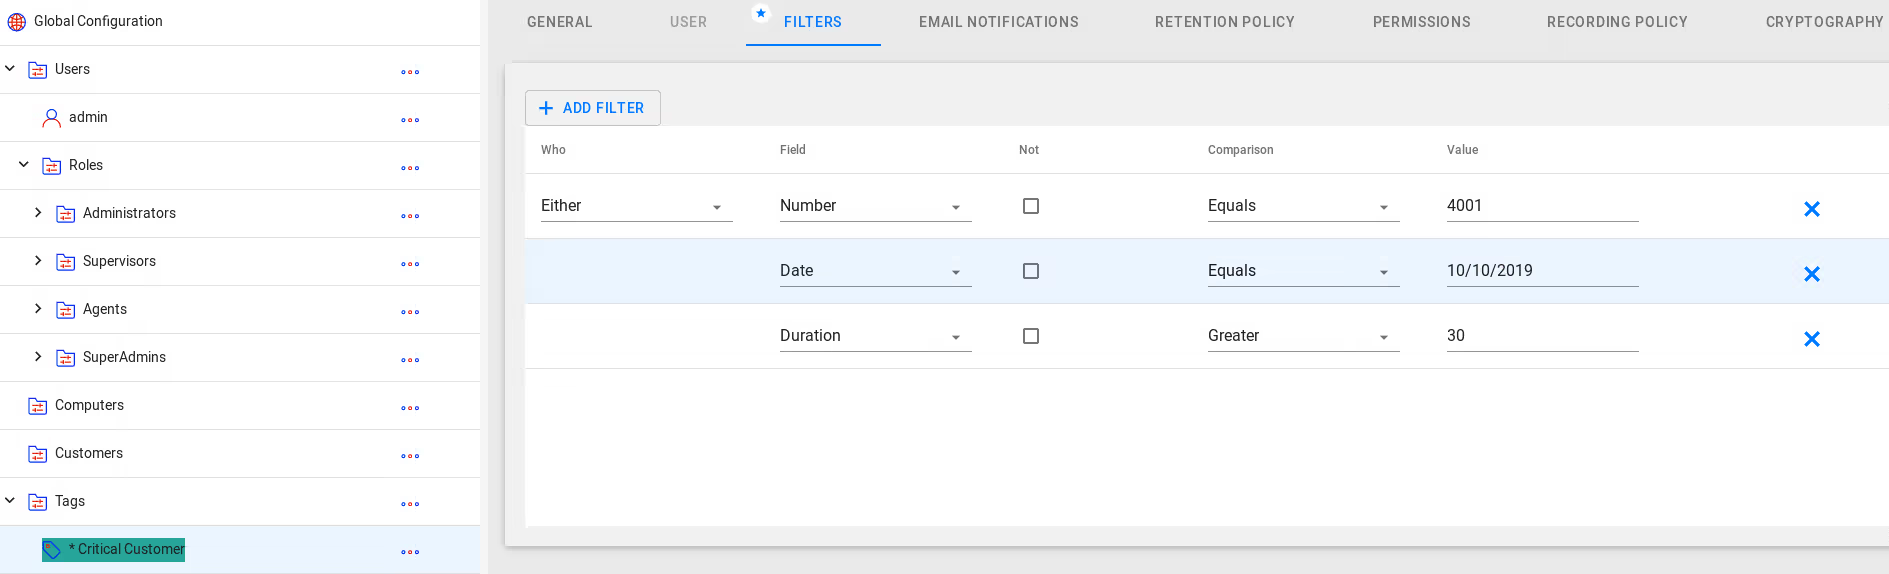
4.3 - Filters
CallReplay can associate call records with a specific item
category (e.g. a user, customer, tag or computer) by matching these
elements using filters that you can create.
To create a filter
Go to System | Configuration.
Select the item category on which the filter aplies.
Click Edit.
Select Filters tab.
Click Add.
To delete a filter
Mark the filter line you want to delete using the check box.
Click Delete.
Click Yes, in the Confirmation dialog.
You can define multiple filters in order to reach complex matching
criteria
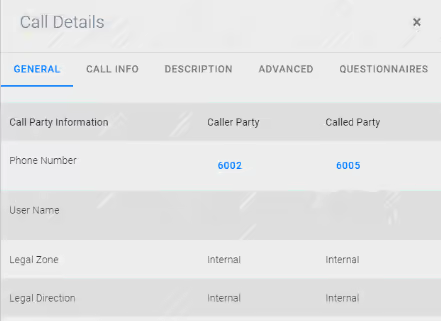
The "Who" field will compare the either the source, destination
or both against the filter
The "Field" contains the elements that can be filtered:
Number - the extension/telephone number of a party
Name - the name of a party, as defined in CUCM
MAC - the MAC address of a party
IPAddress - the ip address of a party
Description - the call description, which is filled in the call
details menu
Duration - the duration of a call, in miliseconds
Date - the date of a call
Suid - the user ID of a party, in an IP Trade call
The "Not" checkbox will negate the result of the filter
The "Comparison" field enables you to make different types of
matchings to the declared value:
Equals - values have to match
Starts with - the declared value must be found in the begining
of the compared value
Ends with - the declared value must be found in the end of the
compared value
Less - the declared value must be lower than the compared value
Greater - the declared value must be greater than the compared
value
Between - the compared value must be between the two declared
values
In - the declared value must be found in the body of the
compared value
Contains - the declared value must be found in the body of the
compared value
Is Empty - the compared value mst be empty
Wildcard(*) - enable use of wildcards (use _ (underline) to
match one character, and % (percent) to match multiple
characters)
RegEx - enable use of regular expressions
The "Value" field is the value that will be compared to the
selected type of element
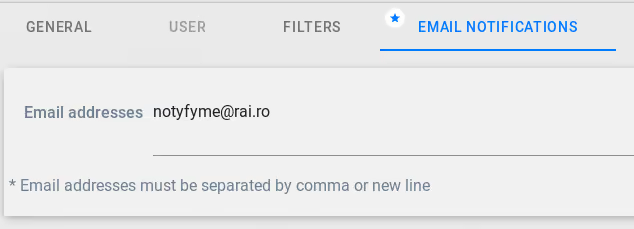
4.4 - E-mail Notifications
In the Email Notifications tab you can add addresses to which emails
will be dispatched as soon as calls matching the respective user are
recorded by the system.
You can add multiple e-mail addresses here, where the E-mail
Notifications for this user will be sent
In order for this to work the SMTP need to be configured. Please refer
to E-mail Configuration sections for more details on how to configure
SMTP.
Two e-mails will be sent, one at the start of a call and one at the end
of the call. They include the call details, as well as a link to the
respective call, in the CallReplay interface. Note: the recipient will
have to login with a user that has replay permissions for that call, in
order to access the URL.
4.5 - Permissions
Newly created users and folders will inherit permissions from their
parents. Permissions can be modified however on a per-user basis.
Changing a folder's permissions will change the permissions of all
children that inherit those permissions.
When a permission is inherited, the inherited value and the node it is
inherited from will be shown between brackets. It is possible to change
any permission, as long as you have the right for that permission
yourself. Permission changes will also inherit down the inheritance
line, so changing any permission will change it for all it's
inheritants.
This feature is available only for items of user type
To configure permissions
Go to System | Configuration.
Select the user for which you want to change permissions.
Click on Permissions tab.
Replay Calls - allow or deny access to replaying calls (allow
setting will show name tags on the right, clicking on them will edit
the users or folders for which the recorded calls can be played)
Is Admin - grants an administrator the rights to change settings
within the tenant he is a member of
Replay All Calls - gives permissions to replay all calls,
irrespective of the selection made at "Replay calls"
Delete Calls - gives permission to delete calll recordings from
CallReplay
Edit Tags - grants the permisson to edit tags
Super Admin - grants super administrator rights to a user, allowing
to create tenants and change global settings, tenent-independent
Assign Customers To Calls - grants permission to assign existing
customers to calls and to create new customers as well
Login and Replay Own Calls - grants the permissions to log in the
web interface and replay calls
Export - grants the permission to export any call that can be
replayed
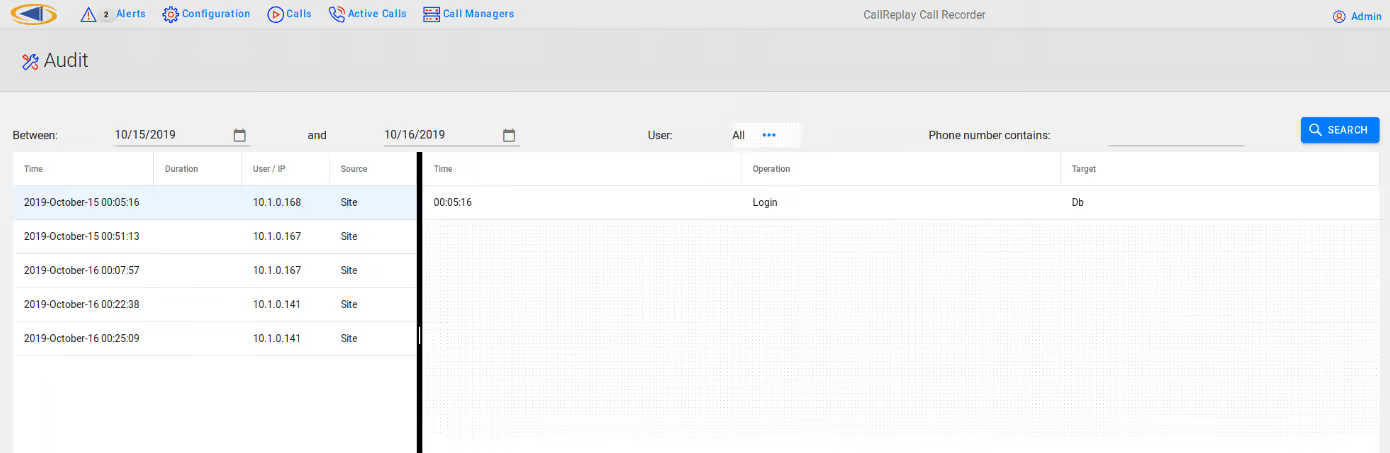
Audit - grants access to the audit page
Assign Tags to Calls - grants the permisson to add tags to calls
Stop Active Calls - grants the permission to stop the recording of
an ongoing call
Do Not Record - obsolete
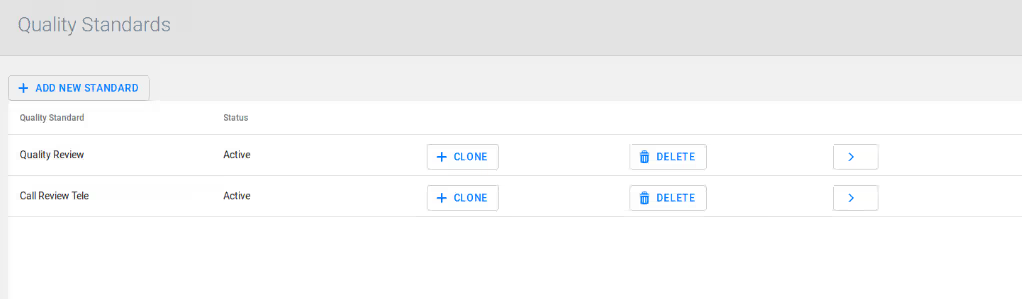
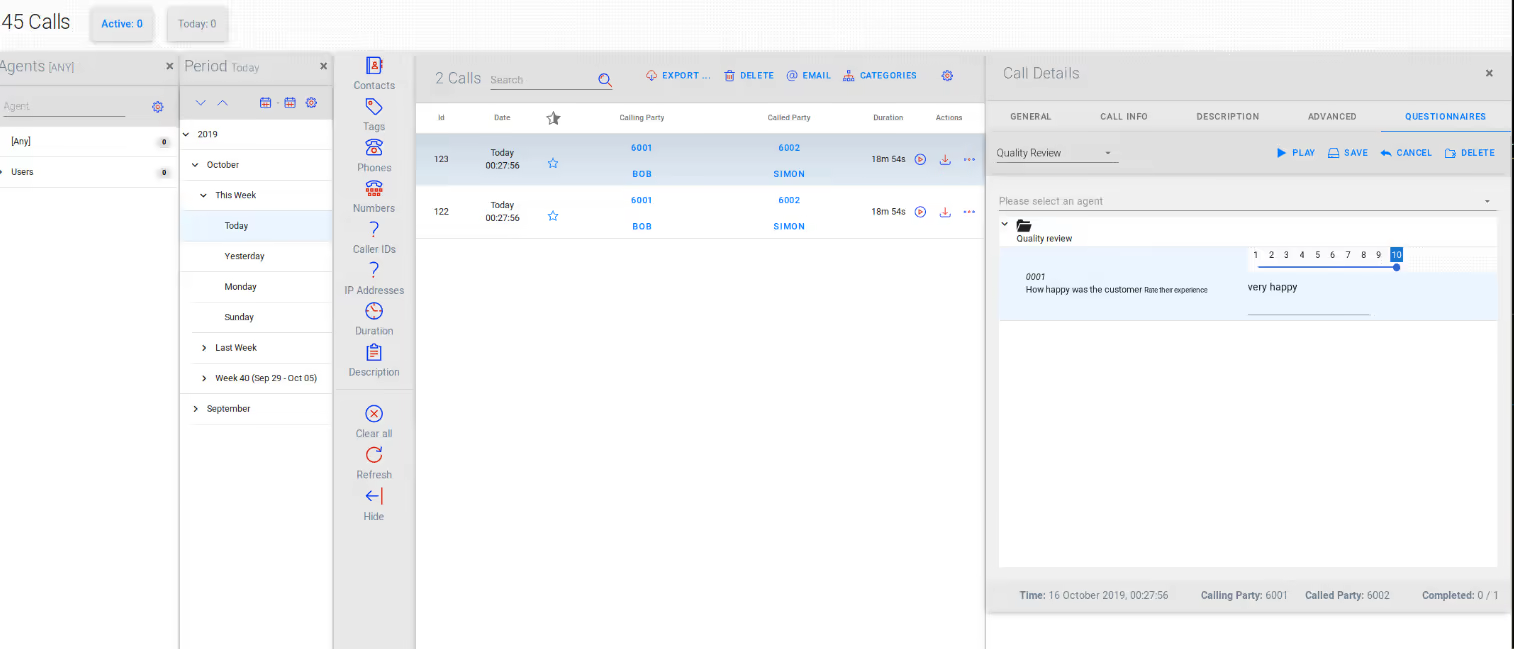
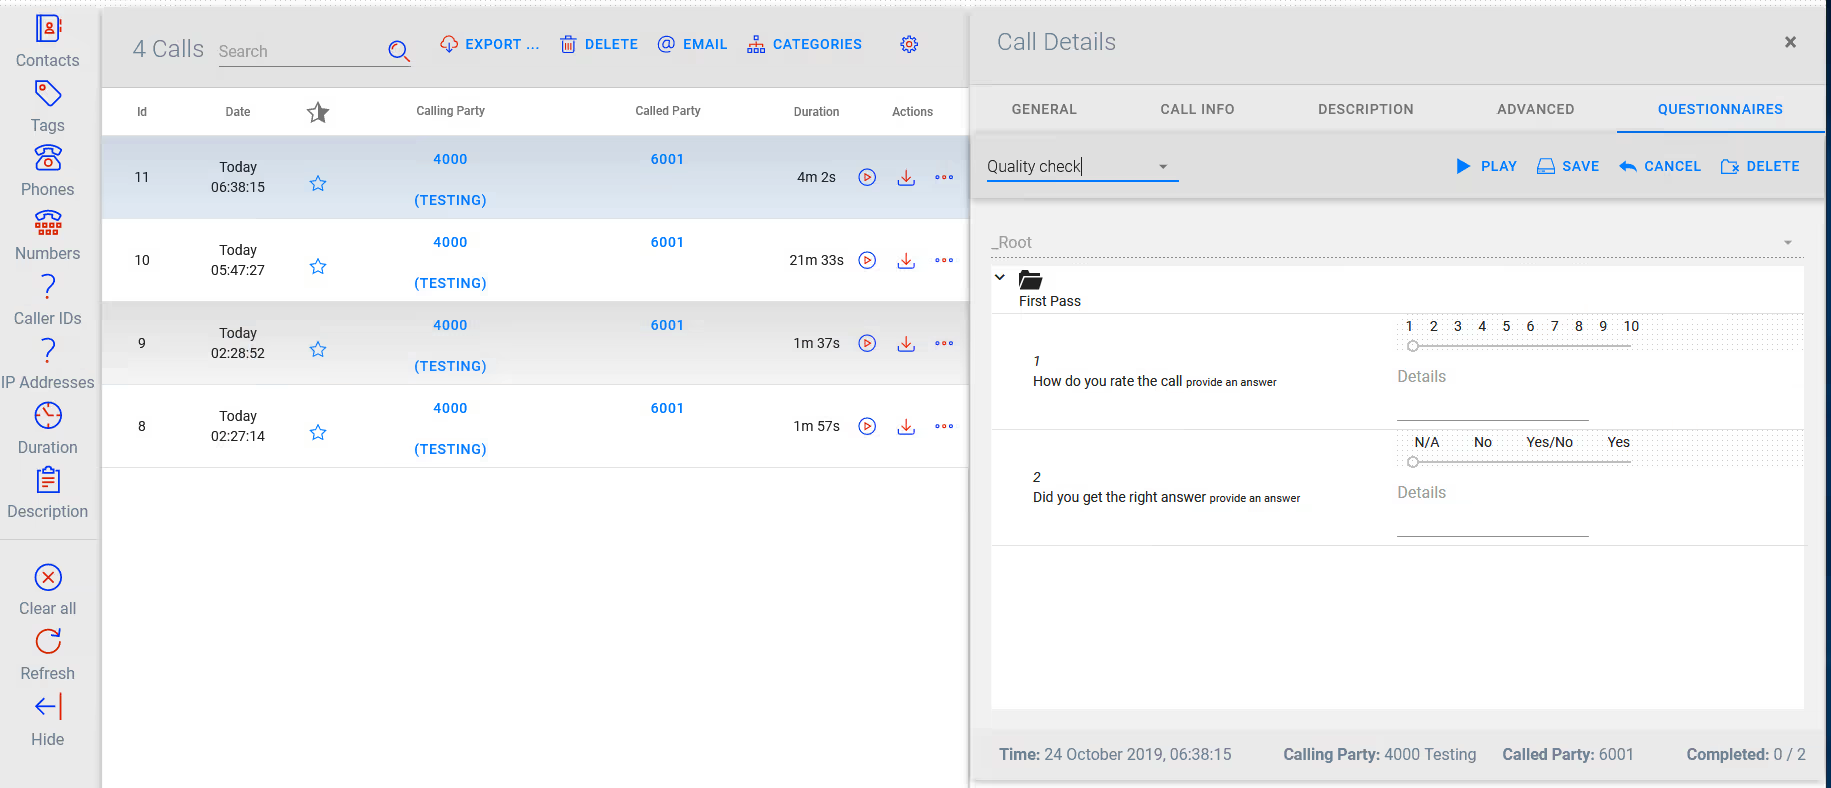
Edit Quality Standards - gives access to quality standards
management (add and edit questionnaires)
Fill Questionnaires - grants permission to fill questionnaires on
the recordings that are available
View Quality Reports - grants access to the Quality Reports menu
Create user - grants the permission to create new users, with the
ability to edit the same permissions that are available for this
user
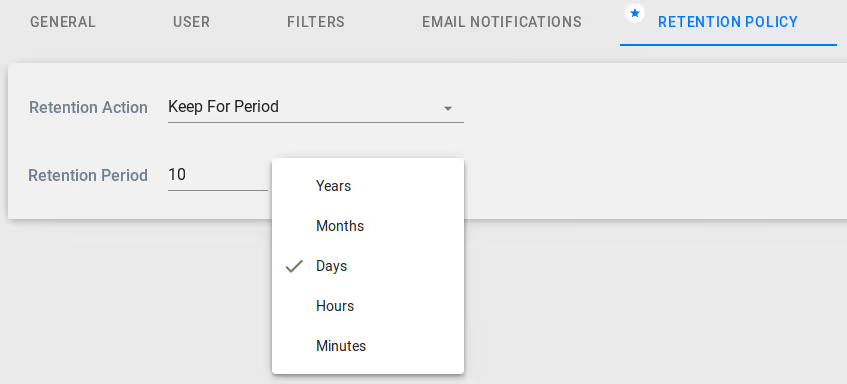
4.6 - Retention Policy
CallReplay can respond to various data retention requirements and can be
configured in various ways in order to meet such requirements. By
default, CallReplay keeps call records until there is no more storage
available.
To set retention policy
Go to System | Configuration.
Select item category for which you want to customize the retention
policy.
Click on Retention Policy tab.
Keep For Period - it will keep the user's recordings for the
specified amount of time, then delete them
Keep Until Backup - it will keep the user's recordings untill
they are backed up, then delete them
Keep until Space Required - will keep user recordings untill the
set amount of disk space is reached.
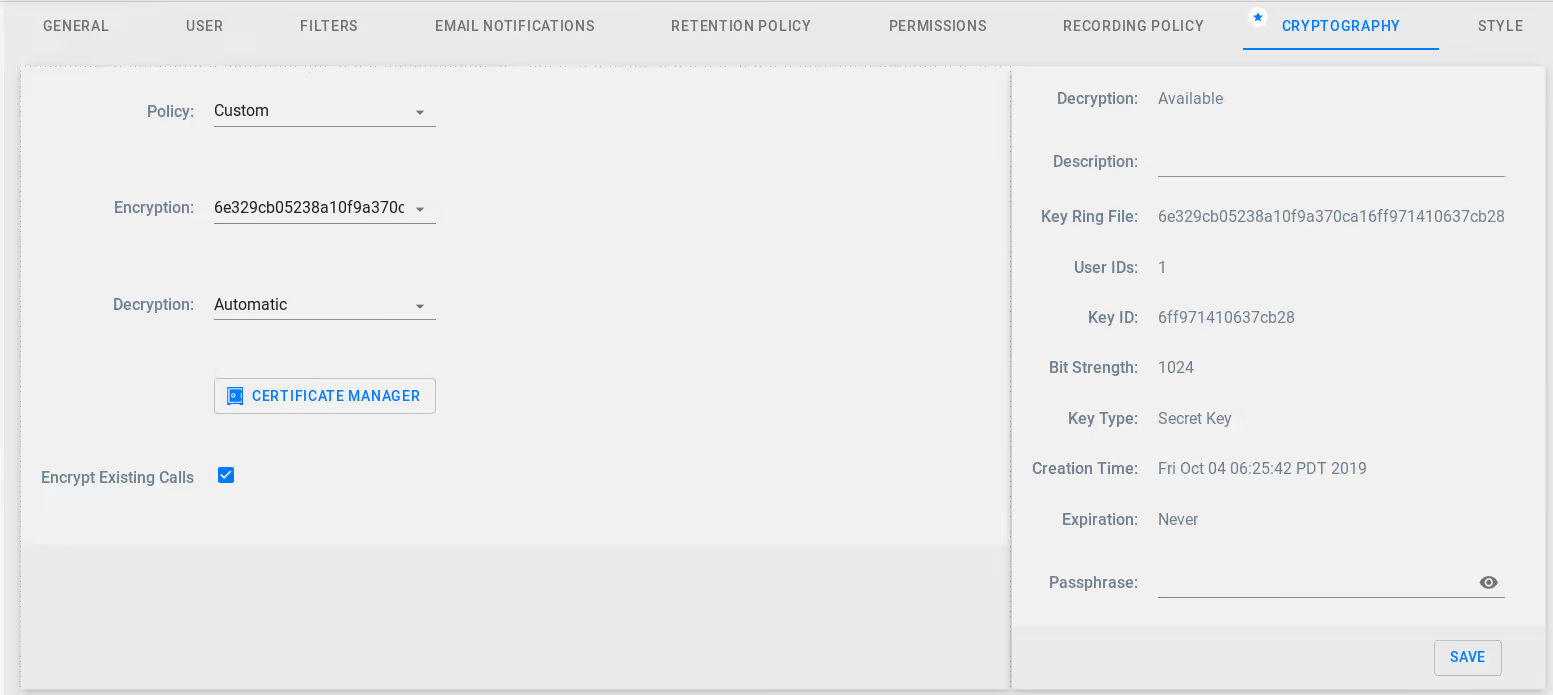
4.7 - Cryptography
Cryptography allows the encryption of the recorded calls with the use of
imported or self-generated certificates.
Before using this feature you need to have valid license that support
encryption. Otherwize you will get
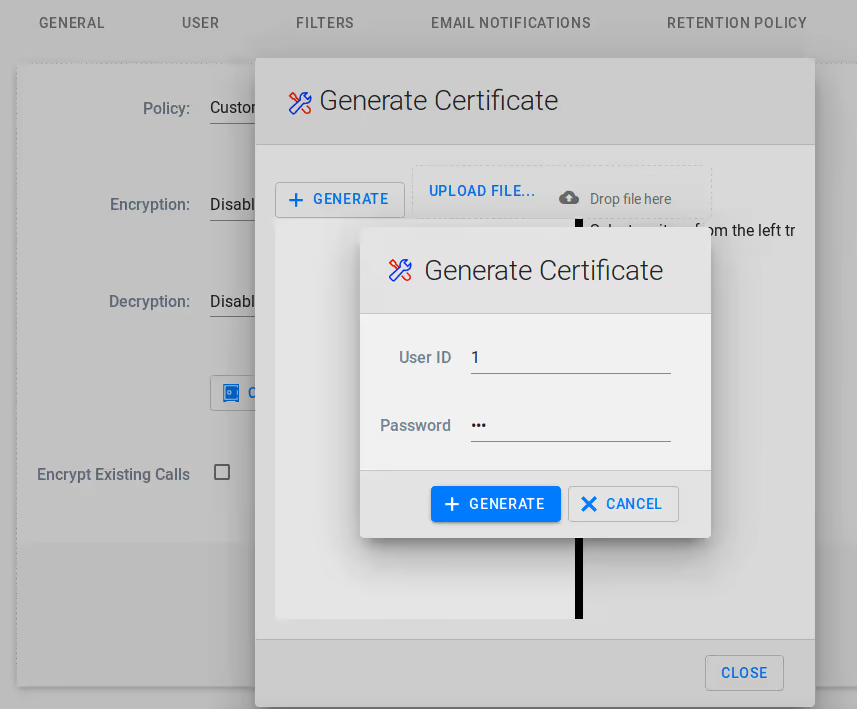
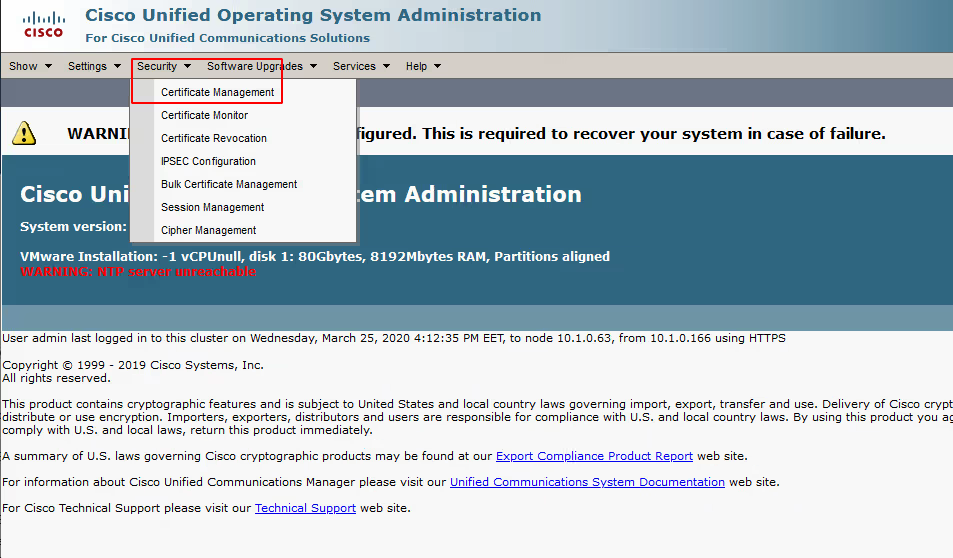
In order to enable records encryption, you must first add a certificate.
Please open the Certificate Manager link. In the upper left of the
Cryptographic Key Manager window you can choose wether to upload a
certificate or generate a new one.
For a new certificate you will need to provide a User ID and a private
key passphrase - your certificate password.
After generating or uploading a certificate, close the window and
select it for encryption. Next, select how you want the recordings
decryption to be handled:
Automatic mode will decrypt the calls automatically when playing
them from the CallReplay interface
Passphrase will ask for the certificate's passphrase when playing a
call from the web interface
Disabled will not allow the recordings to be played from the web
interface
Encrypt Existing Calls - you can choose if you want to encrypt existing
calls with the new certificate, or just encrypt new calls
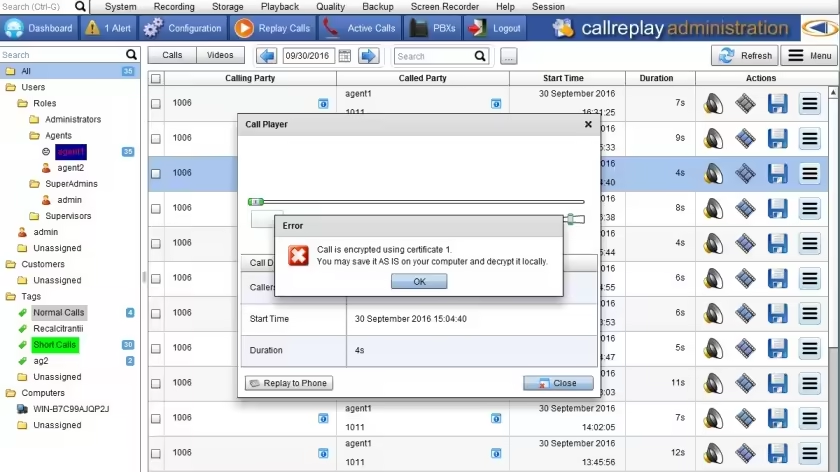
When playing a call, if Decryption mode is Passphrase, you will be asked
for the passphrase of the certificate used to encrypt the call.
If the Decrtyption mode is Automatic, the call will be decrypted
automatically and played.
If the Decrtyption mode is Disabled, You will be informed that you need
to save the call as it is on your PC, then decrypt it locally using PGP.
4.8 - Recording Policy
Recording policy has been integrated into the new unified configuration
menu, so it is now possible to customize it for departments or even
users. Inheritance works for recording policies as well. You may change
the settings for a particular user, folder, or just go with the default
policy:
The Call Recording Trigger determines if calls are recorded
automatically, on-demand or not at all
The Screen Recording Trigger is deprecated
Channel Pool subscribes the user to a Pool, please make sure enough
channels are provisioned to the selected pool
On Demand Approval determines if the full call is recorded, or if
the recording is done after the request
Enabling Record Unlicensed will register calls that do not match the
recording policy, but they will have no audio recording available
Incoming, Outgoing or Internal recording determines if a call is
recorded, based on the direction of the call
For proper call direction determination, you need to set the External
PBX Trunks in the PBX configuration interface. For details, please
consult the CallManagers (PBXs) Configuration page
Recording Parked and Transferred calls will keep recording such a
call regardles of the next leg's policy
Remove Empty will delete all recordings with no associated audio
data
Lookup Party Name will get the CallerID value from the PSTN and
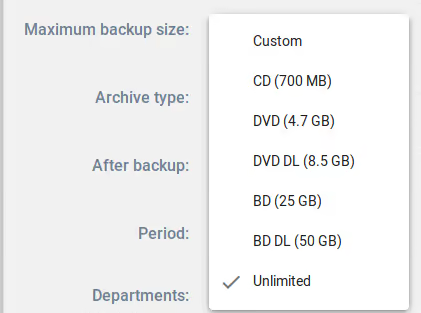
associate it
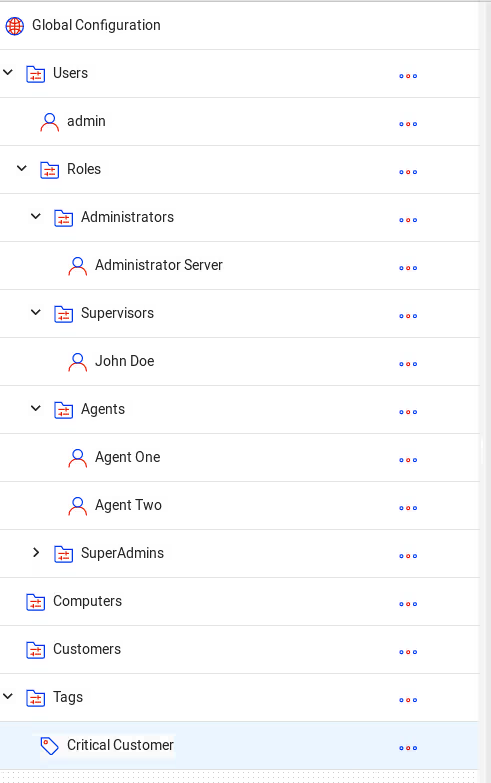
4.9 - Category Tree
Users and departments are managed in a category tree which allows
inheritance for permissions and recording policies. On a clean
installation, the Category Tree will be similar to the structure shown
in the screenshot below:
System > Configuration
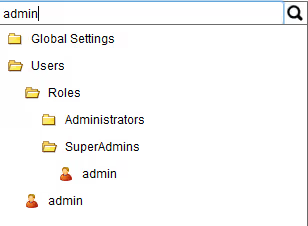
The top search field allows you to quickly search and display only the
objects matched by the search criteria.
By default, a pre-defined, logical structure is available, defining
several folders and the admin username. Each child entry will inherit by
default from its parent, however, any option can be overriden by
specifically changing its value from Inherit to something else in the
respective Recording Policy or Permissions tab.
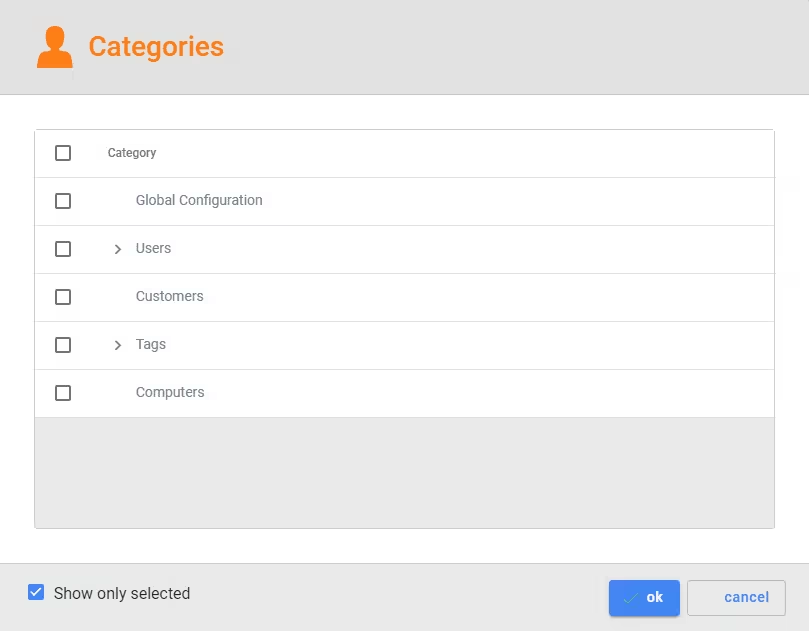
The categories may contain three types of objects: folders, users and
tags.
The Global Settings is the root object of the tree, and has all its
inheritable permissions set to a default. Any child who has an inherit
permission (as opposed to an explicit permission set manually) will
inherit that permission from its parent. Inheritance calculation goes up
the tree until the first explicitly set permission is encountered. This
permission will also be the one that eventual children will inherit.
The Global Settings folder acts as a logical fallback for added users or
folders that will not have set their permissions explicitly.
The Computers special folder will get populated with computer
hostnames that are added to Screen Recorder.
The Customers folder contains all the customers that users create.
Customers can be ussed to identify and classify calls, store basic
customer info, as well as setting different policies for them.
The Tags folder, groups the various created tags.Tags are used to
classify certain calls and can impar different policies to them,
behaving simillar to Customer type categories.
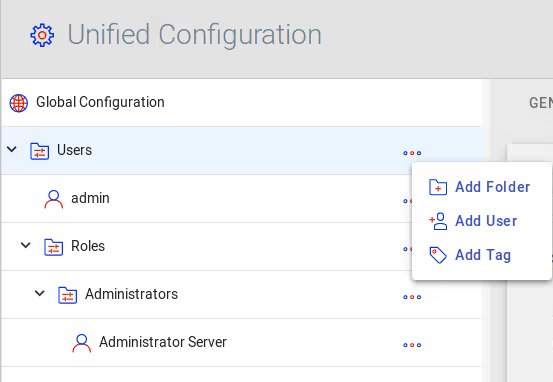
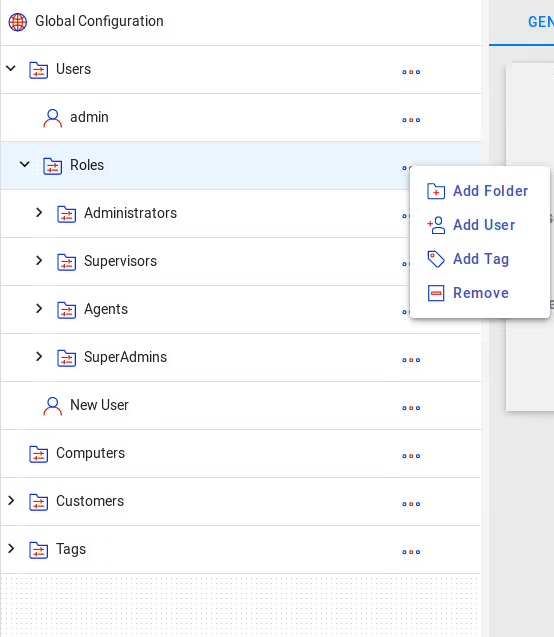
Adding new entries
To add a new entry to the system, mouse-over the category under which
you want to add the user and click on the icon that pops up, as shown in
the below screenshot:
A menu allowing you to add a user, folder or tag will appear. Once you
click the desired entry (User, Folder or Tag), the Edit Mode will be
enabled, allowing you to fill in the details of the newly created entry:
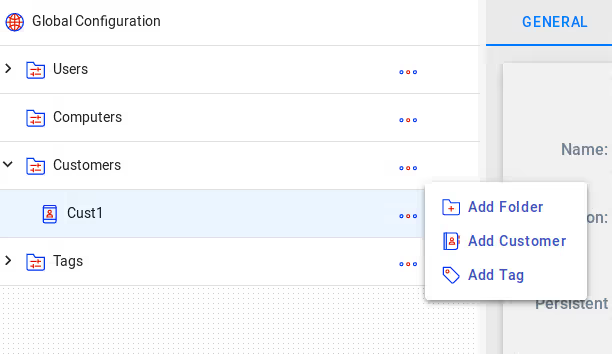
4.10 - Tags and Customers
The Tag and Customer category types can be used to classify calls for a
better oranization of recordings, to set different policies to calls or
to send notifications when certain calls are being made.
These 2 categories do not have the User and Permissions tab, which is
what sepparates them from the user category. In addition, the Customers
category has a Customer tab which contains the customer data.
Customer ID
Name - the name of the customer
Email - the email address of the customer
Address - the physical address of the customer
Website - whe websire address of the customer
All other tabs serve the same functions as in the User category.
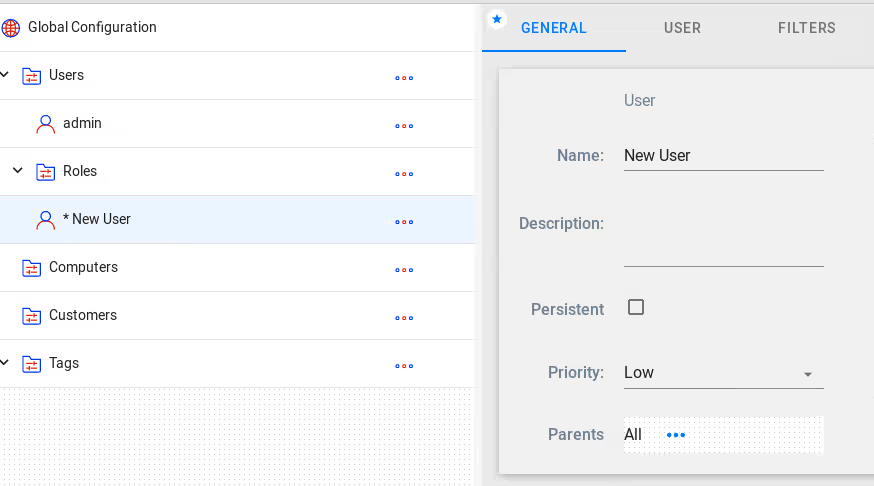
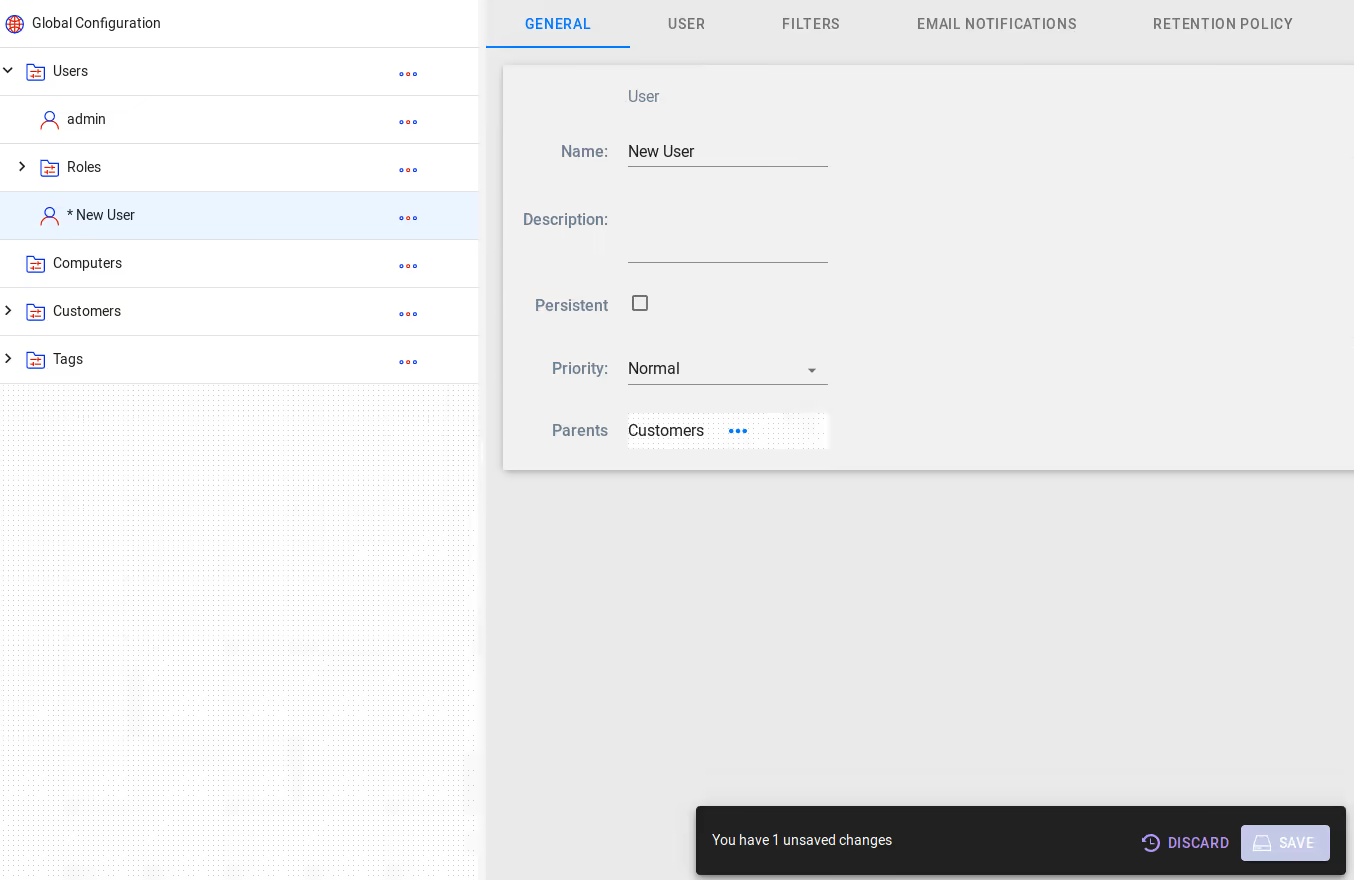
4.11 - General Tab
The General tab allows you to set the name and description of a node, as
well as select which nodes are its parents.
Menu > Configuration > Edit
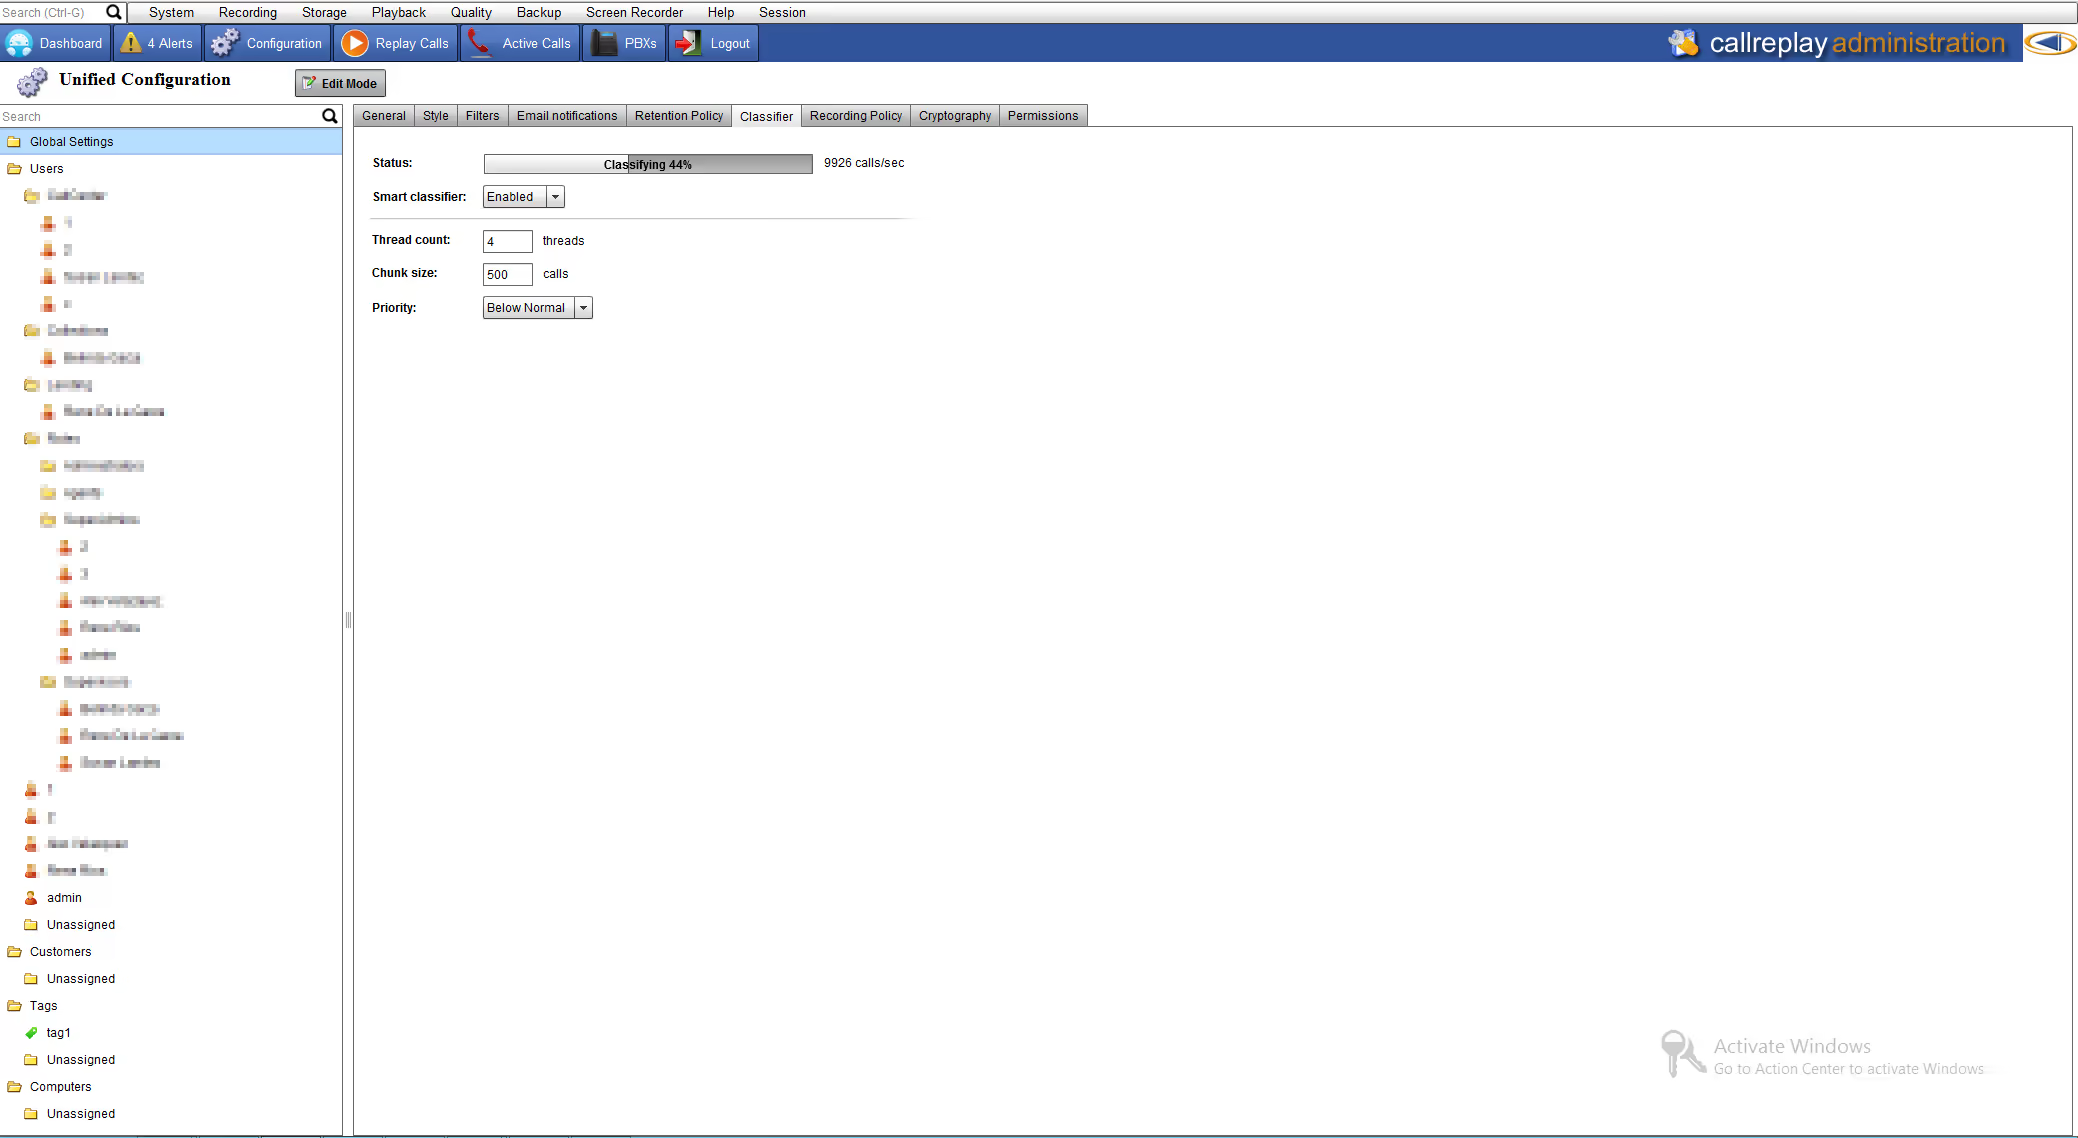
4.12 - Classifier
The classifier is a back-end mechanism that looks at a call's
properties and then compairs them against each category's filters.
When a call starts and when it ends, the classifier compares the call
against all the filters and assigns that call to one or more categories.
This means that at the call's start, the classification will determine
wether the call is recorded or not and other properties, depending on
the category that receives ownership of the call. At the call's end the
duration might get compared against existing filters which might assign
the call to even more categories.
The classifier is also invoked whenever a new filter is added, or an
existing one is modified, checking all existing calls against the new
filter.
Status shows the status and speed of the classifier
Smart classifier is the default option, disabling it turns the
classifier into a "safe mode" classifier - do not change unless
explicitly instructed by CallReplay support staff
Thread count: sets the number of threads the classifier will use.
Lowering the value will make the classifier work slower, but will
decrease CPU load. This should be set accordingly to your CPU
resources and third-party CPU load.
Chunk size: the number of calls it processes at a time - do not
change unless explicitly instructed by CallReplay support staff
Priority: sets the priority of the classifier against other
CallReplay functions - do not change unless explicitly instructed by
CallReplay support staff
4.13 - Roles
Roles are collections of permissions similar to Windows user groups. The application has 3 built-in roles: Administrators Group, Supervisors
Group and Agents Group.
Administrators
can configure the application which includes adding other users, upgrading it or configure system-wide settings may take any action on any call
Supervisors
can replay his own calls and the calls in al the departments and their sub-departmentes.
Agents
can only access his own calls
An administrator can also configure the application so that a manager
can only replay calls, with the exception that a manager can view all
calls within the filter set. The administrator account settings are made in application web site.
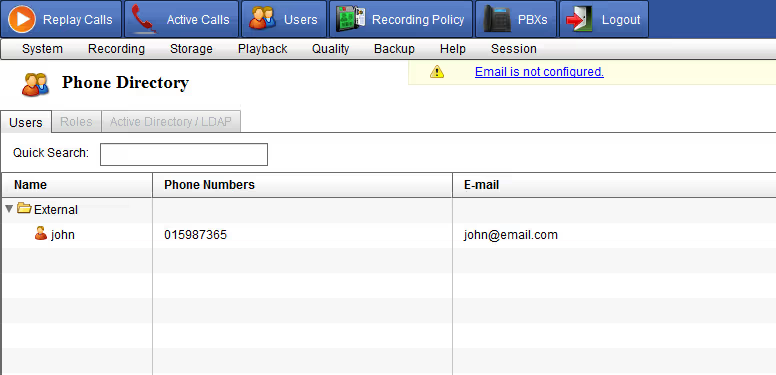
4.14 - Phone Directory
Phone Directory
This feature allows to identify the caller and destination phone numbers
of a call when caller ID is not available. You can organize your
contacts hierarchically on organizations and sub-departments by clicking
on System / Phone Directory.
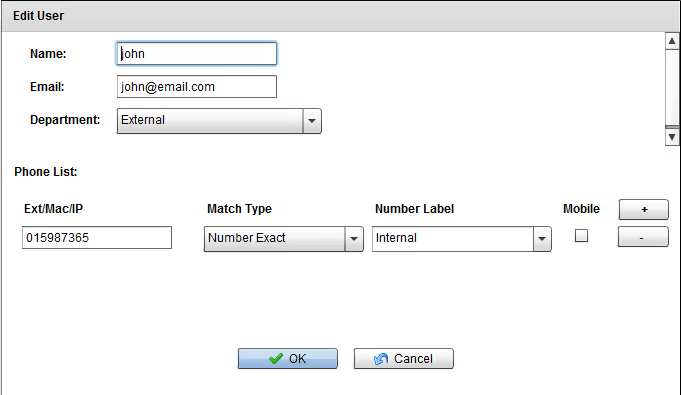
Adding External Organization / Department
Press Add button and choose Add Directory for adding new directory.
Adding a new external contact
Press Add button and choose Add User for adding new contact. Each
contact can have one or more phones After adding an external contact, each call with that contact will have
it colored in blue, with a tool-tip when hovering the cursor over the
contact name.
4.15 - Email Configuration
Enter your SMTP server credentials (SMTP server, Authentication
User, password).
The Admin Email Password is also used for critical alerts.
Click Save.
System > E-mail
SMTP Server: The IP or FQDN of your SMTP Server.
SMTP Port: 25 is standard.
TLS: Most people do not use TLS security. This should be
left unchecked.
POP3 Server: If the Mail server leverages POP3, input the IP or
FQDN. Most people do not use this, so it may be left unchecked.
Authentication User/Password: If the Mail server requires
credentials, input the User/Pass.
From E-Mail Address: When low level emails, like exporting a call,
the From Address will be used as the From address in the email.
Admin E-mail Address: When System Level emails need to be
transmitted to the CallReplay admin, the Admin email address will be
who receives those emails.
System level emails may include:
* Running low on storage.
* Calls have not been recorded for X days.
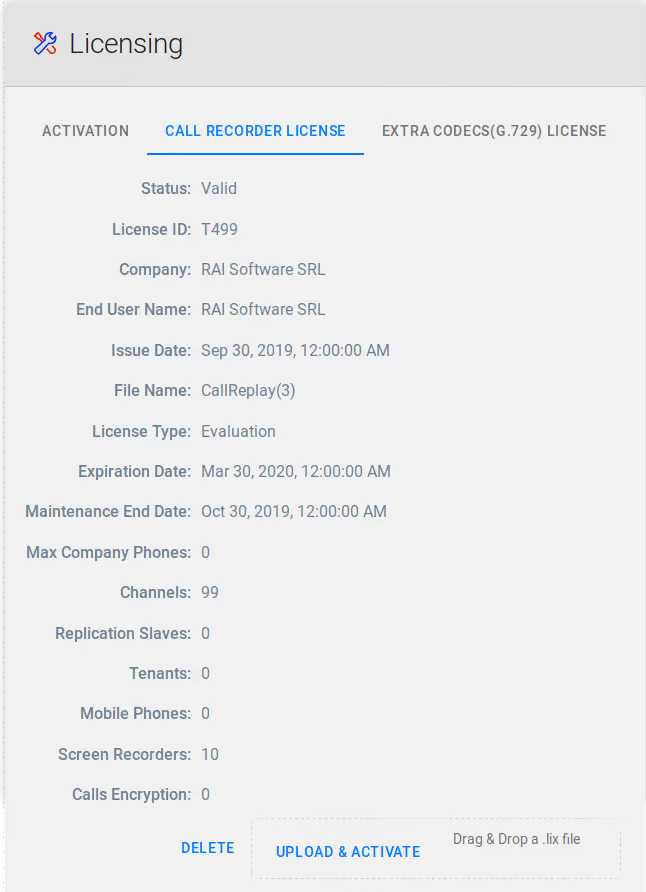
5 - Licensing
CallReplay Licensing
5.1 - License Management
Overview
Before using CallReplay you need a valid license. Depending on your
specific needs, RAI Software can provide the following licenses:
.lix is a generic license, not-activated or bound to any
computer.
.bind is an activated license file which only works on the
computer where it was activated. Only production licenses need to be
activated.
User Agreement Violations
Loading the same license file (that is, with the same license ID)
on two servers at the same time.
Using the license file after it has been revoked or superseded by
a newer license file.
Add License
To add a new software license file, select System | Licenses from the
menu then click the Upload button. The license fill will be
automatically activated if necessary and stored in the
DataFolder/Licenses directory.
If you have troubles with licencing CallReplay, please contact our web
site for license verification, please open the Manual Activation link
(http://lix.call-replay.com/Lix/ManualActivation/) on a computer
with Internet access and fill in the requested information.
Company Wide Recording (CWR) License
If you have a Company Wide license type, ensure that application can
contact CallManager to establish the number of registered phones.
This licensing model is obsolete, do not configure it unless
instructed by technical support.
You must supply a user name and a password in the “Company Wide
Recording” tab, which is used for authentication with the CallManagers.
This user must be the same on all the specified CallManagers. The
password must be the same on all the specified CallManagers. You don't
need to specify the password each time that you make an update in the
configuration page, but only when you need to change the existing
password.
System | Licensing | License
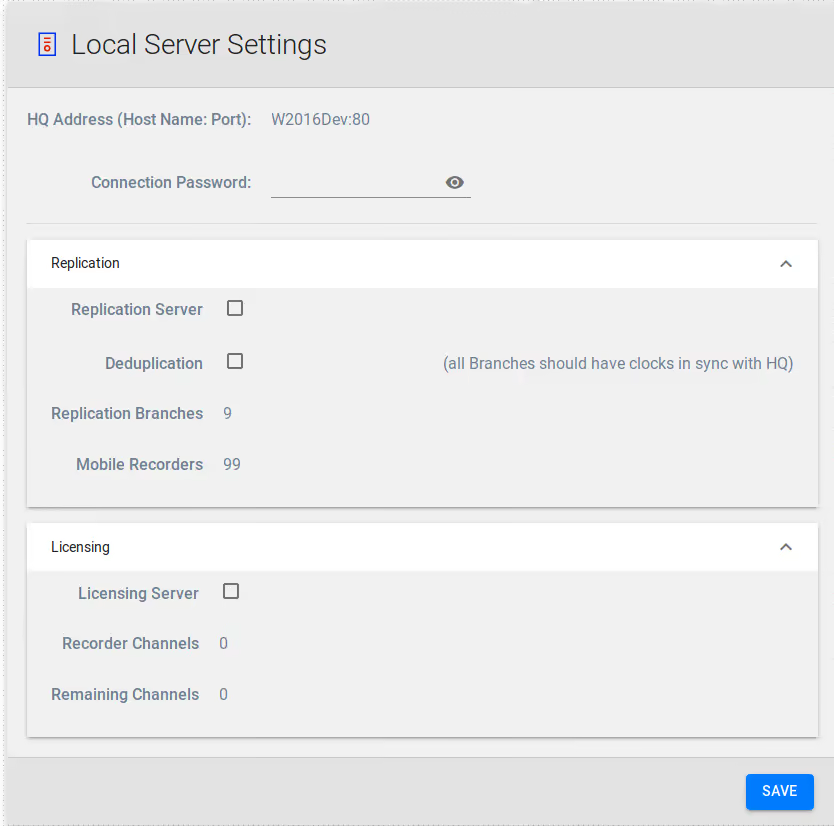
Branch Licensing
You may use the same license to run multiple CallReplay sites, by
splitting the available channels between them.
You will need to configure the server that has the license activated as
the HQ licensing server:
enable "Act as HQ Licensing Server"
make sure the "HQ Address" is correct and reachable by the
branches
set a password for the branch connection
make sure that the branch is enabled once it is connected and
appears in the list
edit a branch to set the number of channels allocated to it
In order to configure branch licensing, please go to
System > Licensing > HQ/Branch Licensing.
The other servers must be set up as licensed branches:
go to the Branch tab and check the "Act as Licensed Branch"
enter the HQ address and port
enter the connection password
click save
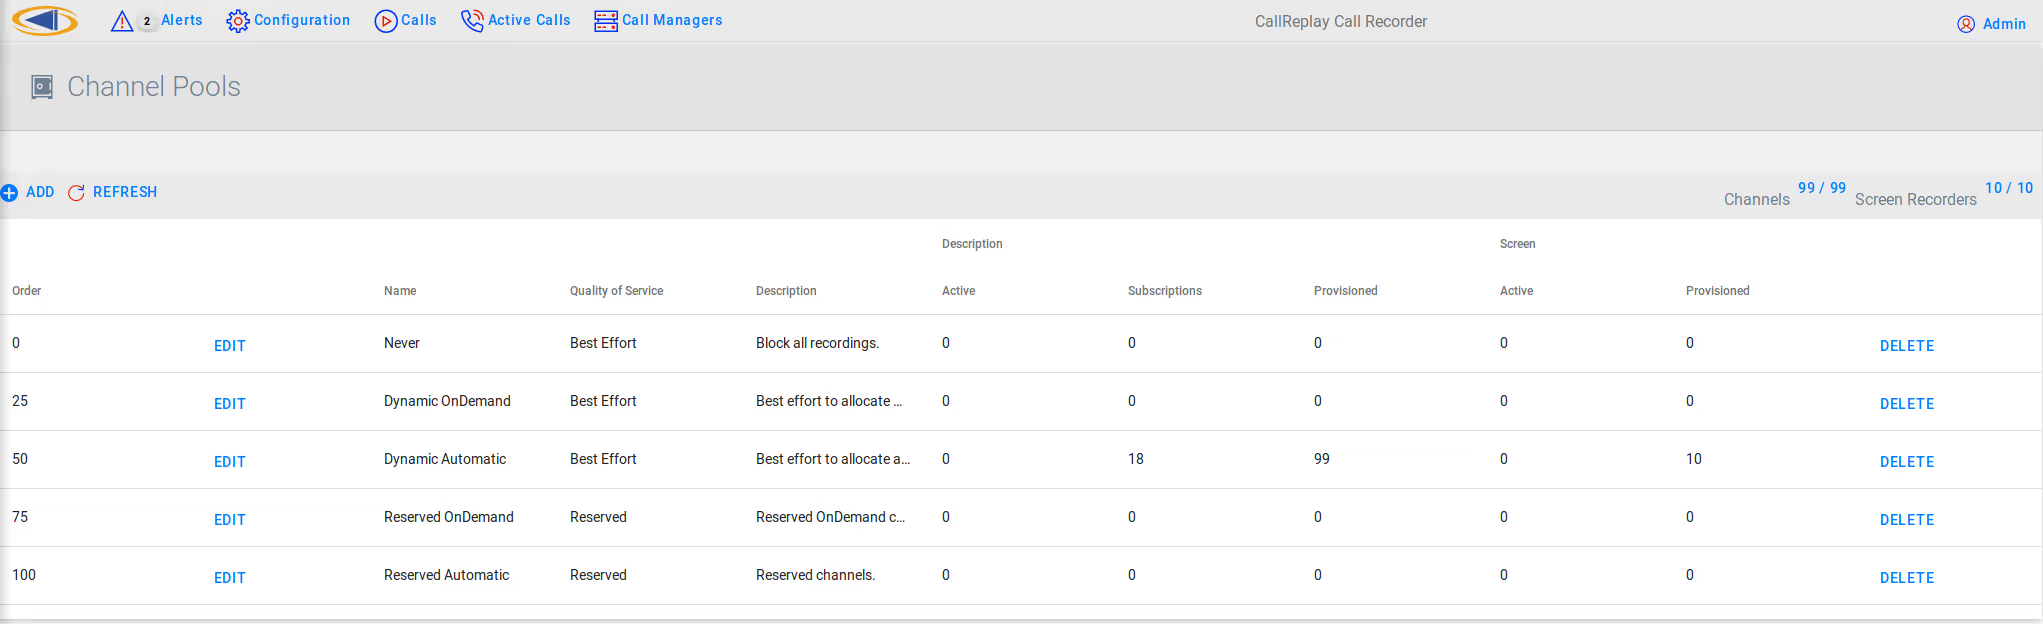
5.2 - Licensing Pools
Channel allocation is now achieved through the Licensing Pools page. You
can allocate channels to each type of recording here, to suit your
specific recording requirements.
The order tab adds a weight, so that if a user has 2 different
recording policies, (a user may reside in 2 departments, for
example) it will select the policy with the highest weight.
All recording policies have their name, quality of service and
description displayed here.
Active Voice Channels / Screen Recorders show the current usage in
the respective channel
Voice subscriptions are the total amount of users that have the
respective recording policy. Note: If the number of subscriptions
exceed the number of provisioned channels for reserved recording,
the configuration will become invalid. You will have to provision
more channels to meet the QOS.
Provisioned channels represents the number of channels you allocated
to the respective recording policy.
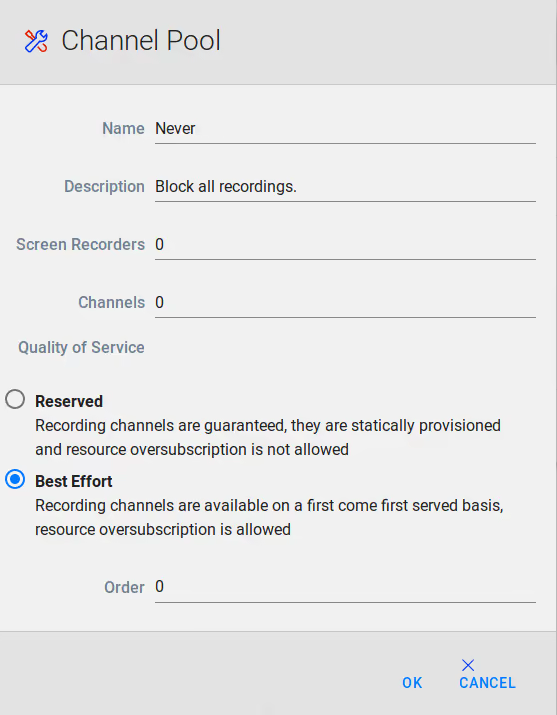
System > Licensing > Licensing Pools
Editing a pool allows you to change its properties and allocate
recording channels.
The name will allow you to identify the pool both in the Licensing
Pools page and in Recording Policy, when assigning a user to a pool.
You can use the description to add more info about a pool
The Screen Recorders and Channels boxes are deprecated
Reserved Quality of Service enforces provisioning of resources, so
that there must always be at least as many channels provisioned as
there are subscribers. This means that all calls that are assigned
to this channel pool will always have an available channel for
recording.
Best Effort Quality of Service, or dynamic mode allows more
subscriptions than provisioned channels. When the provisioned
resources are used, subsequent calls will not be recorded untill a
channel is freed.
The Order is used in the case of a call that may ba assigned to
different categories, having different Licensing pools settings. The
values of the different "Order" will be compared, and the pool
with the highest order will be assigned for the call.
Please note that for setting Automatic or on-demand recording, you must
set the Recording trigger in the Recording Policy tab, in the
Configuration window. The difference between Automatic and OnDemand
pools is only for backward compatibility.
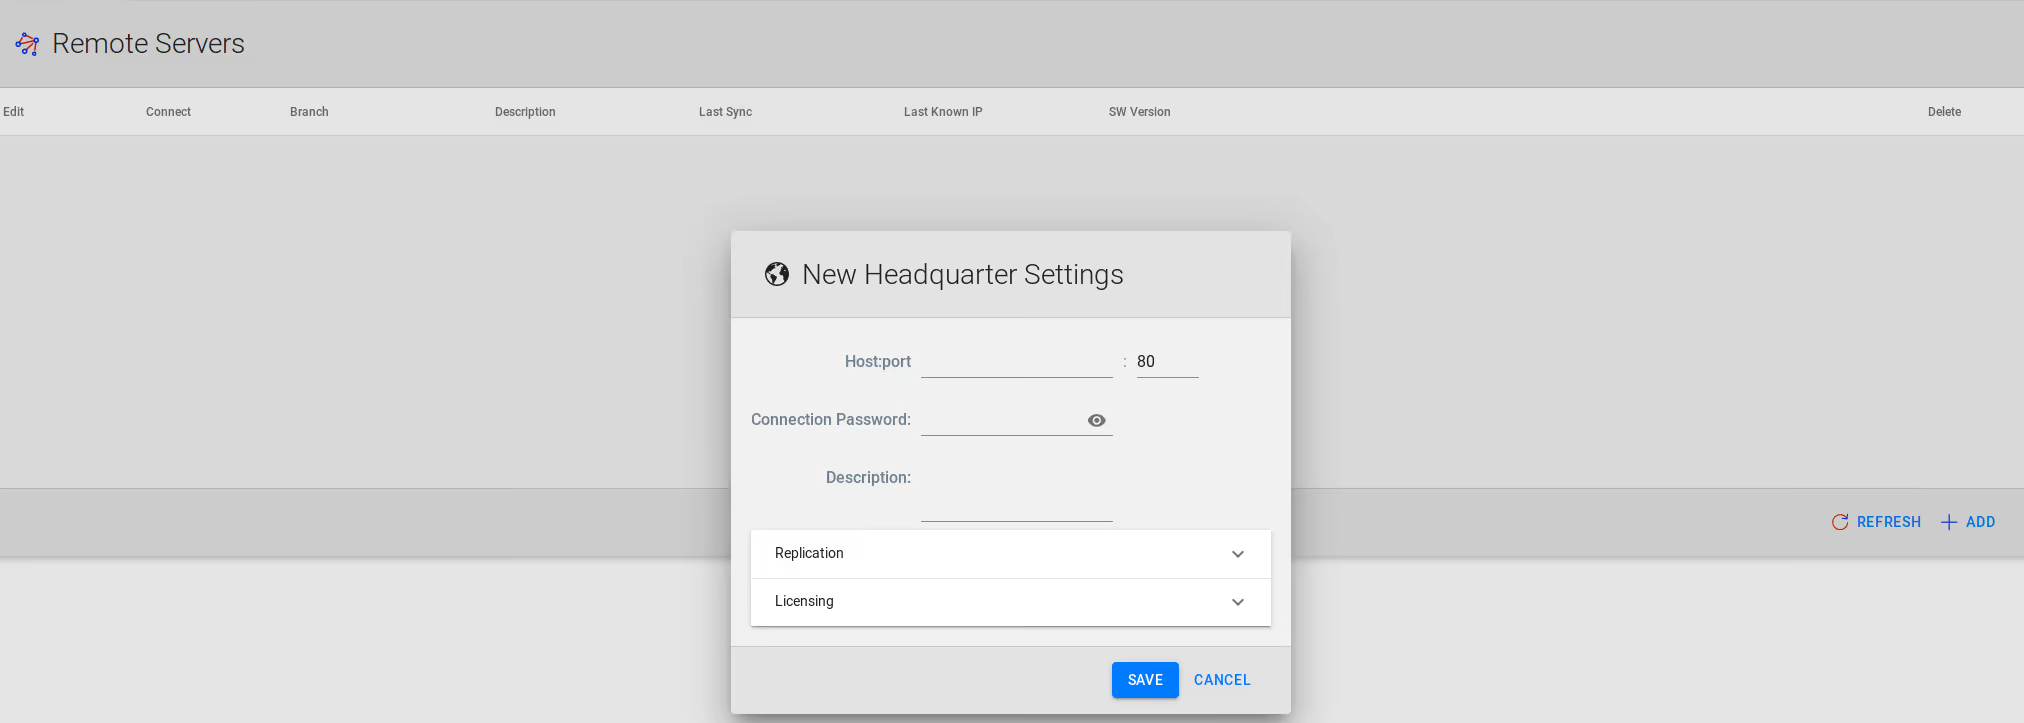
5.3 - Branch Licensing
You may use the same license to run multiple CallReplay sites, by
splitting the available channels between them.
In order to configure branch licensing, please go to System ->
Licensing -> HQ/Branch Licensing.
You will need to configure the server that has the license activated as
the HQ licensing server:
Enable "Act as HQ Licensing Server"
Make sure the "HQ Address" is correct and reachable by the
branches
Set a password for the branch connection
Make sure that the branch is enabled once it is connected and
appears in the list
Edit a branch to set the number of channels allocated to it
System > Licensing > license HQ / Branch Licensing
The other servers must be set up as Licensed Branches:
Go to the Branch tab and check the "Act as Licensed Branch"
Enter the HQ address and port
Enter the connection password
Click Save
6 - System
System Settings
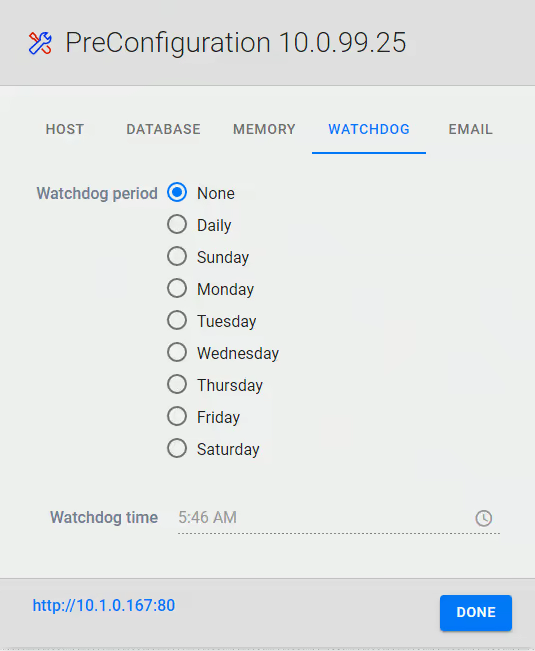
6.1 - Watchdog Configuration
Watchdog is a monitoring component that tracks - at each 60 seconds -
the CallReplay service performance and trigers recovery actions,
including service restart, and automatic notification in case of
impeding errors. In addition, watchdog can be scheduled to perform
automatic service restarts, or to send email notification when no
recording are made within a specified period of time.
Out Of Memory threshold should not be changed without express
instructions from CallReplay support staff.
Configure
Watchdog configuration page can be accessed through System > Watchdog
menu.
Total Memory:
Total memory allocated for CallReplay service.
Current Memory Usage:
Currently memory used by the CallReplay service.
Out of Memory Threshold:
If threshold is reached a restart is initiated regardless scheduling stettings.
Restart Scheduling
Watchdog can be scheduled to initiate a service restart at a specific
hour and at a specific day of week, or daily.
Watchdog is a monitoring component that tracks - at each 60 seconds -
the CallReplay service performance and trigers recovery actions,
including service restart, and automatic notification in case of
impeding errors. In addition, watchdog can be scheduled to perform
automatic service restarts, or to send email notification when no
recording are made within a specified period of time.
Out Of Memory threshold should not be changed without express
instructions from CallReplay support staff.
E-mail Notifications
Watchdog can be configured to send e-mail notification in case when no
recording are made within a specified number of calendar or business
days.
Please check E-mail Configuration page for details about how to
configure it.
6.2 - E-mail Configuration
CallReplay can be configured to send e-mail notification whenever alerts
are available, including:
Running low on storage
Call have not being recorded for sevaral days
In order to configure the e-mail notification go to the menu and select
System | E-mail.
Where:
SMTP Server: The IP or FQDN of your SMTP Server.
SMTP Port: 25 is standard.
TLS: Most people do not use TLS security. This should be
left unchecked.
POP3 Server: If the Mail server leverages POP3, input the IP or
FQDN. Most people do not use this, so it may be left unchecked.
Authentication User/Password: If the Mail server requires
credentials, input the User/Pass.
From E-Mail Address: When low level emails, like exporting a
call, the From Address will be used as the From address in the
email.
Admin E-mail Address: When System Level emails need to be
transmitted to the CallReplay admin, the Admin email address will
be who receives those emails.
System level emails may include:
Running low on storage.
Calls have not been recorded for X days.
6.3 - IP Phone Service
Manual Phone Service Configuration
(This chapter has been obsoleted by the Configure Cisco CM wizard in
version 6). Please use the Forked
Recording Wizard
in the Capture / PBXs page.
Observation: Instructions for setting up a Cisco CallManager Express
phone service can be found on Cisco's site:
The IP phone service is a component of our application that allows users
with a primary extension to listen to their calls from their Cisco Phone
or to demand recording of calls. By accessing the System/Watchdog menu, you can specify the
authentication parameters used with the Cisco Phone XML, and other
values that affect the way that the service works:
Cisco User - The user name used for authentication with the
Cisco Phone XML.
Cisco Password - The password used for authentication with the
Cisco Phone XML.You don't need to specify the password each time
that you make an update in the configuration page, but only when you
need to change the existing password.
System > IP Phone Service
Application Phone XML User
This user is required for the application phone services to function
properly. There is only one application Phone XML User, and it is
different from the site users. You may choose any user you want, but we
recommend creating a new special user that nobody else uses.
Create a new Cisco User or select an existing one
Go to the CallManager Administration Site
Go to User/Global Directory
Click "Add a New User".For more details about adding a new user,
please consult the CallManager Help.
Associate all devices with the desired user
Make sure that this user has all the devices associated to him. Go to the CallManager Administration Site
Go to User/Global Directory, then click "Search"
Select or create the user you want to use with Cisco Phone XML. For
example "CallRecorder"
In the User Configuration page, please click "Device Association"
Now you have to associate all the phones through which you want to
access the application and/or Call Monitoring phone services with
this user. If you want to associate all devices, do the following:
Press "Select Devices" ( leaving the search field empty )
Select "Check All in Search"
Click "Update Selected".
Setting up the authentication
Go to System/IP Phone Service
In the "IP Phone Service" page enter the following values:
In the "Cisco User" field, enter the name of the user that you
associated all your phones with (see the previous step)
In the "Cisco Password" field enter the password of that user
Press "Save"
To make the application service accessible on your Cisco IP phones, you
have to go through the following steps:
Add a new service
Go to CallManager Adminitsration / Device / Device Settings / Phones
Services
Press "Add New" button
Set "Service Name" to Call Recorder
Service Category must be XML Service and Service Type* Standard IP
Phone Service*
For large number of phones this is best done using Device Profiles. Using the Call Manager Administration site:
Go to the CallManager Admin/Device/Phone
For each phone having access to CallRecorder, do the following:
Go to that phone's configuration page
Click "Subscribe/Unsubscribe Services"
In the available services list select CallRecorder, then click
"Continue"
Click "Subscribe"
Click "Update"
Restart the phones so that they can read the new configuration (only
if you had to change the URL to the value we specified)
Go to CallManager Admin/Device/Phone
For each page "Select all", click "Reset", then "Restart".
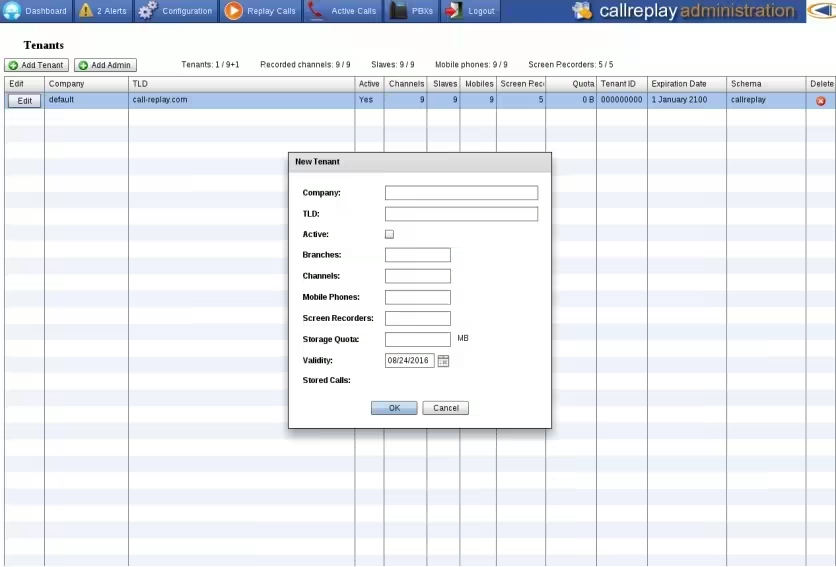
6.4 - Tenants
CallReplay supports the concept of multitenancy by which an instance of
CallReplay can serve different groups of users providing access with
specific privileges, or structured in different ways. For example there
might be a business branch and its users that can use CallReplay in an
isolated way.
Additional tenants may be added hereby clicking the Add Tenant button.
You will need to provision the desired number of channels and screen
recorders, as well as the company's name TLD and number of branches.
Please note that when you upgrade your license with additional
channels/recorders, you will need to assign them here, to the desired
tenant.
System > Tenants.
Company - please enter the company name here, it will be used to
identify the tenant
Please enter the company's top level domain, such as
guest-company.com{.external-link} in the
TLD field
Active checkbox enables or disables the tenant
Branches field represents the number of branch replication channels
assigned to this tenant
You must set the desired number of channels you are granting the
tenant in the channels field. Please note that those channels must
not be assigned to any other tenannt, including the default one. If
all channels are assigned, you will have to revoke some and then
check the respective Licensing Pools allocations.
Mobile phones -
Screen Recorders - add the number of desired Screen Recorder
channels for the tenant. As with the recording channels, they will
need to be unassigned.
Storage Quota - you can set a storage quota for this tenant.
Validity - an expiration date can be set for the tenant.
Stored Calls will show the number of stored calls for the tenant.
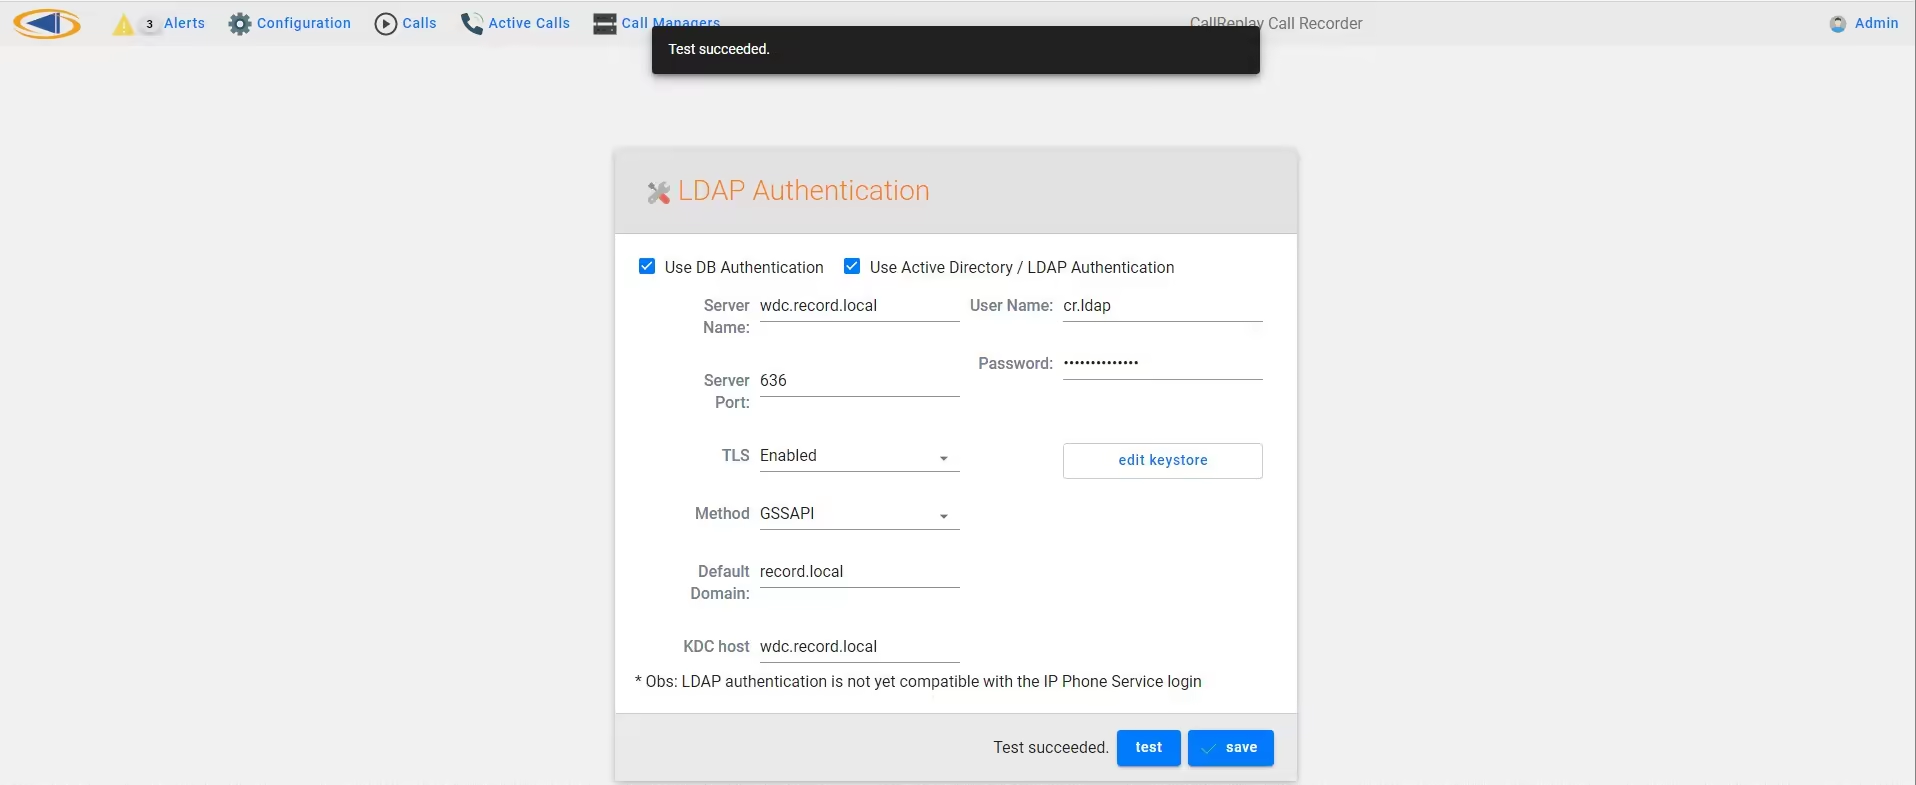
6.5 - Authentication
CallReplay supports two authentication modes: DB and AD/LDAP.
DB Authentication is the default authentication mode and is
integrated at the application level. This means that the user name
and password pairs are maintained at database level
AD/LDAP Authentication can be configured and is the
authentication mode that is integrated at operating system level via
AD (Active Directory) or LDAP (Lightweigth Directory Access
Protocol)
For AD/LDAP Authentication to work, you need an Active Directory or
other LDAP compatible service available.
To configure AD/LDAP authentication
mode
Go to menu System | LDAP Authentication.
Select AD/LDAP Authentication Mode.
Provide the name of the AD/LDAP server
Enter the port where AD/LDAP is listening (389 is the default port
for LDAP service)
Select the authentication method.
Enter the domain's name
Provide the user name as is defined within AD/LDAP
Provide the password associated as recorded by AD/LDAP
"Save" button becomes active only if a connection test was performed
successfully
To configure DB Authentication
mode
Go to menu System | LDAP Authentication.
Select DB* Authentication Mode*.
6.6 - CDR Verifier
The CDR Verifier module is designed to fetch information from the CDR
Analysis and Reporting information. The CDR Verifier is available from
the System > CDR Verifier menu, but it first must be enabled in
CallManager and on a per-PBX basis from Recording > CallManagers
(PBXs) in CallReplay.
Enable CDR in PBX
To enable the CDR Verifier in CallReplay, go to PBXs and click
Edit on a PBX line. Once the Edit PBX window appears, switch to
the CDR Setup tab:
CallReplay uses a built-in FTP server to which CallManager will upload
its CDR information. Make sure to fill in all the fields:
Ftp Server Enabled: This must be checked so the built-in FTP
server is active and listening.
FTP Server: This is automatically filled in by CallReplay with
its IP address.
FTP Username: This will be the username used by CallManager to
login to the FTP server. You can change this to a desired username,
or leave it to default.
FTP Password: This will be the password used by CallManager to
login to the FTP server. You can change this to a desired password,
or leave it to default.
Directory Path: This is the path used by CallReplay to store the
information received from CallManager (e.g.
C:\CallReplay\Cdr\10.1.0.30\).
Import Enabled: Check this to enable CDR imports.
Once the fields are filled in, click OK. One more step is required,
and that is to enable CDR uploading in CallManager. Proceed to the next
step to do this.
Enable CDR in CallManager
In CallManager, go to System > Service Parameters, and make sure
that under the System section, the CDR Enabled Flag is set to
True:
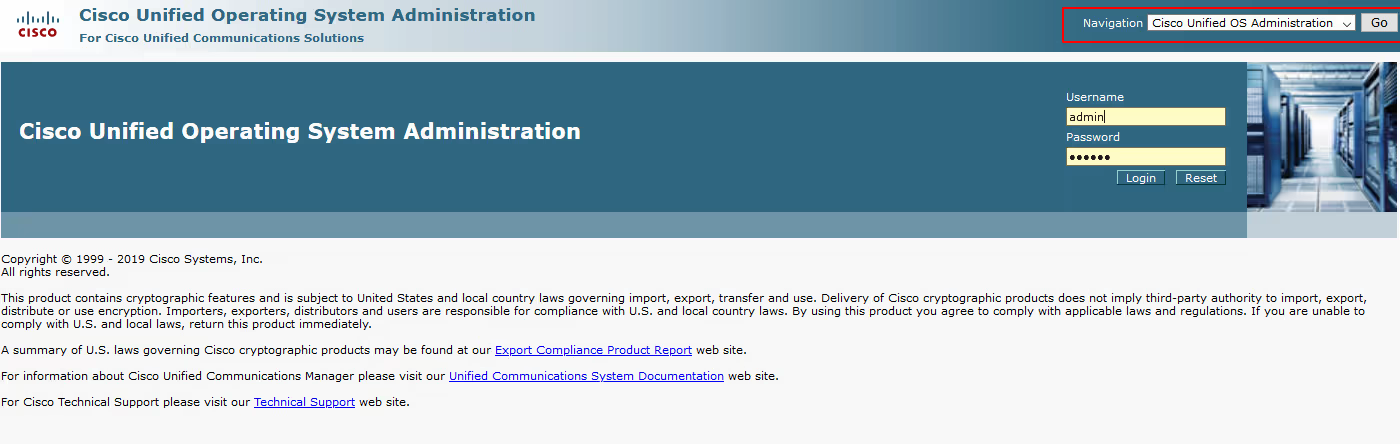
Next, open the Cisco Unified Serviceability from the top-right
drop-down Navigation entry. Now go to the Tools > CDR
Management menu entry. Under the Billing Application Server
Parameters section, click the Add New button:
A new window where you can configure the FTP settings should appear:
Host Name / IP Address*: Enter the IP of CallReplay.
User Name*: Enter a username to use when authenticating to the
FTP server of CallReplay (this will be configured later as well in
CallReplay).
Password*: Choose a password to authenticate to the
CallReplay FTP server.
Protocol*: Choose FTP instead of SFTP.
Directory Path*: Enter a path in the form /CCM_IP/. This
path will be used by CallReplay to place CDR data. By default, it
will be stored in DATA_FOLDER/Cdr/CCM_IP (e.g.
C:\CallReplay\Cdr\10.1.0.30\).
Click the Add button.
It will take a while until CallManager starts uploading information to
CallReplay, and once it does, you should be able to see statistics from
the System > CDR Verifier menu.
7 - Recording
Configure recording
7.1 - Recording Overview
CallReplay Call Recorder offers two methods for recording calls: Forked
(SPANless) and SPAN recording. The modern, recommended, recording method
is Forked Recording, because of its ease of installation.
For Cisco CallManager Express please use SPAN recording, and manually
set the PBX type to Express, as auto-detection will not work.
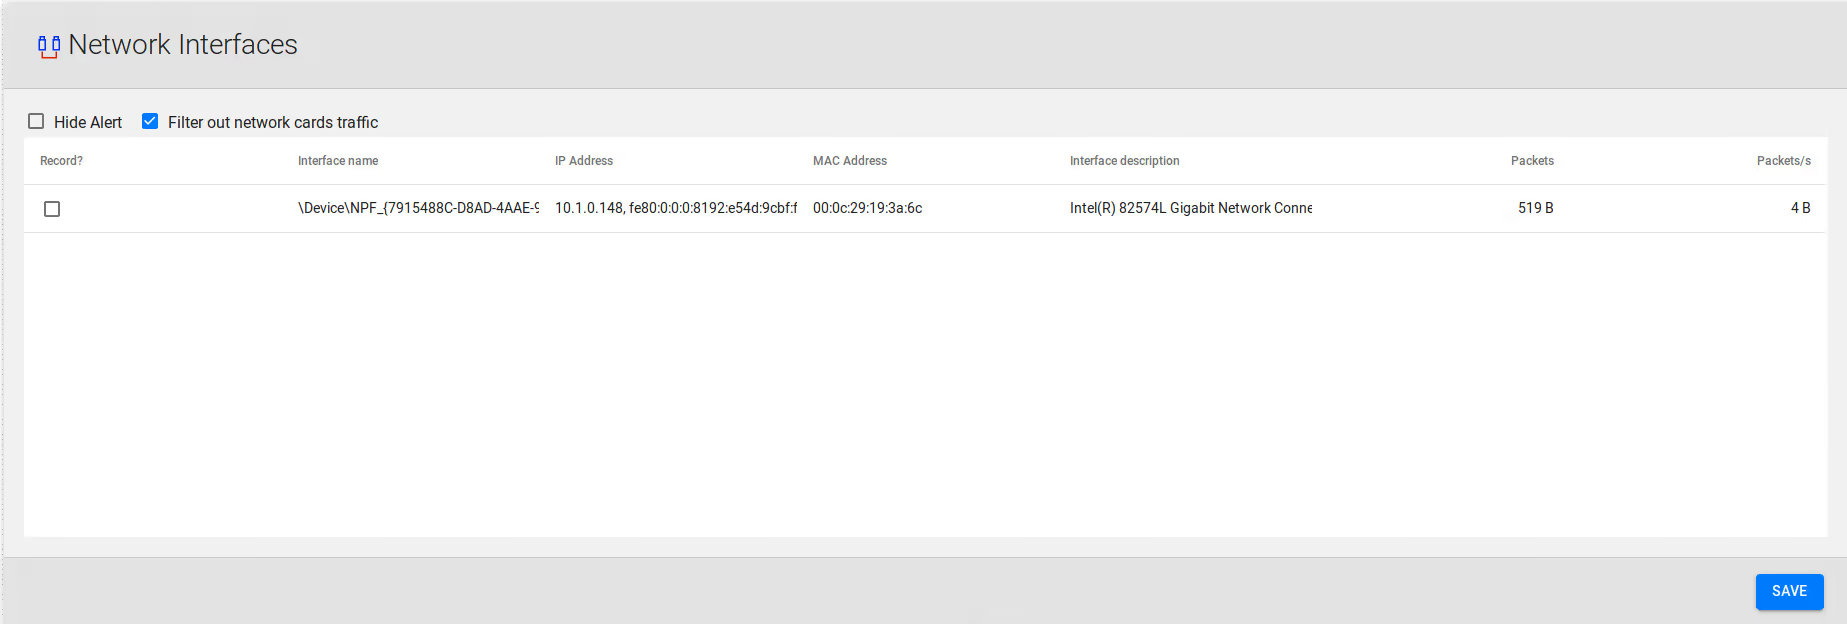
7.2 - Network Interface
Because monitoring ports cannot usually transmit traffic, for production
setups the server you are using must have a minimum of two network cards
for the application to function properly. One of them will be used for
general network traffic and accessing Application Web Administration
Interface and the other for listening VOIP related traffic. The NIC
selected for website access should have a static IP address.
Important
The monitoring NIC should not have a routable IP address, because
network switches inhibit the transmission of packets from ports used
as port mirroring destinations. If the OS routes packets through this
port, all sent packets will be discarded. Remove the IP address of the
monitoring NIC, or set it a non-routable address, such as 1.1.1.1.
We assume that you have already configured your network switches in
order to mirror all VOIP traffic from VOIP LAN to the monitoring NIC of
CallReplay otherwise no calls will be recorded.
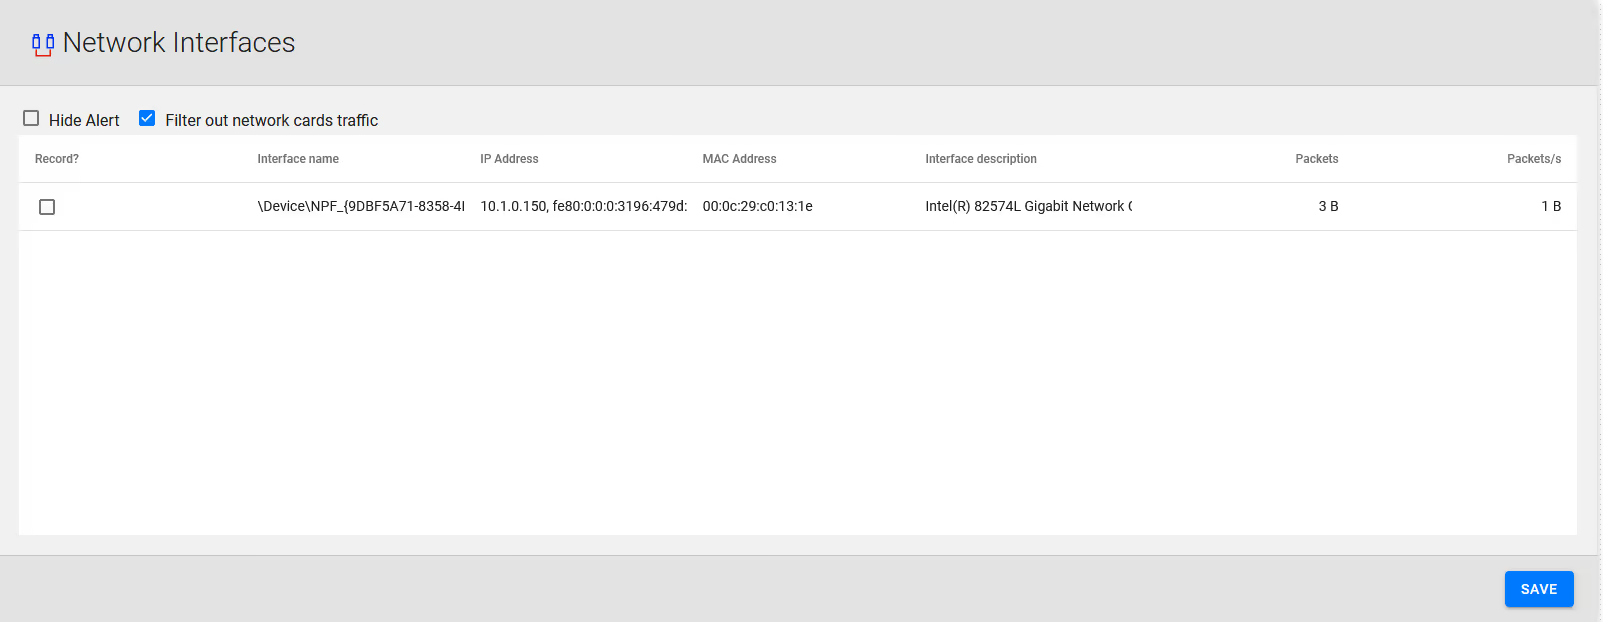
Open the Recording / Network Interfaces page, and choose which NIC
is used for VOIP traffic and which one is used for web administration
and general traffic.
To set NIC used for VoIP
Go to Recording > Network Interfaces
Click in the column Record? the NIC that would be reserved for
recording
If you have configured port mirroring correctly, calls will start being
recorded immediately. For CallManager Express please see the PBX
Configuration chapter.
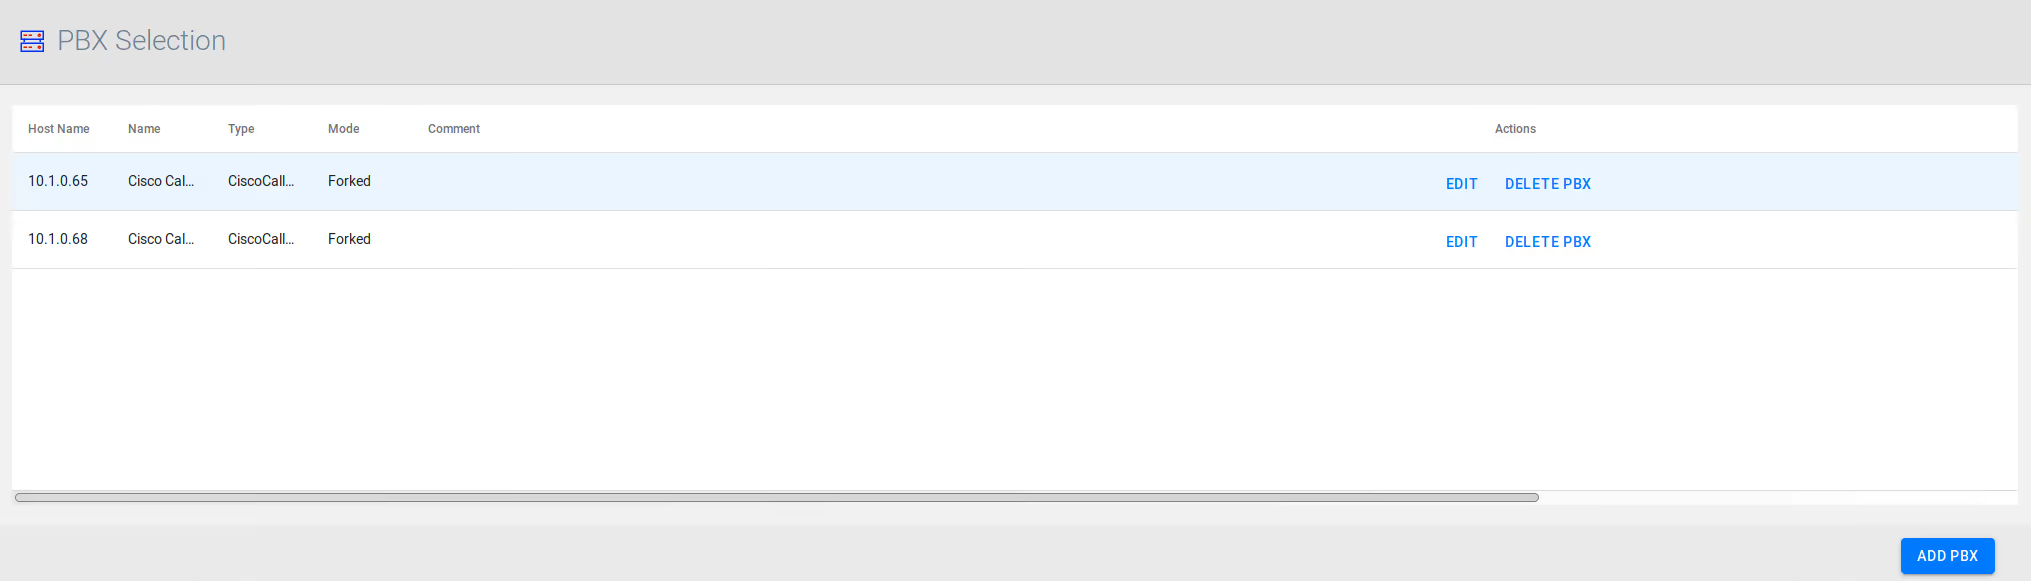
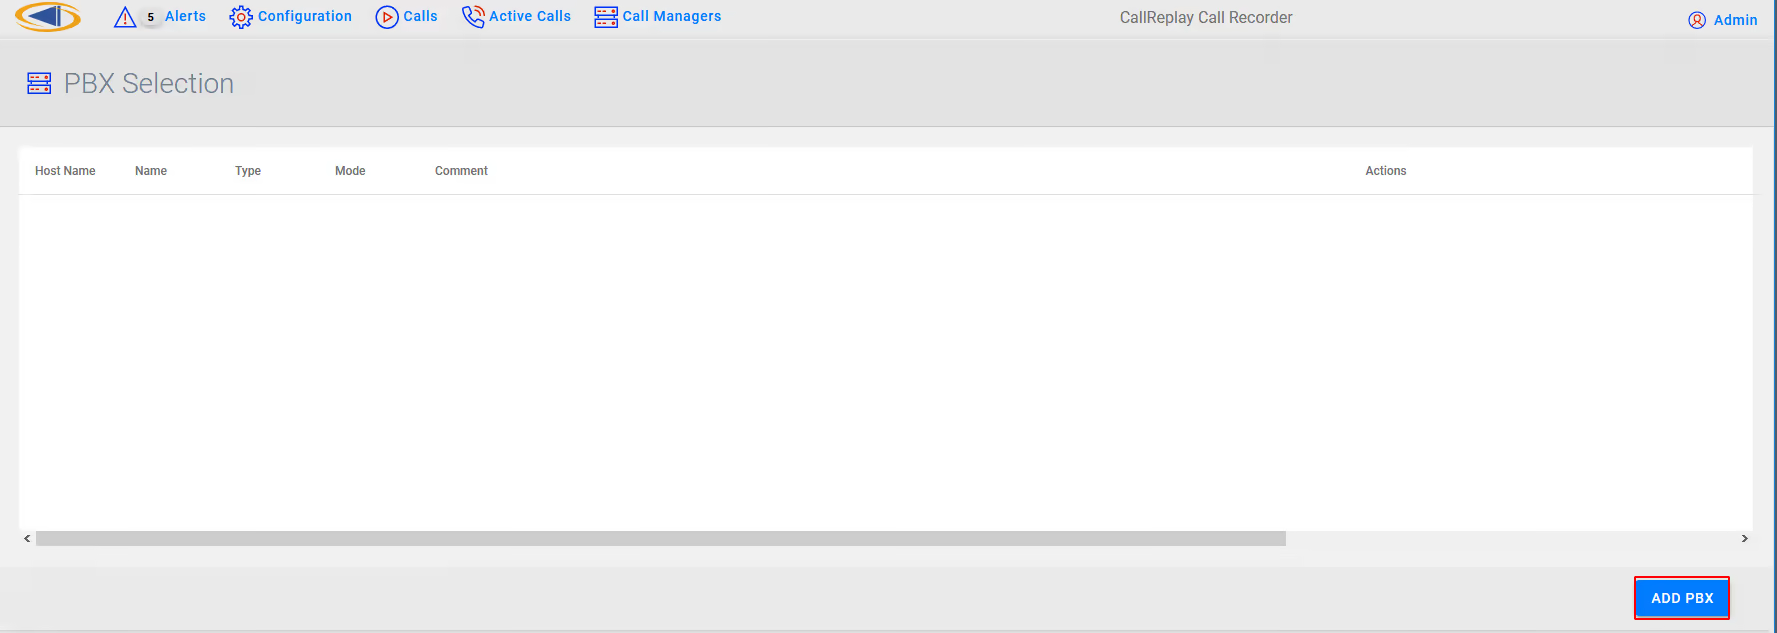
7.3 - Call Managers (PBX)
Call Managers page allows the management of Cisco CallManagers, Mitel,
IPTrade, NEC and other supported telephony controllers.
To add a controller
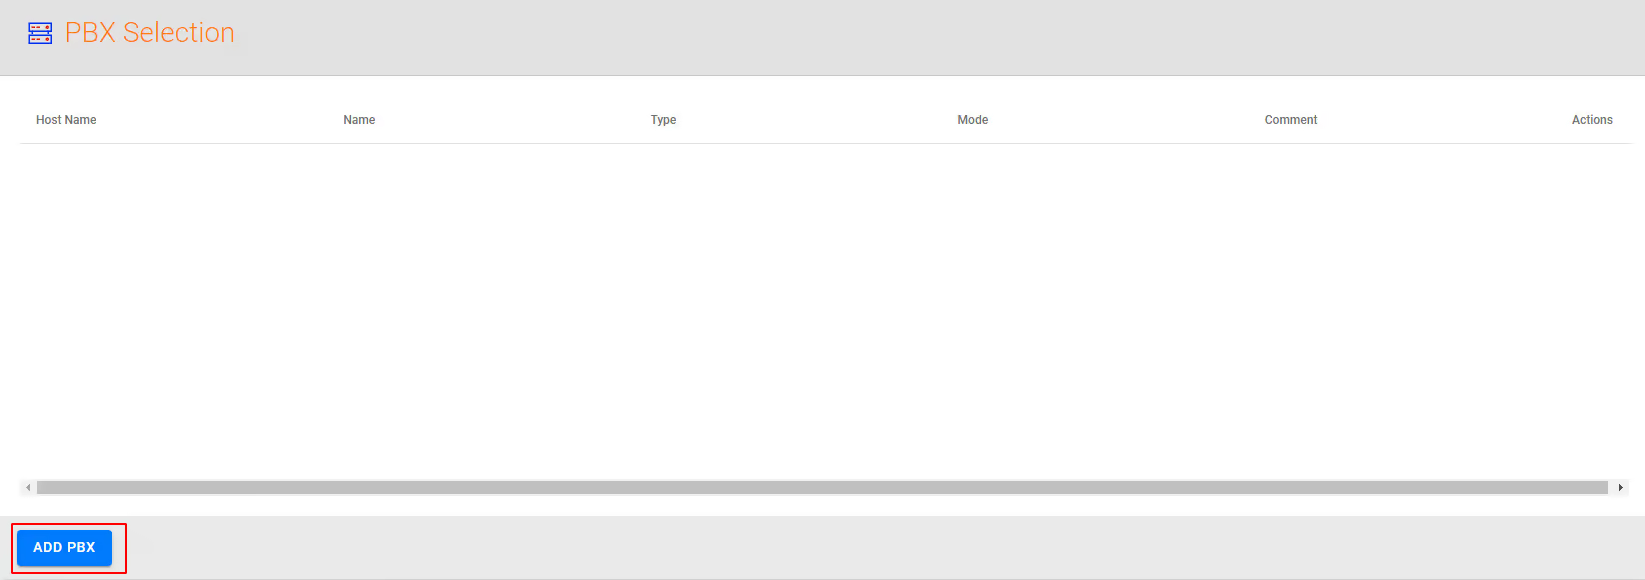
Go to Recording > Call Managers (PBX).
Click Add PBX button.
Provide all data required by Edit PBX window (see how to edit a
controller)
Click Ok.
To delete a controller
Go to Recording > Call Managers (PBX).
Check the row(s) containing the controller(s) to delete
Click Delete PBX button.
Click Yes to confirm deletion
To edit a controller
Go to Recording > Call Managers (PBX).
Click Add PBX if you create a new cotroller, or Edit to
modify and existing one.
Observation: Cisco CallManager Express is a different type than Cisco
CallManager.
7.4 - Silence Compression
CallReplay has the capability to 'trim' silence allowing a significant
reduction of RTP and as consequence a better usage of storage space or
transmission bandwidth.
Voice Activity Detection is used with IP Trade Turrets to trigger call
recording based on the voice signal intensity. It can also be used with
Radio Gateways and other analog-to-IP equipment with no call signalling.
To configure silence compression:
Go to Recording > Silence Compression.
Change settings according with your requirements.
Click Save.
VAD Sensitivity: the level of voice activation detection from
which the signal is not considered silence. The default value is
Normal (40dB). Other values are Low (30 dB, noisy environment) and
High (50 dB, Catch every breath).
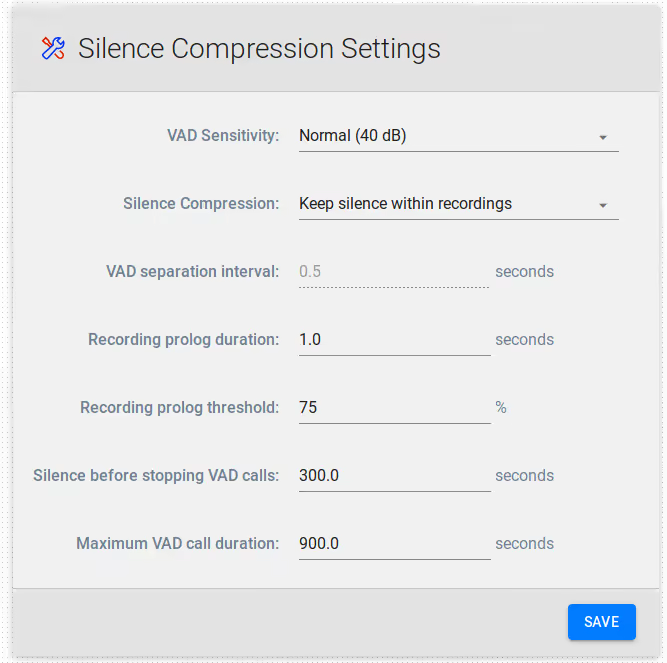
Silence Compression: keep or not to-keep the silence within
recordings
VAD separation interval: it is enabled when silence is removed
within recordings. This is the length of the silence inserted
between active signals.
Recording prolog duration: it means the length of the interval
recorded before the moment of active signal.
Recording prolog threshold:
Silence before stopping VAD calls: after specified value of
silence the recorded call will be stopped.
Maximum VAD call duration:
CallReplay has the capability to 'trim' silence allowing a
significant reduction of RTP and as consequence a better usage of
storage space or transmission bandwidth.
Voice Activity Detection is used with IP Trade Turrets to trigger
call recording based on the voice signal intensity. It can also be
used with Radio Gateways and other analog-to-IP equipment with no
call signalling.
To configure silence compression
Go to Recording > Silence Compression.
Change settings according with your requirements.
Click Save.
VAD Sensitivity: the level of voice activation detection
from which the signal is not considered silence. The default
value is Normal (40dB). Other values are Low (30 dB, noisy
environment) and High (50 dB, Catch every breath).
Silence Compression: keep or not to-keep the silence within
recordings
VAD separation interval: it is enabled when silence is
removed within recordings. This is the length of the silence
inserted between active signals.
Recording prolog duration: it means the length of the
interval recorded before the moment of active signal.
Recording prolog threshold:
Silence before stopping VAD calls: after specified value of
silence the recorded call will be stopped.
Maximum VAD call duration:
7.5 - SPAN Recording
Overview
SPAN Recording is a passive technology. It is working with all Cisco
CallManagers and all kind of phones as long as they are SIP or SKINNY
compatible.
The application service uses a network interface card functioning in
promiscuous mode, in order to capture packets for the conversation
recording. The host computer or the server need a network connection to
voice traffic, through a non-switched hub or through a SPAN port on a
switch. For more information about configuring a mirrored port on your
switch, read the user manual of the switch. You can also visit the following links:
The application works by monitoring phone traffic. There are two types
of phone traffic essential to recording:
signaling (call control), from phones or voice gateway to
CallManager
audio streams (RTP), from phone to phone, or from phone to voice
gateway
To be able to record calls, the application needs to intercept both
types of traffic, call control and audio streams. For more information about network sniffing please read the Wireshark
FAQ: http://www.wireshark.org/faq.html
Virtual Environment
The difficulty in getting SPAN based/passive recording functional in a
virtual environment is the SPAN itself. With the SPAN configured on a
physical switch port, all communication will be directed to a physical
NIC. This physical NIC MUST be bound on the VM. The reason behind this
statement is because most virtual NIC software cannot forward the SPAN
information to the VM, so the physical NIC will be required to be bound
to the VM. Because of this requirement installing the application into a
virtual environment may not be advisable. Allocating a physical device
to a VM only requires VT-D support in the host CPU.
Implementation Options
There are two main options in configuring network monitoring:
Record only external calls. This is the easiest. All you need to
do is to have the CallManager and the voice gateway in the same
switch and SPAN them to the application recording port. If you have
them in different switches you need two monitoring NICs in the
recording application server, one for each switch. Make sure you
are mirroring all the CallManagers and voice gateways, including
backup ones.
Record all calls, external and internal. For that you will need
to have all the phones' traffic monitored to the application
recording port. That is, monitor all switches with phones. Usually
this is done by placing all the phones in a separate VLAN, and
monitoring that VLAN. Using a VLAN also has the advantage of
discarding the general (PC) network traffic, which can overload the
monitoring interface in both the switch and in the recording
application.
Because RTP traffic (green and red in the figure) travels directly
between end points, without going through CallManager, in a large
enterprise with multiple switches only external calls (PSTN) can be
recorded in a cost effective way (one recorder for each voice
gateway). To record internal calls also, one recorder per switch with IP phones is
required.
Server Side Network configuration
Because monitoring ports cannot usually transmit traffic, for production
setups the server you are using must have a minimum of two network cards
for the application to function properly. One of them will be used for
general network traffic and accessing Application Web Administration
Interface and the other for listening VOIP related traffic. The NIC
selected for website access should have a static IP address.
Important: The monitoring NIC should not have a routable IP
address, because network switches inhibit the transmission of packets
from ports used as port mirroring destinations. If the OS routes packets
through this port, all sent packets will be discarded. Remove the IP
address of the monitoring NIC, or set it a non-routable address, such as
1.1.1.1.
We assume that you have already configured your network switches in
order to mirror all VOIP traffic from VOIP LAN to the monitoring NIC of
CallReplay otherwise no calls will be recorded.
Open the Recording / Network Interfaces page, and choose which NIC
is used for VOIP traffic and which one is used for web administration
and general traffic.
Recording > Network Interfaces
If you have configured port mirroring correctly, calls will start being
recorded immediately. For CallManager Express please see the PBX
Configuration chapter.
7.6 - Forked Recording
Overview of Forked Recording
Forked Recording (SPANless Recording) is an active recording technology,
available only on Cisco CallManager platforms newer than 5.0 and
selected Cisco phone models.
Benefits of Forked Recording
Ease of use and management
Establish complex network architectures not depending on SPAN ports
Move or reconfigure complete departments with ease
Improve control over branch locations
Economical
Reduce OPEX with easier administration as no configuration of SPAN
ports is necessary
Reduced CAPEX – need for fewer elements at the branches
Reliable and secure
Free-up resources for network monitoring
Increase reliability utilizing system resources better and more
manageable
Security: Both authenticated and encrypted mode can never be
recorded.
Geo redundancy available with high bandwidth utilization
The Cisco Unified Communications Manager (CUCM) interface provides two
recording modes:
Automatic recording of all calls on line appearance. This method is
invoked by CUCM.
Selective recording allowing users to record ad-hoc or also allows
recording server to record based on business rules and events.
After calling-in and routing the call to an agent CUCM automatically
sends two call setup messages to the Agent device. The 1st call is the
agent stream and the 2nd call is customer stream. The Communications
Manager invites the recorder to both calls via SIP Trunk and the
recorder accepts both calls and receives RTP streams from Agent device.
Forked recording requires:
usage of the silent monitoring and recording interface of CUCM
CUCM version 6.0 and higher
the usage of 3rd generation phones, as detailed here:
In the Recording / PBXs page, the Forked Recording wizard button appears
only when the PBX type is Cisco CallManager, version is greater or equal
than 5.0 and the Forked Recording Protocol is selected in the PBX
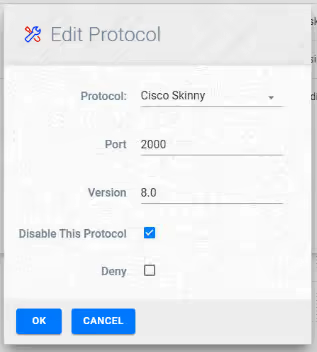
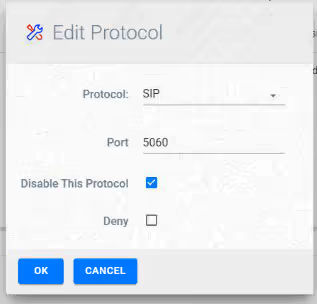
options. In this case other recording protocols should be disabled.
Step 1. Add a new PBX by clicking the Add PBX button.
Menu > PBXs
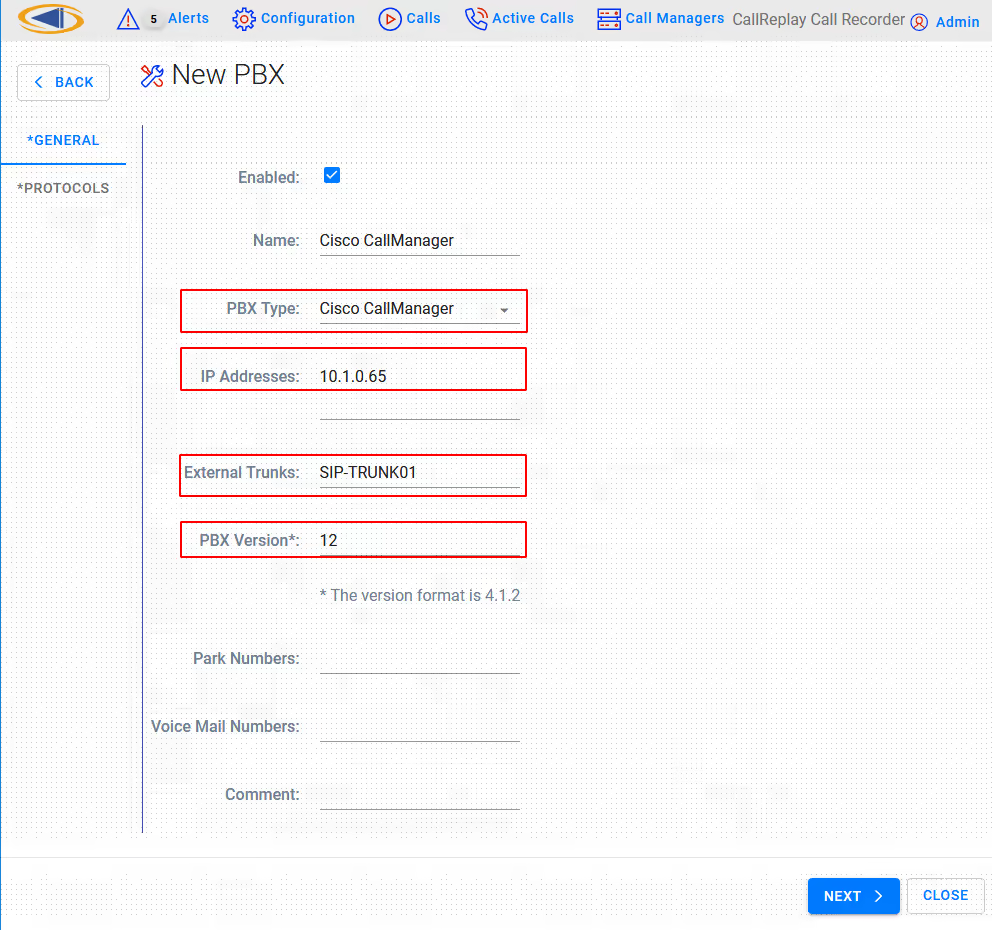
Step 2. The PBX window appears allowing to edit the PBX settings.
You may need to change the following fields according to the type of
PBX:
PBX Type: This drop-drown list allows the selection of the PBX
type, for example CallManager or CallManager Express.
IP Addresses: The IP address of the PBX. If there are more IPs
(for example if you have a cluster) separate the IP addresses by the
semi-colon character, or write each address separately on one line.
External SIP Trunks: The names (not the IP) of your external SIP
Trunks. You can enter them one per line.
PBX Version: The version of the PBX. It is important to insert
the correct version using at least the MINOR:MAJOR notation (e.g.
10.5 or 10.5.2 for CallManager 10.5.2). CallReplay takes this
version into account when it communicates with CallManager (make
sure to change this to the appropriate value when upgrading your
CallManager).
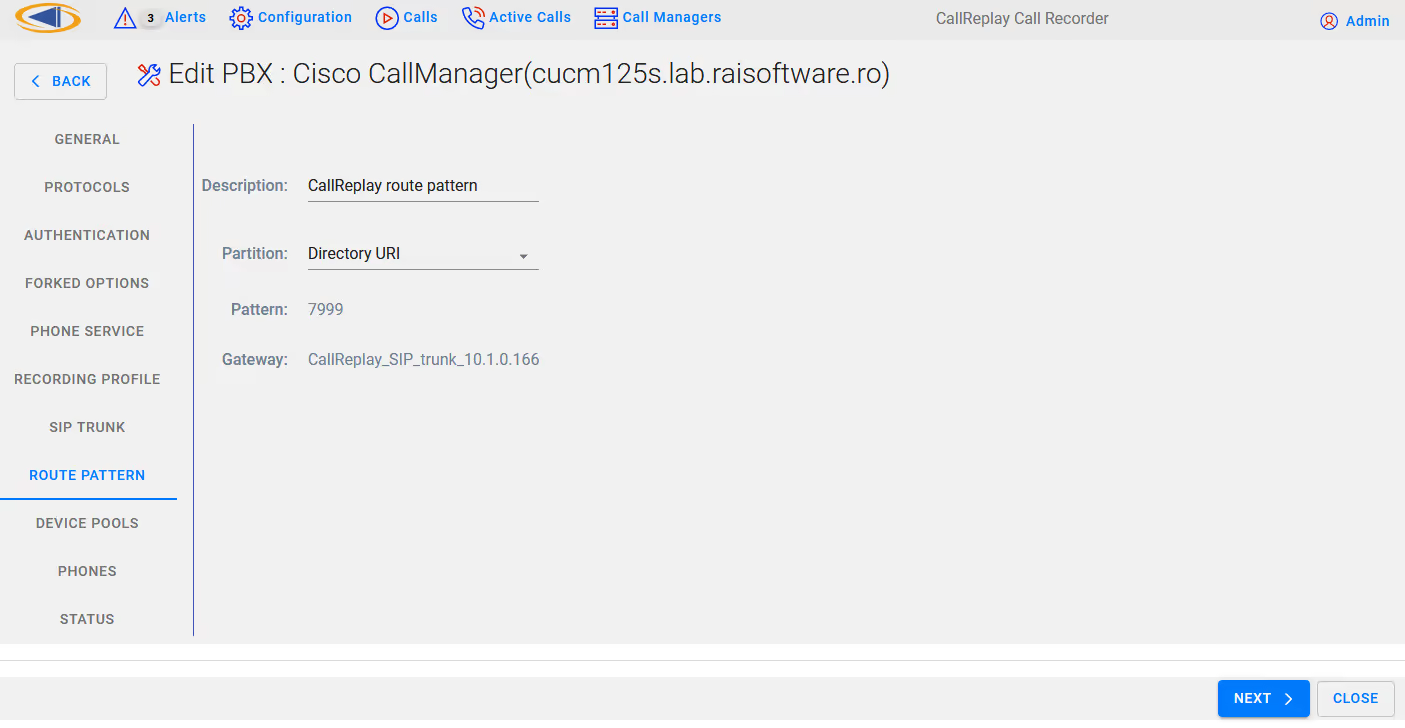
Park Numbers: A list of park numbers. Use the X wildcard to
stand for zero or any one digit.
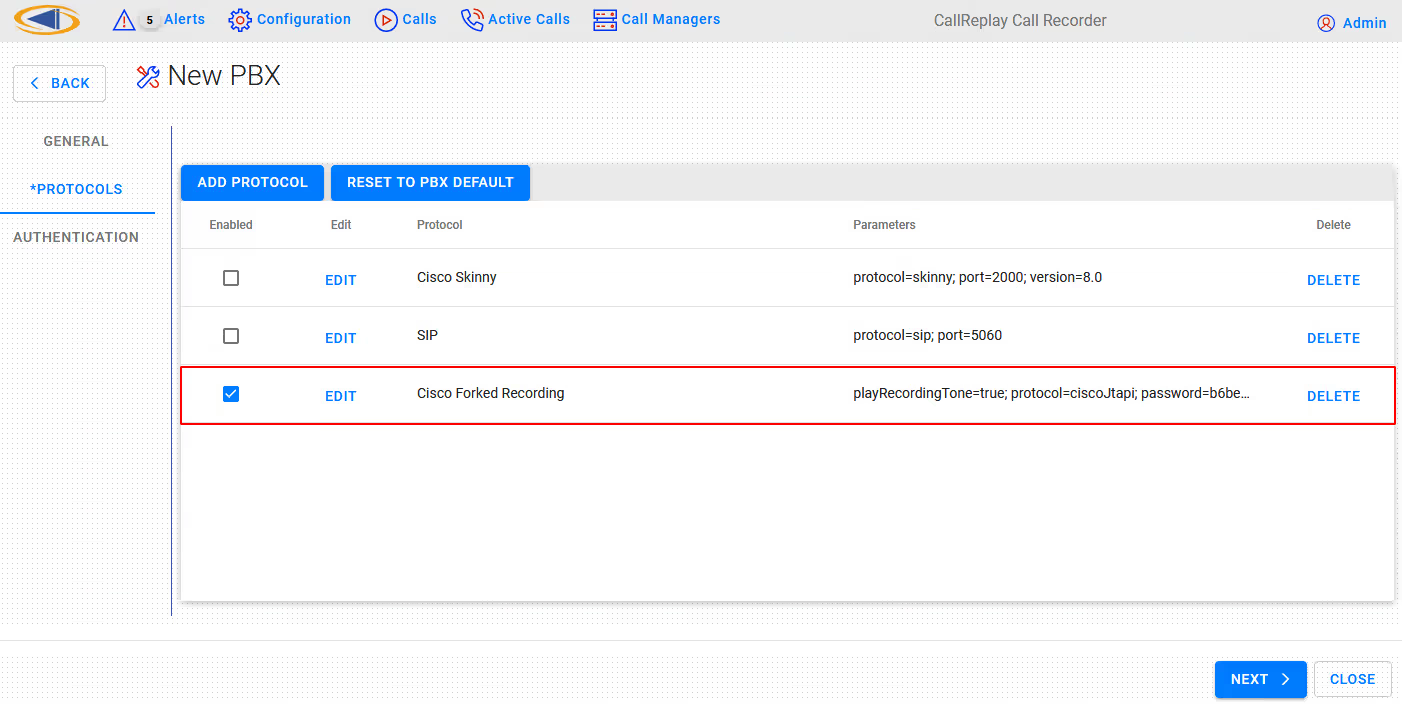
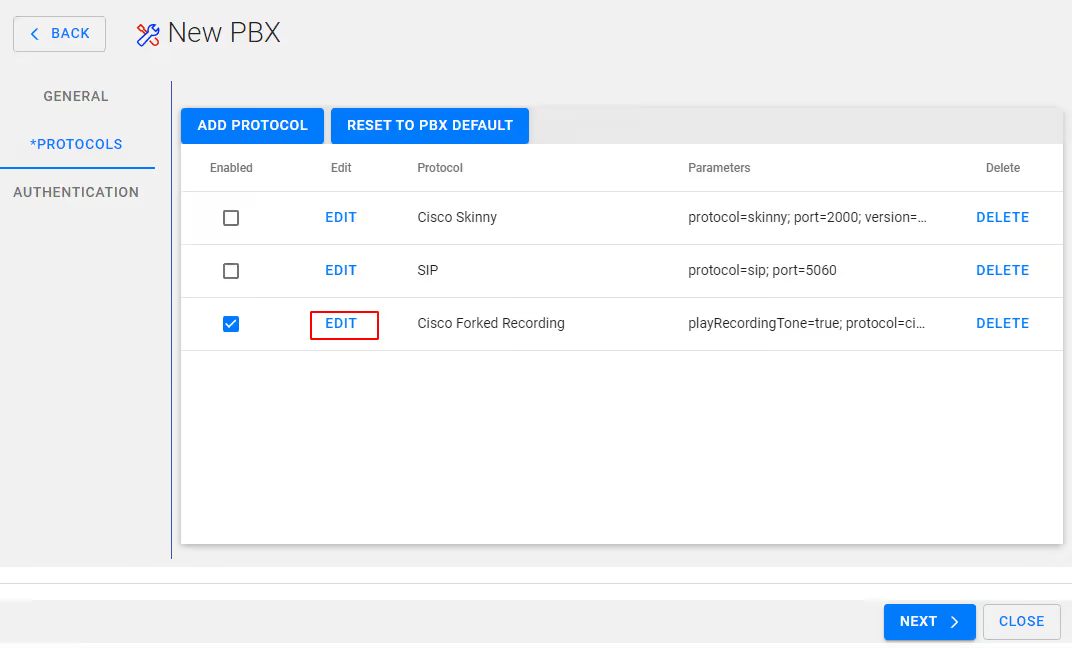
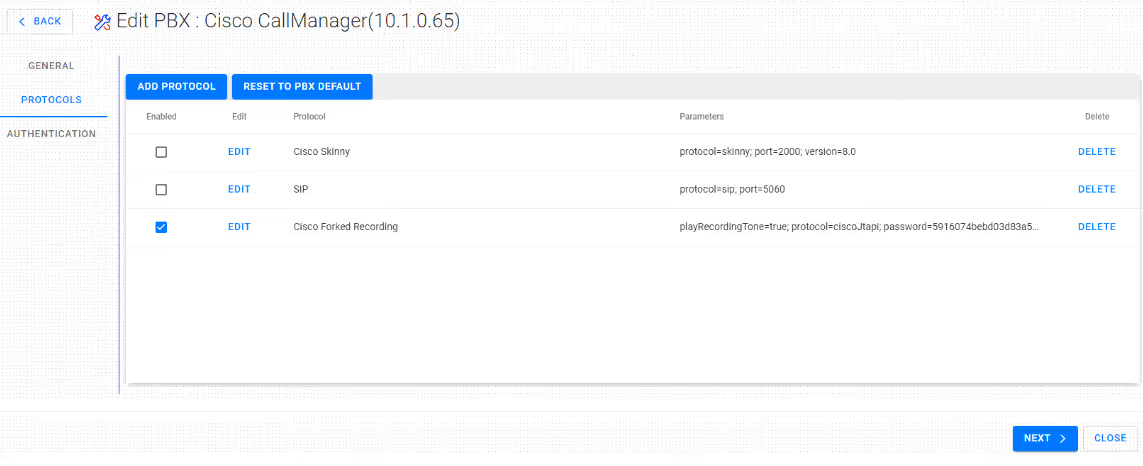
Step 3. Select Next to continue to the Protocols configuration
Protocols: This list should already have Forked Recording
enabled. Make sure it is checked.
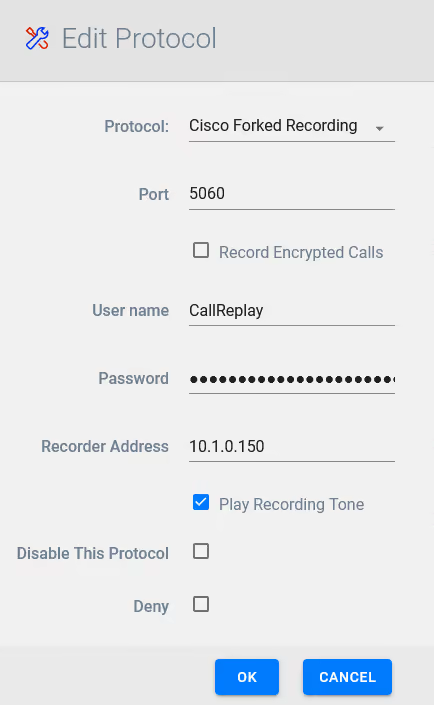
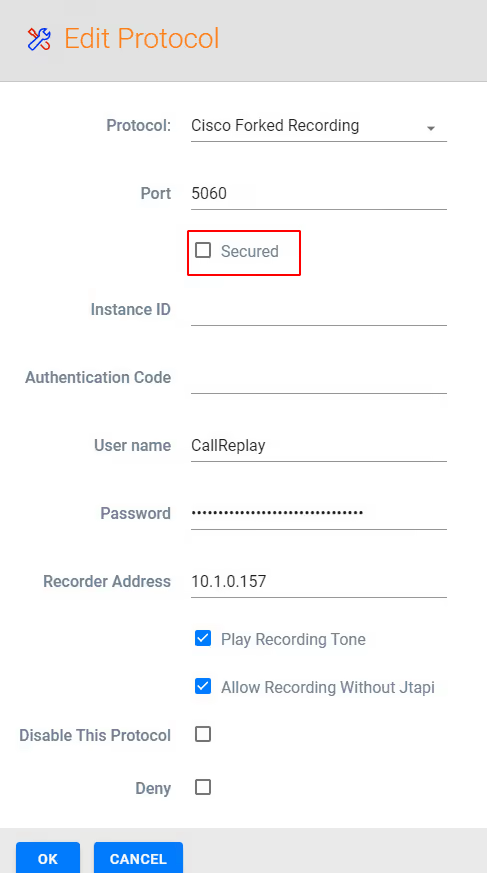
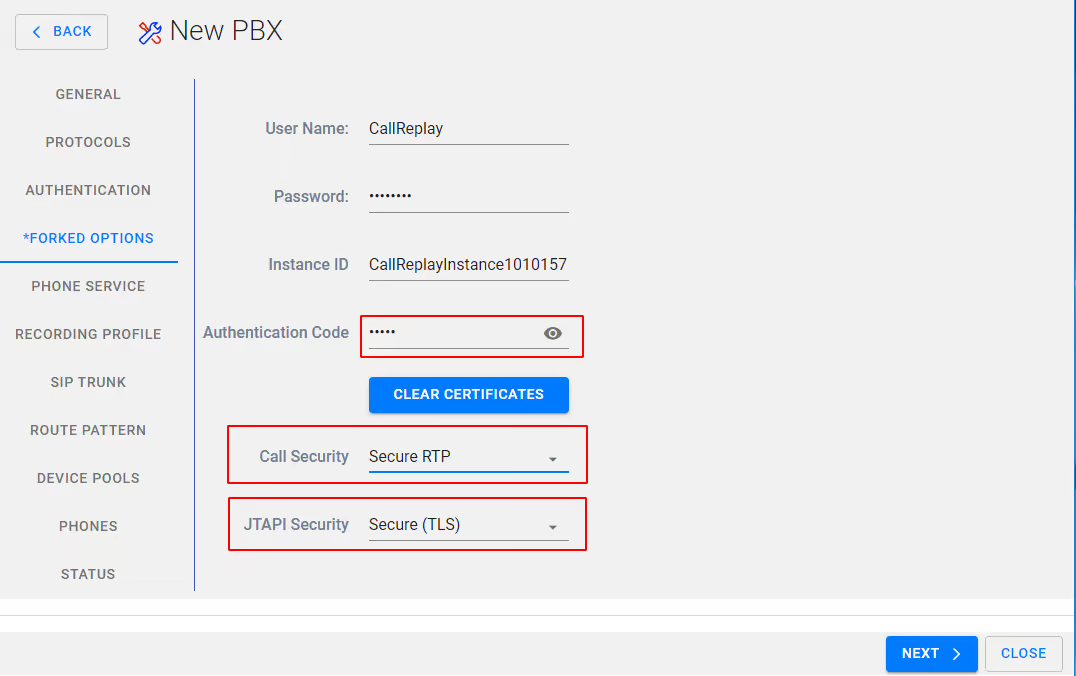
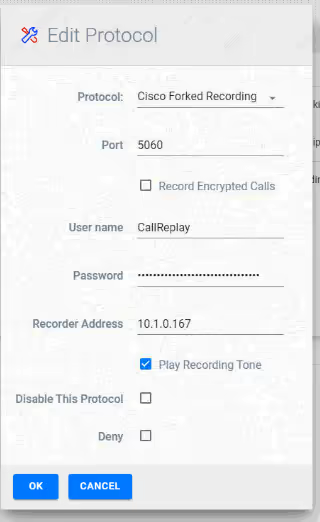
Step 4 Edit Cisco Forked Recording
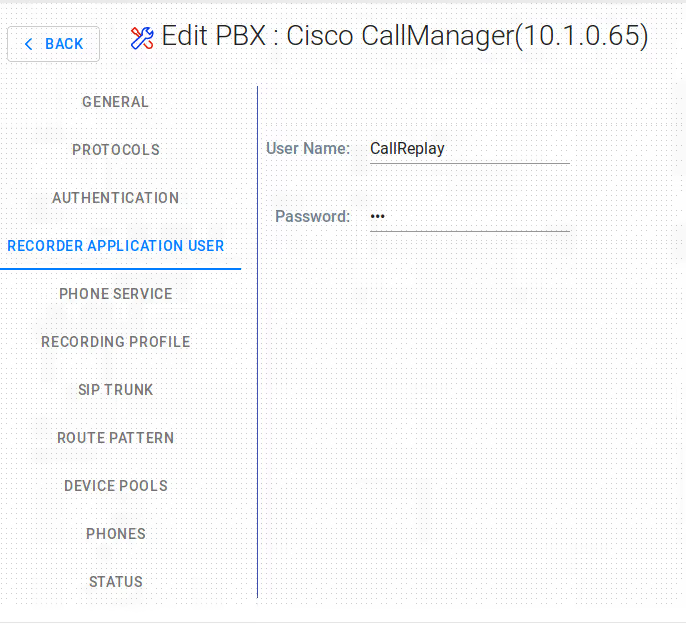
Ensure the password for CallReplay user is set correctly
One the settings are in place click OK and then click the Next button.
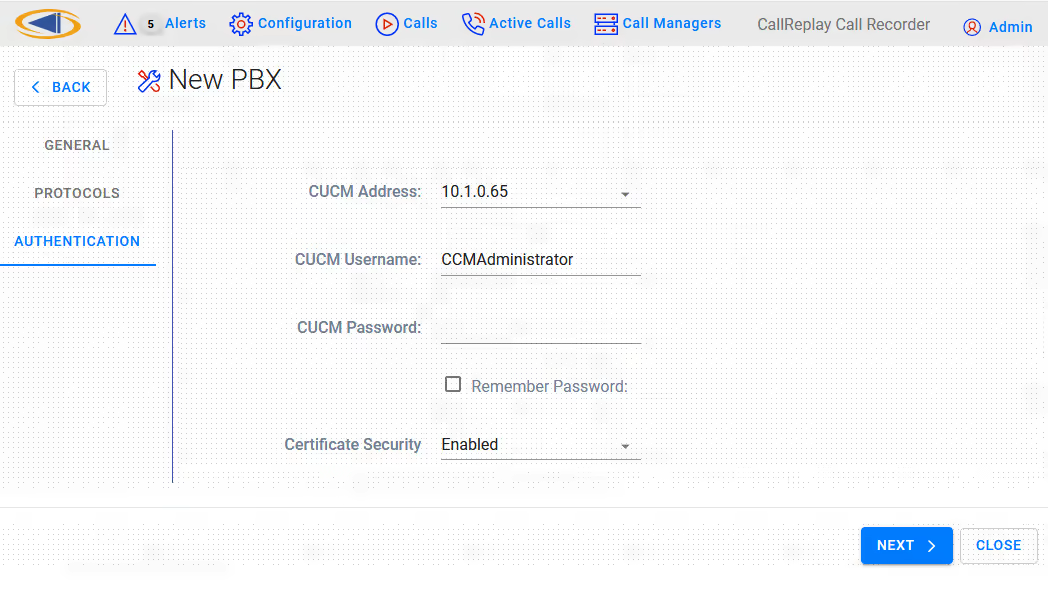
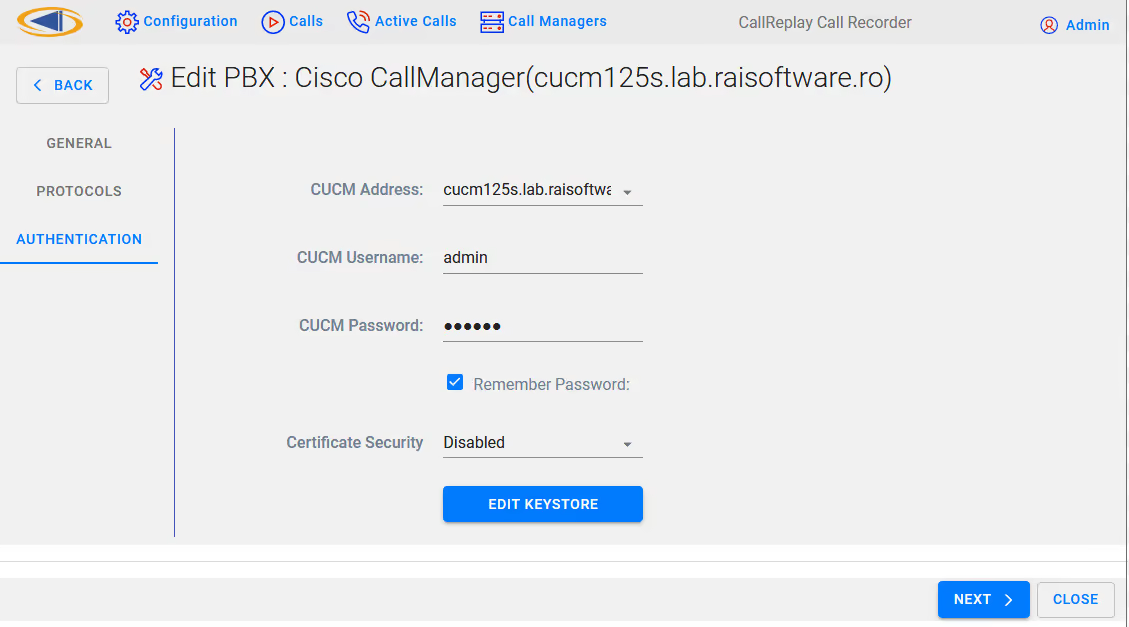
Step 5 Confirm CUCM Username and password and confirm Certificate
Security
Click Next button to conitnue
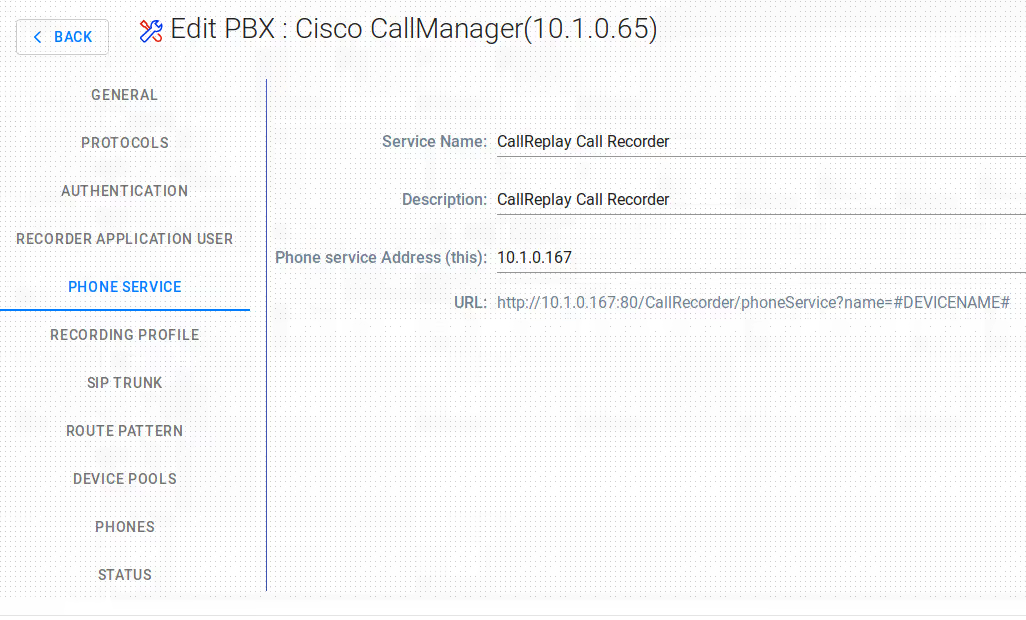
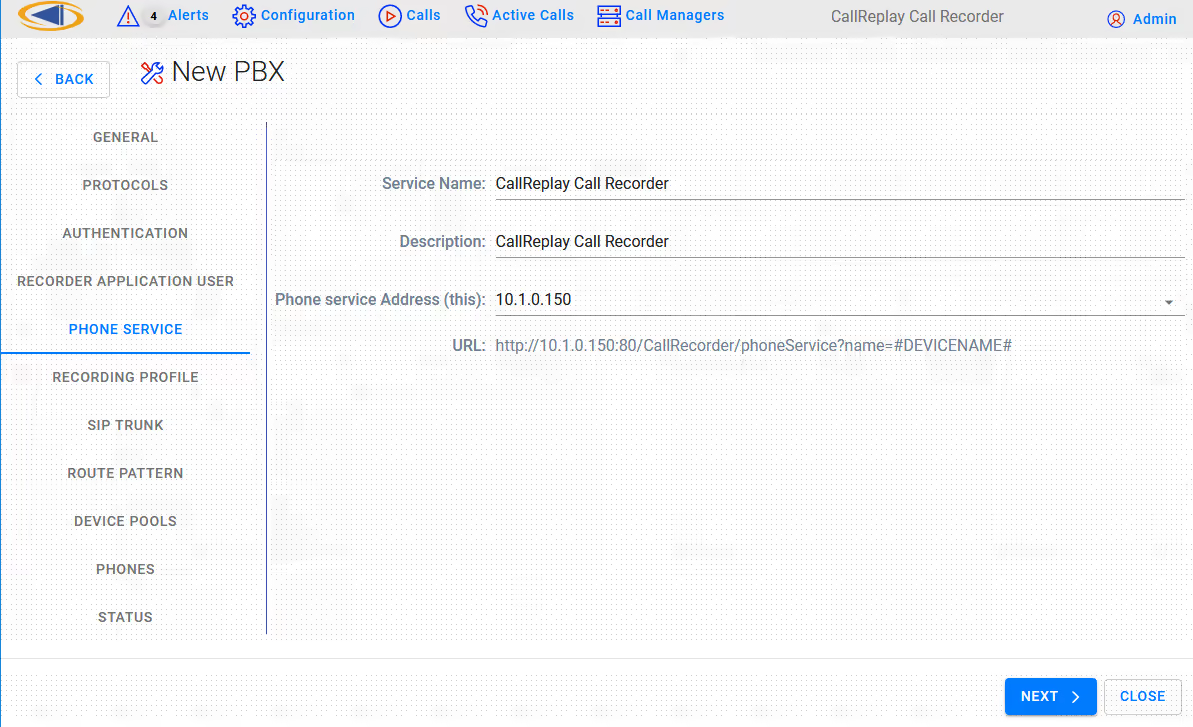
In the next page leave all the fields unchanged unless instructed by
technical support. The Phone Service IP address must be routable from
the phones' VLAN. Press Next button.
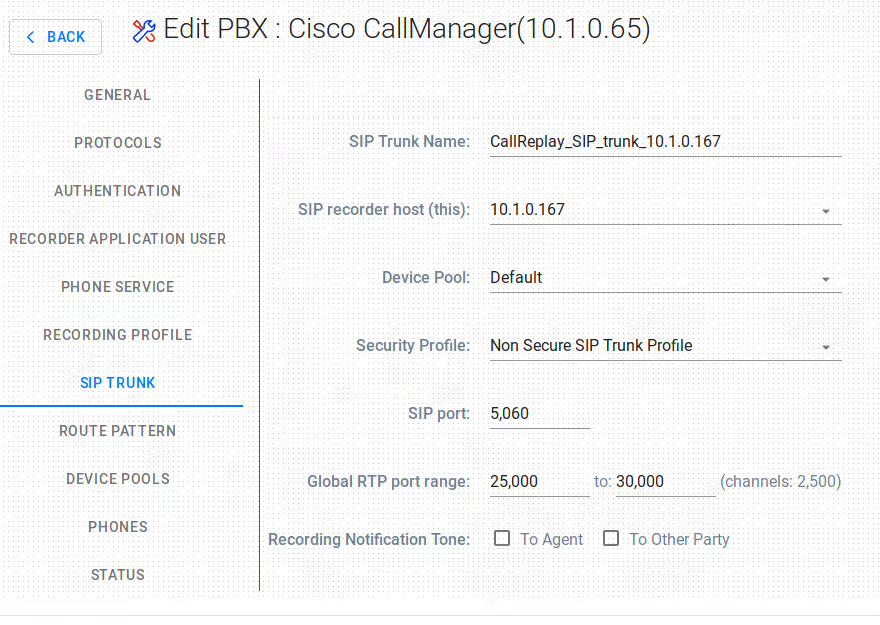
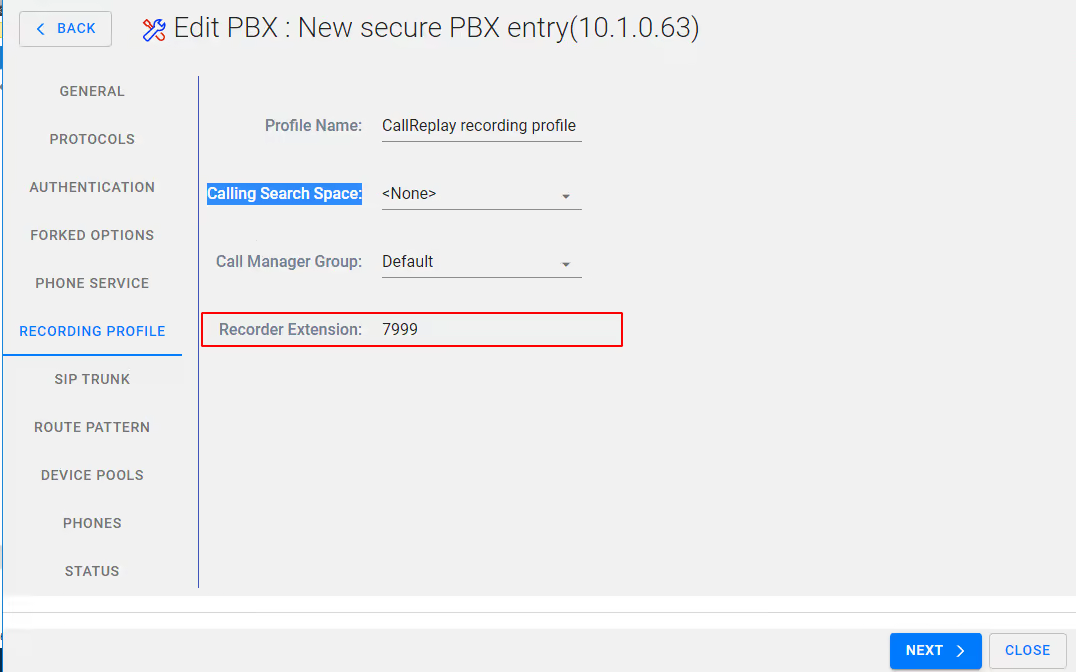
Step 5. Here you must select the correct CallManager Group, Recorder
Extension for CallReplay, the IP address of the CallReply recorder (
also needs to be routable from a phone's IP address ), CSS and Device
Pool for recorded phones, Security Profile, SIP port of Callreplay (
Syn-Apps' SA-Announce also uses a SIP trunk so make sure in that case
to select another port, such as 5061 ) and the RTP port range used by
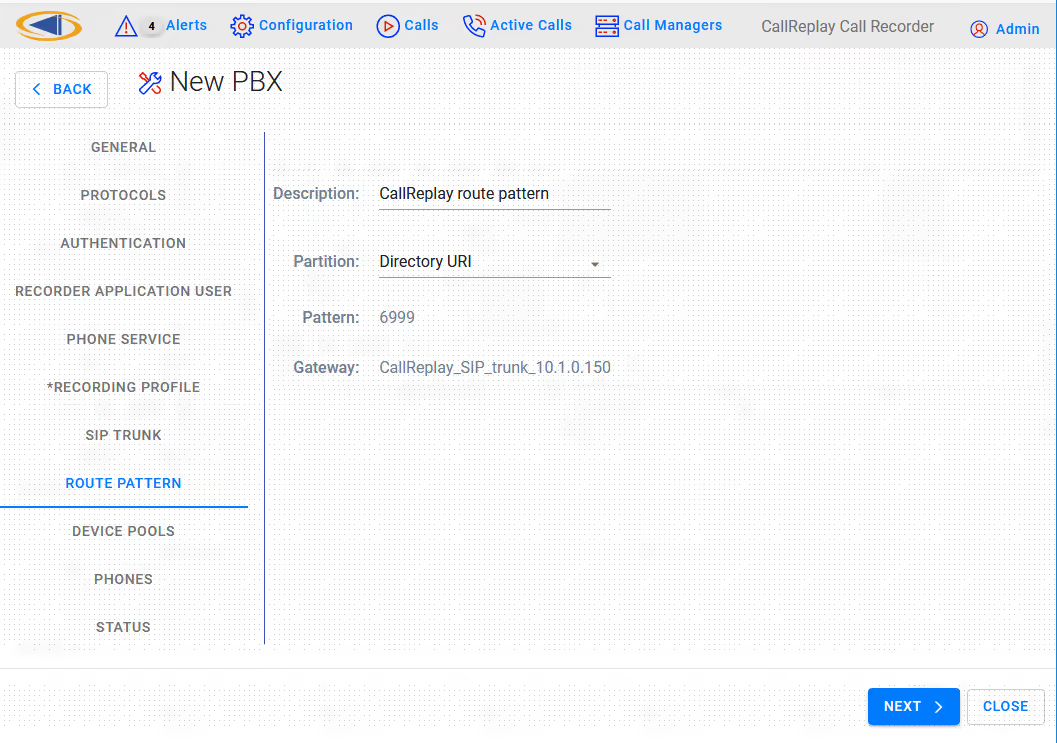
CallReplay for receiving audio streams. The recorder extension must have
the same number of digits as recorded extensions.
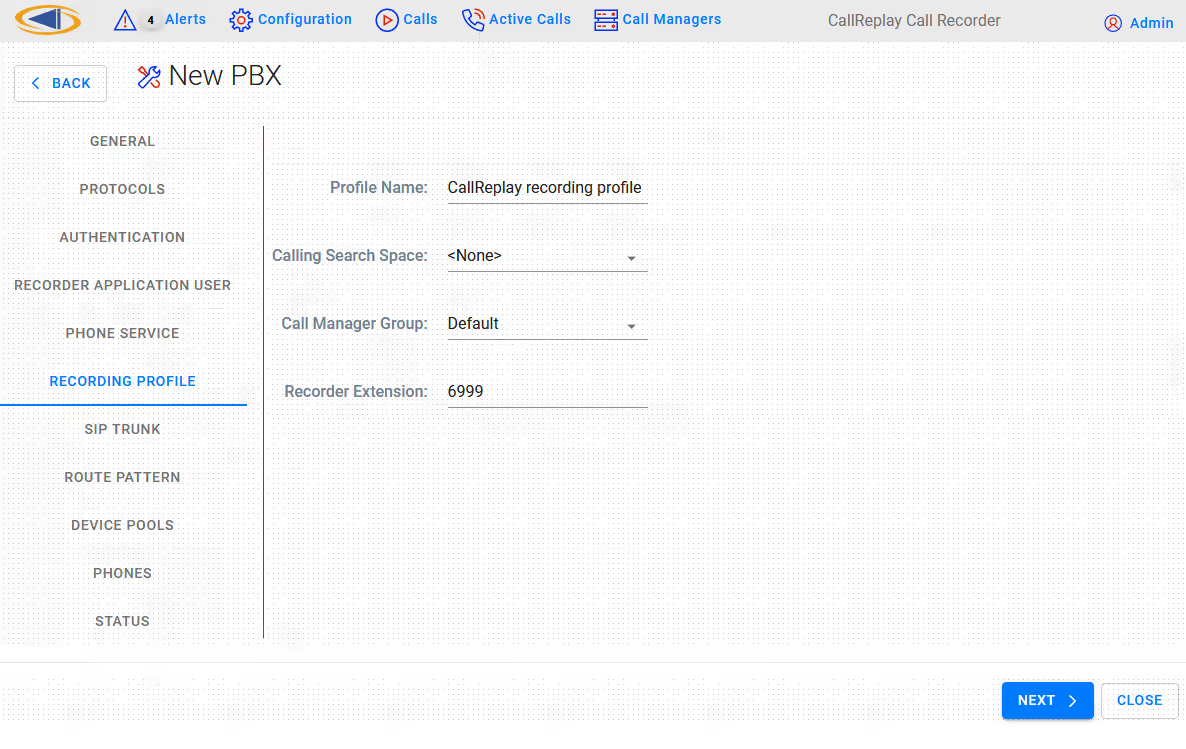
Recording Profile > Calling Search Space: This is the CSS that
will be selected for the Recording Profile. Please use a CSS setting
so that the recording trunk phone number is reachable from all the
phones which are to be recorded. A quick test would be to call the
recording trunk extension from one of the phones to be recorded. The
trunk should answer instantaneously and just silence should be
heard. A fast busy tone would indicate a connection problem.
Recording Profile > Recorder Extension: The number that will be
used to send SIP invites to CallReplay in order to record. The
number of digits for this extension must be the same as the number
of digits of the recorded phones.
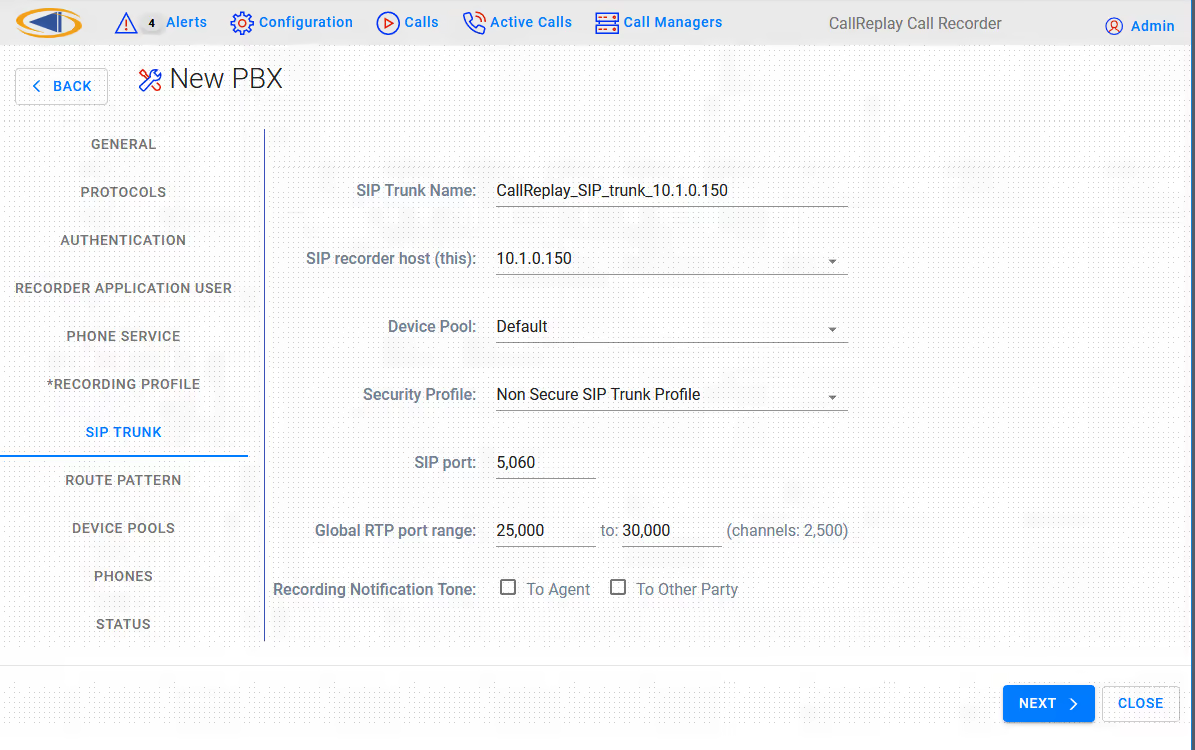
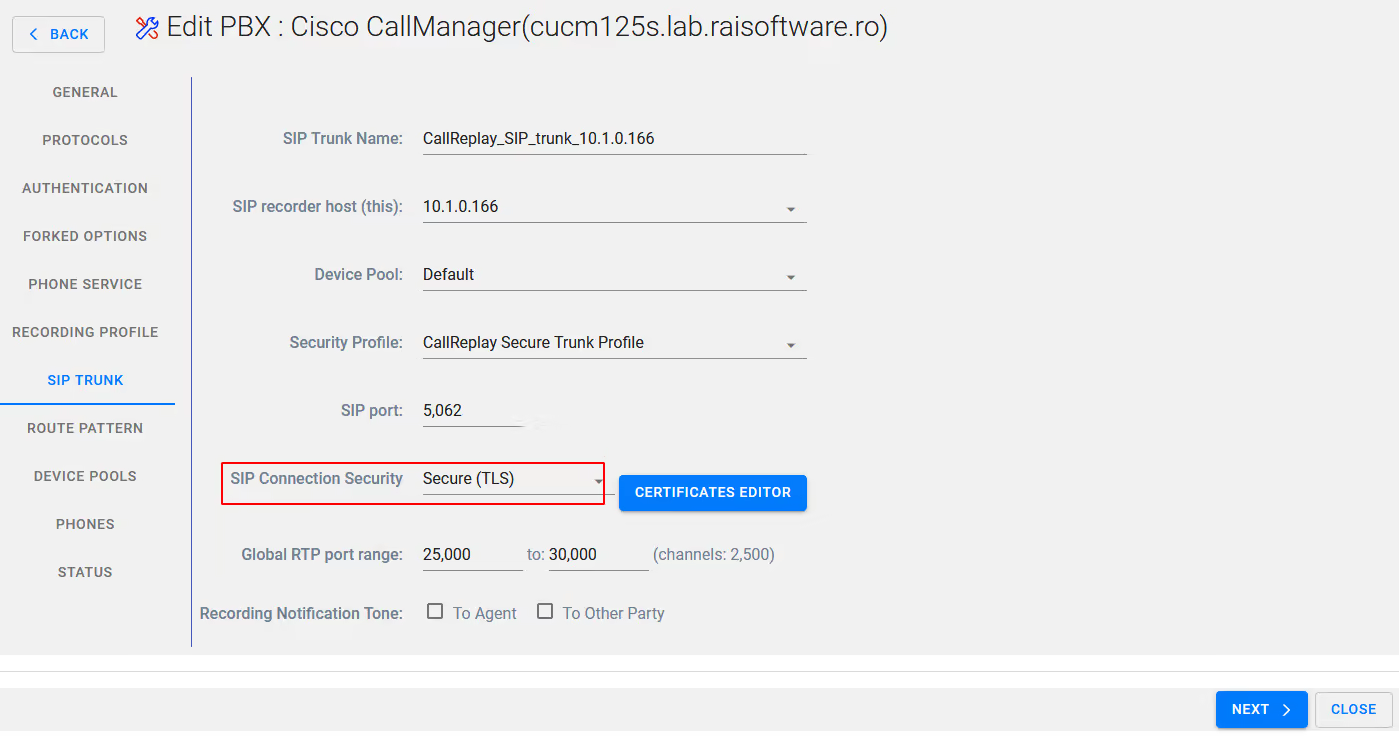
SIP Trunk > SIP recorder host (this): Enter the IP of the
CallReplay machine
SIP Trunk > Device Pool: Choose the Device Pool that the SIP
trunk will be created with. The recorder should be in a DP which
matches the physical location of the recording server. It is
recommended that a dedicated DP is used for the recorder so that no
media transcoding is necessary.
SIP Trunk > Security Profile: Make sure to select a Non Secure
SIP Trunk Profile or a New Non Secure SIP Trunk Profile, this
profile will be configured to use TCP for incoming connections.
Once the above settings are complete, press the Next button.
CallReplay will tell CallManager to create all the profiles (if they
already exist, they will be overwritten).
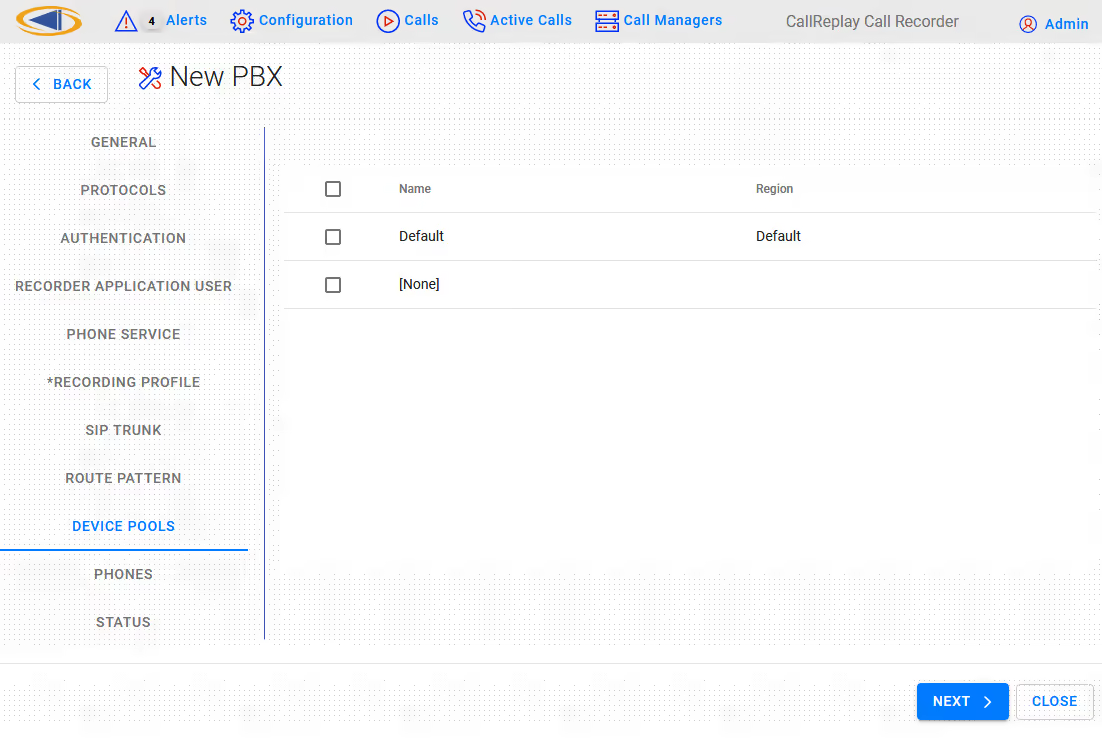
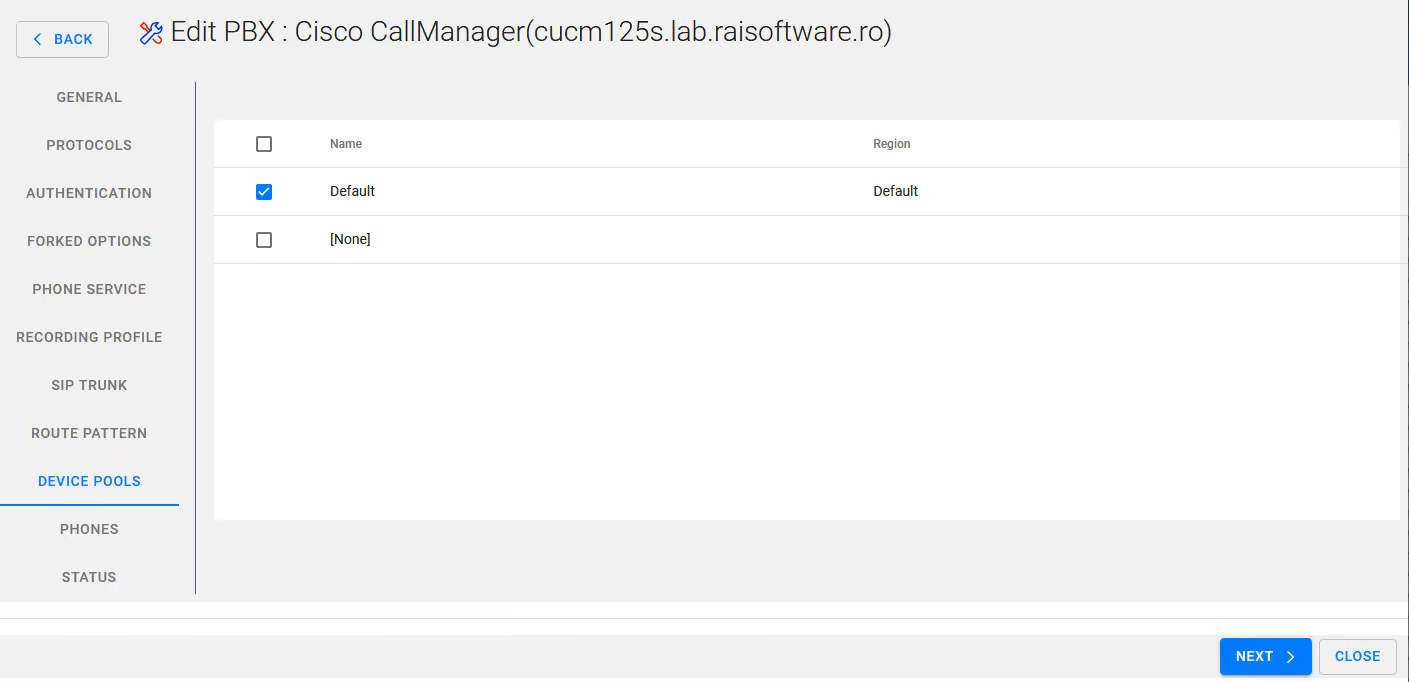
Step 6. In the Device Pools section you can select which device pool
to configure. Once you selected a Device Pool, in the next tab (Phones),
only the phones in the respective pool will be shown.
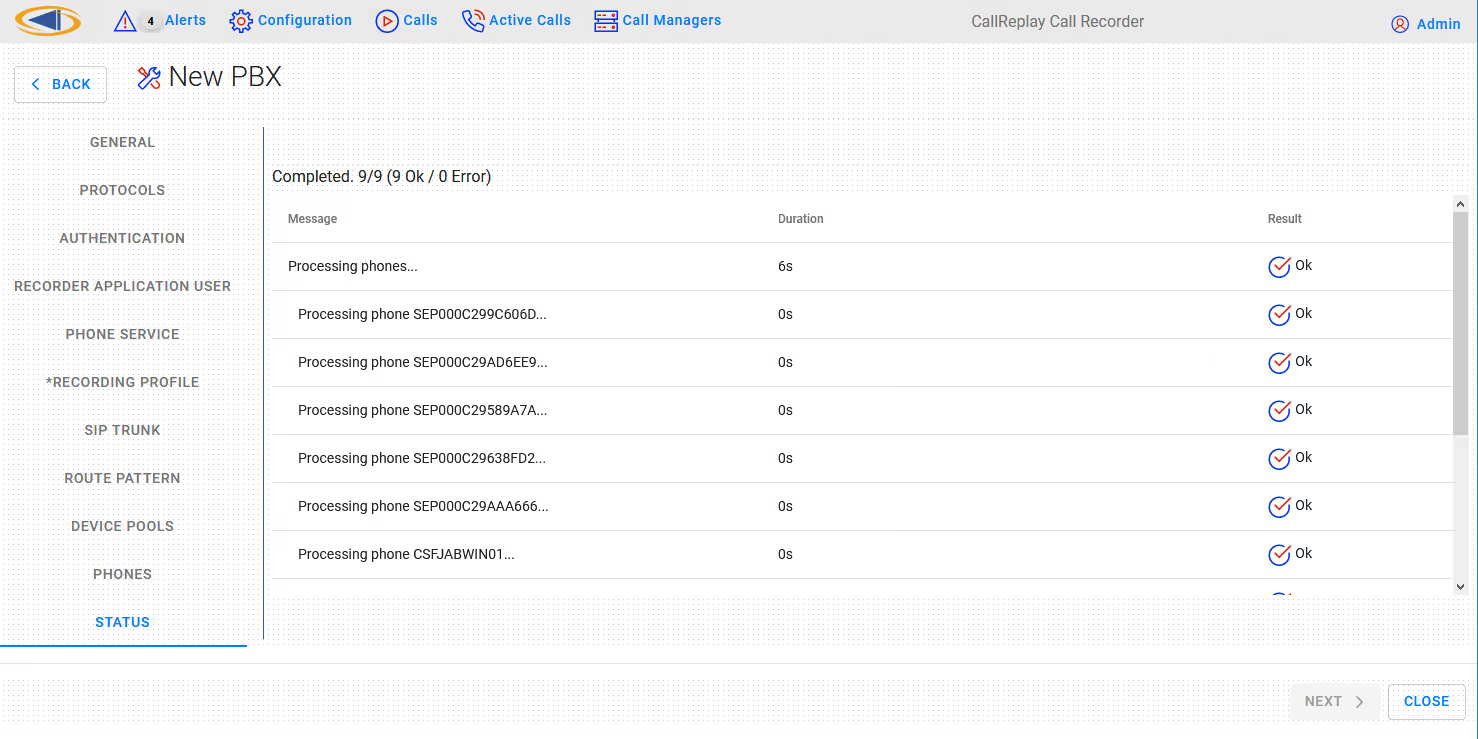
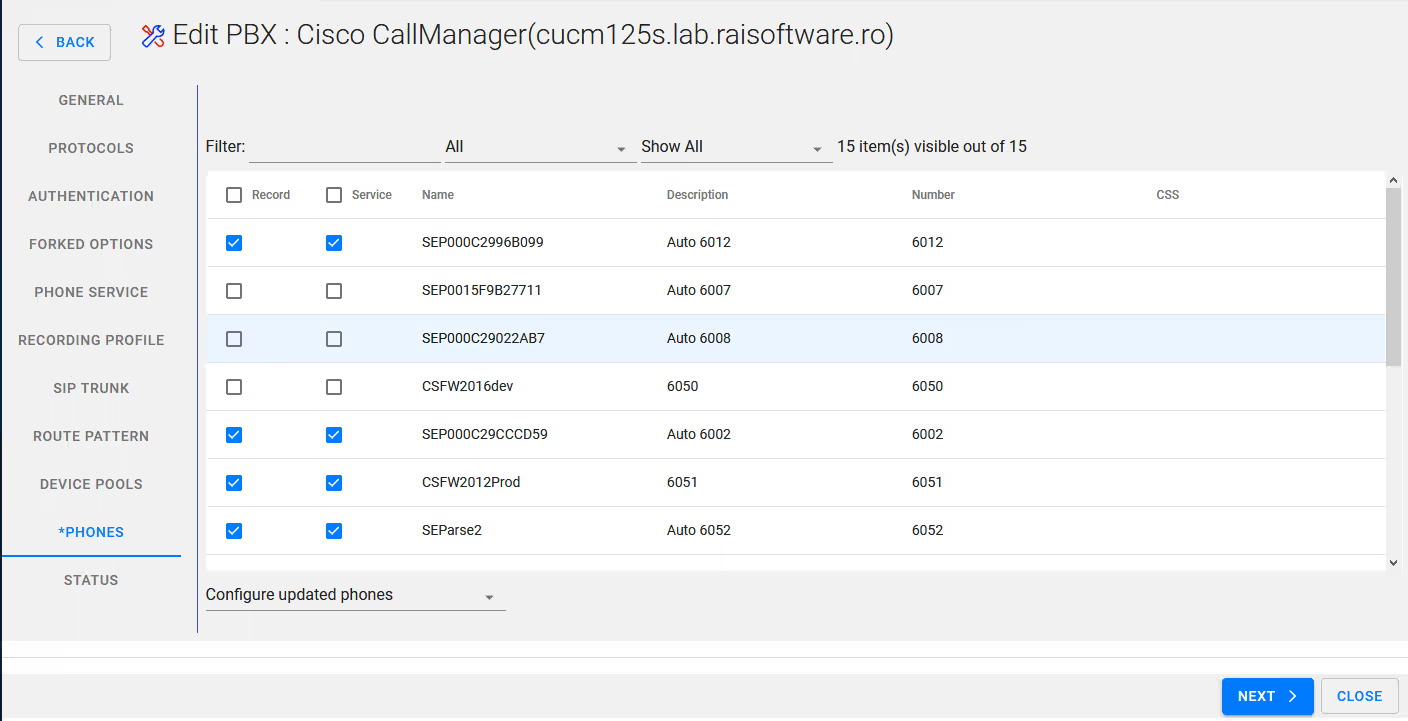
Step 7. Here you have a list of a phones to manage. Check all phones
to record under Record column. Similarly for Service check box. When
that check-box is selected, the phone will be subscribed to CallReplay
Phone Service (see step 2), which will become available on
the Service button (on the phone). Thus we can control recording and
monitoring independently for each phone. You can filter phones
by*** *Selected / Unselected (record or service) or by typing some
text to search in all columns. Checking Reconfigure all controlled
phones will update all phones with current shown configuration,
otherwise only changed ones will be updated.
Step 8. Press the Next button and the selection will be
processed. The status of processing will be shown.
Press the Close button to close the wizard configuration utility.
Cisco CallManager - Alternative/Manual Configuration for Forked Recording
We recommend the usage of CallReplay Forked wizard for configuring your
Cisco CallManager. But if you do not want to use this feature follow
these steps to prepare your Cisco CallManager for recording.
1. Recording phones using forked
You need to create by hand an application user - CallReplay, a new SIP
profile - CallReplay SIP profile, a recording profile - CallReplay
recording profile and a new trunk - CallReplay_SIP_trunk.
CallReplay Application User
In CallManager site administration go to User Management > Application
User. Press the Add New button and fill in the text fields as follows:
Application User Information
User ID*: CallReplay ** Password**: password Confirm Password: password ** Presence Group***: select* Standard Presence group* Device Information Add from the list of Available Devices to the list of Controlled
Devices the phones who will be recorded. If you use EM profiles then add from "Available Profiles" list
to the "CTI Controlled Device Profiles" list the EM profiles who will
be recorded. Permissions Information ** Groups**: press *Add to User Group *button and in list shown
subscribe to the following groups: Standard CTI Enabled, Standard CTI
Allow CallRecording, Standard CTI Allow Control of Phones supporting
Connected Xfer and conf and Standard CTI Allow Control of Phones
supporting Rollover Mode
Press Save button to create the application user.
CallReplay SIP profile
In CallManager site administration go to Device > Device Settings >
SIP Profile. Press Add New button and fill in the Name* with
value CallReplay SIP profile. Save the changes
CallReplay recording profile
In CallManager site administration go to Device > Device Settings >
Recording Profile. Press Add New button and fill in the text fields as
follow: Name*: CallReplay recording profile Recording Calling Search Space: select a CSS Recording Destination Address*: xxx - the extension used by
CallRecorder. The value must be an unassigned EXT and having the same
number of digits as recorded extensions. If extensions in your network
have 3 digits then this value must have 3 digits too.
Save the changes.
CallReplay SIP trunk
In CallManager site administration go to Device > Trunk and press Add
New button to define a new trunk. Fill in the text fields: Device Information ** Device
Name***: CallReplay_SIP_trunk_xx.xx.xx.xx where xx.xx.xx.xx is
the IP of CallReplay server. Device Pool*: select the device pool where the recorded
phones are registered SIP information Destination Address: the IP of the CallReplay server Destination Port: the port where CallReplay is listening (
default value 5061 ) SIP Trunk Security Profile*: select security profile
accordingly SIP Profile*: select CallReplay SIP profile ( created
before )
Save the changes.
2. Subscribe phones to the CallReplay Call Recorder Phone Service
Create CallReplay Call Recorder phone service
In CallManager site administration go to Device > Device Settings >
Phone Services and press Add New button to define a new phone service.
Fill in the text fields as follow: Service Name*: CallReplay Call Recorder ** ASCII Service Name***: CallReplay Call Recorder Service Description: CallReplay Call Recorder Service
URL: http://IP:PORT/CallRecorder/phoneService{.external-link} (
you can get these values from CallReplay Site Configuration ); Service Category*: select XML Service Service Type*: select *Standard IP Phone Service * Enable: True
Save the changes.
Subscribe devices
In CallManager site administration go to Device > Phone and perform the
following operations: -select a device; -select from Related Links dropdown list
option Subscribe/Unsubscribe Service and press Go button; -in the new windows select CallReplay Call Recorder service -press Next and after that* Subscribe* button; -close the window; After the phone reset the CallReplay Phone Service becomes available
for use.
7.7 - IPTrade Turret Recording
CallReplay offers an fully integrated solution for IPTrade Turret VoIP
recording, based on active recording. This means that the two platforms
are directly connected, without requiring any additional hardware and a
duplicate media stream of every conversation to be recorded is sent from
the turret to the recorder.
Active Recording Settings
This section represents the system configuration for active recording on
IPTrade turrets. Administrators must set the CallReplay as the recording
server and indicate that server to the IPTrade system. The following
settings have been confirmed to work on CallReplay v7.5 and IPTrade
Turret Support Server (TSS) v7.4.24448.
CallReplay settings
On Recording > PBX page choose New PBX and from the PBX Type,
select IPTrade Active.
Fill in the the IP Addresses field with any address (ex. 0.0.0.0).
From Protocols list choose IPTrade Active and edit the protocol
settings:
Port indicates the TCP port to listen for incoming connections.
Default value is 4456. You must enable this port into the system
firewall.
VAD indicates whether or not the recording server will use Voice
Activity Detection settings for silence detection.
Turret Support Server settings
Following settings are required on TSS for integration with the active
recoding system.
Set turret recording engine
Go to System\Settings\FTP settings (turrets) and on Recorder -
Basic Mode choose "iptrade" for Recorder compatibility.
Configure the voice recorder address
Use the same location as the one used to set the recording engine or
inside user profile (Account Management\User) or shared profile
(Account Management\Shared Profile) go to Settings tab and on
Recorder - Basic Mode configure the voice recorder location in form
<protocol>://<address>:<port> where:
Protocol indicates the voice recording system to be considered.
Valid values are: vrc.
Address indicates the IP address or the name of the voice recording
service host.
Port indicates the TCP port to connect to the voice recording
service (same as the value used to configure the IPTrade Active
Recording protocol in CallReplay).
Requires Jabber for Windows 9.2 or later and UCM 10.0(1) or later
Yes
Yes
No
N/A
N/A
Cisco Jabber for Windows -Remote Desktop Control Mode
N/A
N/A
Refer to the device model under remote control to determine support.
Refer to the device model under remote control to determine support.
Refer to the device model under remote control to determine support.
Refer to the device model under remote control to determine support.
Refer to the device model under remote control to determine support.
Refer to the device model under remote control to determine support.
Refer to the device model under remote control to determine support.
Cisco Jabber for Mac -Softphone Mode
XX
Requires UCM 10.0(1) or later
Yes
Yes
No
Requires Jabber for Mac 9.2 or later
Requires Jabber for Mac 9.2 or later
Cisco Jabber for Mac - Remote Desktop Control Mode
N/A
N/A
Refer to the device model under remote control to determine support.
Refer to the device model under remote control to determine support.
Refer to the device model under remote control to determine support.
Refer to the device model under remote control to determine support.
Refer to the device model under remote control to determine support.
Refer to the device model under remote control to determine support.
Refer to the device model under remote control to determine support.
Cisco Jabber for iPad (Wifi-only)
N/A
N/A
Requires UCM 10.0(1) or later
Yes
Yes
No
N/A
N/A
Cisco Jabber for iPhone
N/A
N/A
Requires UCM 10.0(1) or later
Yes
Yes
No
N/A
N/A
Cisco Jabber for Android
N/A
N/A
Requires UCM 10.0(1) or later
Yes
Yes
No
N/A
N/A
Cisco Unified Personal Communicator - Softphone Mode
N/A
N/A
N/A
N/A
N/A
N/A
N/A
N/A
Not a supported device
Cisco Unified Personal Communicator - Remote Desktop Control Mode
N/A
N/A
Refer to the device model under remote control to determine support.
Refer to the device model under remote control to determine support.
Refer to the device model under remote control to determine support.
Refer to the device model under remote control to determine support.
Refer to the device model under remote control to determine support.
Refer to the device model under remote control to determine support.
Refer to the device model under remote control to determine support.
Cisco Unified Communications Integration for Microsoft Office Communicator/Lync -Softphone Modes
N/A
N/A
Requires UCM 10.0(1) or later
Yes
Yes
No
N/A
N/A
Cisco Unified Communications Integration for Microsoft Office Communicator/Lync -Remote Desktop Control Mode
N/A
N/A
Refer to the device model under remote control to determine support.
Refer to the device model under remote control to determine support.
Refer to the device model under remote control to determine support.
Refer to the device model under remote control to determine support.
Refer to the device model under remote control to determine support.
Refer to the device model under remote control to determine support.
Refer to the device model under remote control to determine support.
Cisco Unified Communications for RTX (CUCRTX) -Softphone Mode
N/A
N/A
Requires UCM 10.0(1) or later
Yes
Yes
No
N/A
N/A
Cisco Unified Communications for RTX (CUCRTX) - Remote Desktop Control Mode
N/A
N/A
Refer to the device model under remote control to determine support.
Refer to the device model under remote control to determine support.
Refer to the device model under remote control to determine support.
Refer to the device model under remote control to determine support.
Refer to the device model under remote control to determine support.
Refer to the device model under remote control to determine support.
Refer to the device model under remote control to determine support.
Cisco Web Communicator forWx Social -Softphone Mode
N/A
N/A
Requires UCM 10.0(1) or later
Yes
Yes
No
N/A
N/A
Cisco Web Communicator forWx Social - Remote Desktop Control Mode
N/A
N/A
Refer to the device model under remote control to determine support.
Refer to the device model under remote control to determine support.
Refer to the device model under remote control to determine support.
Refer to the device model under remote control to determine support.
Refer to the device model under remote control to determine support.
Refer to the device model under remote control to determine support.
Refer to the device model under remote control to determine support.
Cisco Unified Communications Integration for WebEx Connect -Softphone Mode
N/A
N/A
N/A
N/A
N/A
N/A
N/A
N/A
Not a supported device
Cisco Unified Communications Integration for WebEx Connect - Remote Desktop Control Mode
N/A
N/A
Refer to the device model under remote control to determine support.
Refer to the device model under remote control to determine support.
Refer to the device model under remote control to determine support.
Refer to the device model under remote control to determine support.
Refer to the device model under remote control to determine support.
Refer to the device model under remote control to determine support.
Refer to the device model under remote control to determine support.
VGC Phone
N/A
N/A
N/A
N/A
N/A
N/A
N/A
N/A
Not a supported device
VG224
N/A
N/A
N/A
N/A
N/A
N/A
N/A
N/A
Not a supported device
VG248
N/A
N/A
N/A
N/A
N/A
N/A
N/A
N/A
Not a supported device
CTI Port
N/A
N/A
Requires UCM 10.0(1) or later
Yes
Yes
Yes
N/A
N/A
CTI Remote Device (Extend & Connect)
N/A
N/A
Requires UCM 10.0(1) or later
Yes
Yes
Yes
N/A
N/A
CTI Route Point
N/A
N/A
N/A
N/A
N/A
N/A
N/A
N/A
Not a supported device
CTI Route Point (Pilot Point)
N/A
N/A
N/A
N/A
N/A
N/A
N/A
N/A
Not a supported device
ISDN BRI Phone
N/A
N/A
N/A
N/A
N/A
N/A
N/A
N/A
Not a supported device
Carrier Integrated Mobile
N/A
N/A
Requires UCM 10.0(1) or later
Yes
Yes
No
N/A
N/A
IMS Client
N/A
N/A
Requires UCM 10.0(1) or later
Yes
Yes
No
N/A
N/A
Mobile Communicator
N/A
N/A
N/A
N/A
N/A
N/A
N/A
N/A
Not a supported device
Nokia S60
N/A
N/A
Requires UCM 10.0(1) or later
Yes
Yes
Yes via DTMF
N/A
N/A
Remote Destination Profile (Single Number Reach)
N/A
N/A
Requires UCM 10.0(1) or later
Yes
Yes
Yes via DTMF
N/A
N/A
7.9 - JTAPI Encrypted Call Support
To enable support of encrypted calls the following actions will need to
be performed
From within the CallReplay administration GUI
Navigate to Call Managers and Add a PBX
Add the appropriate details for the highlight boxes in the image
NOTE: Ensure IP addresses include Publisher and all subscribers, FQDN
can be used but are not recommended.
Select Next, You will then be presented with the following protocols
screen
On Cisco Forked Recording - Select Edit and ensure Secured is
enabled/checked
Select OK and Next
Fill out the connection details for your CUCM
select EDIT KEYSTORE,
Within Keystore Editor select + NEW to create a self sign
certificate
NOTE: you may also import your own certificate here from a trusted
Certificate Authority in X.509 .PEM format
Next export the certificate, and return to Authentication page by
selecting SAVE and then select NEXT.
On the FORKED OPTIONS page ensure you have the required Call Security
(Secure RTP) and that JTAPI security is set to Secure (TLS). Also make a
note of the Instance ID and the Authentication Code by clicking the eye
icon.
Select NEXT
If required Modify the Service Name and Description and verify the
Phone service Address (this) is correct – this should be the IP address
of the CallReplay server, then Select NEXT
If required modify the Profile name or leave as default, modify Call
Search Space and Call Manager Group as required or leave as default,
Leave Recording profile as default or modify if required, select Next
On the SIP trunk tab ensure that you have selected Secure (TLS) - you do
not need to be concerned with Certificate editor if yu followed the
earlier instructions.
Make any other requried modifications here or leave as default
Select Next
On the Route Pattern tab leave as default or make modifications if
required
Select Next
Selecrt your device Pool
Select Next
Select the desired phones / extensions for inclusion for recording
Select Next
Close the wizard
Then launch the web interface for CUCM (Cisco Unified Communications
Manager)
And select Operating System Administration
Login into the interface as an administrator
Then select Security / Certificate Management
Select Upload Certificate/Certificate chain
Select Upload Certificate/Certicate chain
For Certificate Purpose* ensure to select CallManager-trust
Provide a freindly name for example : servername-callreplay
Select Browse from Upload File and locate the certificate you exported
from the CallReplay keystore earlier or one that you have created from
your own CA which is also imported to the CallReplay keystore store.
Select Upload
Once uploaded please note the requirement to restart CallManager and
TFTP service on CUCM
8 - Storage
Storage configuration
8.1 - Storage Volumes
The Storage Volume page allows to set the folder where the calls are
stored. You can add new folders, you can join folder, or you can remove
folders. In addition, CallReplay can manage multiple volumes that store
calls on separate drives, which will be used in a round-robin order.
To add new volumes
Go to Storage > Storage Volumes.
Click Add Volume.
Provide all the information requested.
Click Ok.
Path - destination path on the local HD, where calls will be
stored
Quota - the maximum space that can be used to store calls. (0
means unlimited).
Reserved - the reserved storage space for CallReplay
When (Used Space + Remaining Drive Free Space) becomes lower than
Reserved Space, a warning e-mail will be sent to the
administrator.
The storage volume list will be updated, including the information about
free space on available drivers.
To join volumes
Go to Storage > Storage Volumes.
Click Join on the volume that will be the source
Select the To as the destination folder.
Click Join.
To delete a volume
Go to Storage > Storage Volumes.
Select the row with volume to delete.
Click on the red circle button in Delete column.
Click Yes to confirm.
NOTES
A deleted volume is not removed when it contains calls, will be just
marked as deleted and no other calls will be stored on it.
8.2 - Storage Settings
The Advanced Storage Configuration holds further options for the storage
of recordings:
Force G729 Recompression will encode all the stored files with the
G.729
Capture Device Buffer - sets the buffer used to store capture
packets in SPAN recording. It should not be changed unless instructed by
CallReplay support team.
Recording Database Connections should correspond to the number of
cores your processor has. Overprovisioning or high processor load from
other applications can lead to a decrease in performance or, in the case
of SPAN, recording quality
Recording Disk Threads should be tailored to the write speed and
IOPS of your current storage. For regular HDD storage, 2 threads should
be enough, and SSD based storage can use more threads, up to the number
of processing cores.
Temporary Files Expiration - time to keep the temporary files, such
as .PNG files
Recording Storage Format allows you to set the file type of the
recorded calls. The recording is made in RTP format, and the default
setting is to convert it to SPX, which is the most efficient compression
format, designed specifically for voice audio. When changing the format,
you have the option of converting existing recordings to the new format,
as well.
Conversion Threads should be provisioned like Recording Disk
Threads, as they have the same impact on the storage hardware. For
regular HDD storage, 2 threads should be enough, and SSD based storage
can use more threads, up to the number of processing cores.
Player Access Password - auto generated password, used for
interfacing with APIs
8.3 - File Renaming
File Name TemplatesPage allows the administrator to change the
template used to generate the file names for storing recorded calls.
The file names template is a string containing macros that expand to
values related to the call like the call ID or caller number. The list
of macro names that can be used is displayed in the "Fields list"
table as can be seen in the image. Click on a macro name from the table
to have the macro included at the end of the current file names
template. You can also type any macro name from the table in the File
Name Template field, surrounded by barces { and }, to include the
macro in the file name template string.
The Example field (below the File Name Template field) shows how a
file name would look like using the currently displayed template string.
Also watch the Example field for errors like a worng macro name being
typed in the template string.
A new file name template takes effect after the Save button is
pressed, and the new template will be used for all calls recorded
thereafter. To also apply the new template to all the old files, that is
to rename all previous files using the new template, use the "Rename
existing files ?" radio group and select the option "On". For this
case, you can use the "Call count" field as an estimate of the
number of calls that would have to be renamed with this option.
After saving a new template with the option to rename existing files,
you can see the rename progress in the Call count field, in the format
"remaning / total", like for example "120 / 550".
The "Cancel" button restores the current template string into
the File Name Template field, and discards any changes you might have
typed in the input box.
Storage > File Renaming
8.4 - Call Encryption
Overview
We value your privacy, so we introduced an OpenPGP public key encryption
of recorded calls. If you do not have an OpenPGP public / private key
pair, you can generate them using a 3rd party software which you can
find freely on Internet (see notes on the bottom of the page).
Setting Up Call Encryption
Login as administrator on CallReplay Cloud Server and go to 'Storage'
/ 'Recording Encryption'.
Click the 'Upload' button and select your OpenPGP public key file. If
successful, you will see some of the details of the public key
certificate. For the purpose of call encryption, the certificate does
not need to be signed.
Upon the next connection of your mobile phones to your tenant, the
certificate will be sent to all of them and all subsequent calls will be
encrypted using this certificate.
You can change the certificate any time you want, and only subsequent
calls will be encrypted with the new certificate, the older ones will
remain as they were (unencrypted or encrypted with older certificates).
Notes: 1.Uploading only the public key gives you a great deal of privacy: in
case of mobile phone theft, the calls could not be listened. The
drawback is that neither you can listen to your calls on the mobile
phone. 2.In case you've wondered if someone could listen to your calls
uploaded to CallReplay Cloud Server, this way you can be sure nobody
could. The drawback is the same: neither you can listen to your calls
online.
The only way to listen to your encrypted calls is to download them to a
computer, decrypt them with your PGP capable software of your choice.
The software will ask you for the private key, will decrypt your files
and you can listen to them using your favorite WAV/3GPP player.
Quick setup for call encryption
You can also generate an OpenPGP private/public key pair using
'Generate' button from the same page. After entering a name and a
password, you will be prompted to save the private key to your computer.
The generated public key will be sent to your mobile phones and calls
will be encrypted using it. However, the private key will not be kept on
our server for security reasons, so you should take proper care of the
saved key. If you lose it, your calls cannot be decrypted.
Mobile phone encryption configuration
For the encryption to work, after you generated or uploaded a public key
on CallReplay Cloud Server, you need to connect your mobile to the
server. Make sure you have Internet connection then either go to
'Status' page and click 'Upload Now'.
Then go to the 'Settings' page, 'Upload Server' section and you
should see the new info on 'Encryption Certificate' item.
Note: in case you have used multiple certificates over time, for each
encrypted call you will see the certificate details on the call details
page; this way you can identify the private key required to decrypt the
recorded call.
Notes
The encrypted file conforms with OpenPGP standard (RFC 4880). The
encryption is done using AES 256.
The generated certificate is a 1024-bit RSA key OpenPGP.
If you do not have an OpenPGP certificate and prefer creating one
yourself, you can use GPG4Win, which is a 3rd party OpenPGP compliant
free software for Windows: http://www.gpg4win.org.
9 - Playback
Replay recorded calls
9.1 - Replay Calls
Please refer to the Replay Calls in the User’s Guide, section 2.1
9.2 - Audit
Audit Page allows to see who listened a call or who emailed a call.
You can filter by auditor or / and by phone number. This option is
accessible through Playback / Audit
Playback > Audit
9.3 - Active Calls
The Active Calls window allows the administrators to view calls
which are in progress, monitor them, stop or resume recording. This
window is available from the Playback > Active Calls menu or from
the Active Calls ribbon button below the menu.
Playback > Active Calls
The top area of the window, above the current calls table shows the
following information:
Max Licensed Calls: Shows the total number of active,
in-progress calls that can be recorded.
Recorded Calls: Shows the total number of active, in-progress
calls.
Waiting for demand: Shows the total number of calls which can be
recorded on-demand when the user selects Record This Call on the
phone services button. Call recording can also be triggered from the
CallReplay interface by clicking the Start Recording icon on a call
in the list. If the user doesn't request recording, the call will
not be recorded.
Not Recorded Calls: Shows the total number of active,
in-progress calls which will not be recorded. This can happen due to
not enough channels or because of the currently set Recording
Policies in Unified Configuration.
When calls are in progress, they will appear in this window. The
columns include the following information:
Calling Party: The number of the calling party.
Called Party: The number of the called party.
Start Time: The date and time the call started.
Recording Policy: The rules/policies which influence the call
and the allocated pool.
Actions: The 4 icons allow to monitor an active conversation,
start recording a call in progress, pause/resume recording a call in
progress, or stop recording. When a recording is stopped, the call
is discarded and there will be no possibility to record it again.
Monitoring a Call
To listen to a call in progress, click the Speaker icon in the rightmost
column. A popup window playing the current conversation should appear:
Recording Policy Column
The Recording Policy column displays information about the recording
policies which are matched for an active call. For example, in the
screenshot below the active call is recorded only On-Demand, meaning
the user would have to press the Record This Call phone service button
for the call to get recorded, or the administrator would have to click
the Demand Recording button from the CallReplay interface.
On-Demand Policy
Once the user presses the Record This Call button on the phone, a Pool
name will appear showing where the call was categorized:
Automatic / Reserved Policy
A call which will be automatically recorded is listed using either
Dynamic Automatic or Reserved Automatic recording policies:
Direction Not Recorded
The calls which have a direction for which there are policies in place
which explicitly forbid recording (from Unified Configuration >
Recording Policy) will not be recorded. These include calls of types:
internal, outbound, inbound, parked, transferred. They should not appear
in the Active Calls window.
10 - Quality
10.1 - Quality Overview
With CallReplay you have the ability to evaluate any call whether it
happens in real-time (active call), whether it is a record of a
call or conference record. This can be achieved
through customized templated questionnaires ('quality standards')
which can be linked with a particular
call.
Templated questionnaires ('quality standards') represents a set of
questions that have predefined answers and which can be grouped into
various categories depending on your particular
needs.
10.2 - Quality forms
Before being able to evaluate real-time calls, or their recorded
version, you must define quality forms.
To create a form
Go to Quality > Quality form.
Click Add.
Enter the name for the form.
Leave Disabled unchecked.
Click Save.
At any time you can disable a form by checking Disabled. This
will make the form and questions within unavailable to be linked
with call records.
To create a category
Go to Quality > Quality forms.
Click Edit button beside the form where you want the category
to be created.
{
Click Add button.
Select Category for the drop-down menu.
Introduce the category name as you like to be refered.
Chose parent for the new category. It can be a form category or
a subcategory.
Click Ok.
You can change the parent for a category by clicking on Edit button.
To create a question:
Go to Quality > Quality forms.
Select the category where you want the question to be
Click Add button.
Select Question for the drop-down menu.
Click Ok.
10.3 - Reports
To view reports containing questionnaire scores, go to
Quality>Reports.
Choose report type Compare Scores, period of the report, department,
and quality standard.
To view the report press View report button.
To export the report to an excel file, press Export button.
10.4 - Answers
CallReplay allows the creation of custom 'answers' templates that can
be bounded with a particular question depending on specific evaluation
needs and based on the context of that question.
[To create a new answer template]{style=“text-decoration: underline;”}:
Go to Quality > Quality Standards.
Click Add button.
Enabled: Make the answer available to be bound with a question
Label: Meaningful label.
With the installation, CallReplay provides seven predefined answer
templates that can be used and which cover most of the needs.
To edit an answer template:
Go to Quality > Answers.
Select the template you want to edit.
Click Edit button.
To edit a specific lable, double click over it.
10.5 - Records Evaluation
The questionnaires are accessible in recordings list through extended
actions menu
Replay Calls > Call Menu
The Questionnairemenu shows the questionnaires labels with the
following information:
Evaluated questionnaires have their score displayed to the right of
the label ( ex: QS 1 ).
If a questionnaire has a 'N/A' answer, then it will be marked
and shown as incomplete ( ex: sta ).
If a questionnaire has all 'N/A' answers, the score will not be
shown and only incomplete will be displayed ( ex: QS 2 ).
For not evaluated questionnaires, only their label is shown (ex:
sta (2) ).
Evaluating Records
Once a standard is 'attached' to a record, you will not be able to
alter the standard anymore. Exception to this is that you can activate
or deactivate it.
Calculating scores
Each question can have a real score between 0 and 1 ( ex: 0.5 = 50%
). Unanswered questions have score 0.
The question's importance is a coefficient applied to the
question's score. It has one the following values:
Ignored = 0
Low = 0.5
Medium = 1
Important = 2
Questions of type text have importance 0 ( Ignored ) by default.
When calculating the total score of an evaluated questionnaire, the
following algorithm is applied:
Sum each answered question's score multiplied by its importance
Scale the result to a value between 0 and 100% based on the maximum
achievable score of the questionnaire ( sum of answered questions
importance ).
Note that if a question has 'N/A' answer, it is ignored from
evaluation's total score. It is considered as if not answered, and the
total score will scale accordingly ( for example, you can have an
evaluation score of 100% if the first question is answered '1*0'*and
the second is answered 'N/A' ).
See Reports section for details about how to generate reports.
11 - Backup
Backup your data to stay safe
11.1 - Backup Overview
What does CallReplay backup mean?
CallReplay provides backup and recovery capabilities that allows you to
create ‘images’ (i.e. files and metadata), and copy those to a secondary
site for archive in case of failure. At any time, in case data must
return to original condition, CallReplay can use the backups for
recovery.
11.2 - Configuring Backup
To Backup call recordings to a local folder or a windows network share,
use the Backup page.
To perform a backup
Go to Backup > Backup menu.
Click Start.
Before doing a backup, ensure everything is in place in terms of
configuration.
Backup Options
In the above image, you can see the backup page, which contains the backup options.
The** full path** is the location where the backup will be done.
Pressing the "..." button, will focus the backup root directory
to be changed.
The maximum backup size is a value that limits total call
recordings backup size (example: to fit some external disk)
The archive type can have one of the following values:
Incremental - only calls that haven't been backed up will
be included
Full - all calls will be included ( other filters applied)
After backup, you can choose three options:
Don't Remove - calls will remain in the database and on
disk as they are
Remove File, Keep Call Info - will remove the recording
files, but will keep the calls in the database, and will not
allow you to listen them
Remove File and Call Info - will remove the recording files
from disk, and remove all calls information from database
The free space from the backup root directory is shown on the
right
The backup period has three choices:
Any calls will be included
Between - only calls that have the starting date between the two
values will be included.
If one date is empty, then only one date will be used as the
interval margin. (example: start date is empty, end date is
non-empty, then only calls with a start date below entered end date
will be considered for backup).
Older than - only calls that have the starting date older than
input value will be included
You can choose which calls to be backed up by departments, clicking
the departments combo, and a pop-up will appear:
Status Tab
The status tab is visible only when the backup process starts.
In the progress bar, processed calls and remaining calls count are
shown.
The text area below shows errors occurred during backup.
11.3 - Restore
To Restore a backup made in a windows network share or local folder, use
the Restore page.
Backup > Restore
Options
To view backups, select a backup root folder or a backup
folder from which to restore calls.
You can also select a location from a windows network
share (following the pattern \\<server>\<path> ) and login
information will be shown:
If no login information is inputted, then the default user GUEST will be
used.
You can sort backup entries in the left grid by clicking on a column
header.
In the right panel, backupdetails of the selected backup are
shown (same as backup history).
The refresh button located right of the input directory helps rescan for
backups.
You can select either to move files from the backup or
to copy them.
If move files is selected, the backup files are removed during
restore process.
If copy files is selected, the backup files remain intact.
To start a restore operation you can:
click restore button in the last column of the grid, which
restores the backup form that row
click restore button from the details panel to restore
selected backup
Status
Once the restore operation has started, the status tab becomes visible:
![] (/images/image-placeholder.avif)
11.4 - History
To view a history of backups made and their details, use the Backup
History page:
The left grid shows all backups made. You can sort entries by clicking
any column header.
The right panel shows selected backup details.
12 - Session
Your session
12.1 - Log Out
It is recommended that when you no logger need access to CallReplay to
log out the application.
To log out from CallReplay
Go to Session > Logout <user name> and click
You can access Logout als from the toolbar.
To check signed on user
Go to Session.
The current user is showed beside Logout menu item.
12.2 - Change Password
CallReplay allows you to change your password or PIN at any time.
Change Login Password
If someone else has your password, then they can use the system
impersonating your account. We recommend to change your password. Change
your password immediately if you have any reason to believe that someone
else had access to it or has broken into your account.
You should change your password periodically, ideally at least every
six months.
To change your login password
Go to Session | Change Password.
Type your current password
Type the new password
Retype the new password for confirmation
Click Save.
Change Personal Identification Number (PIN)
If you are using CUC (Cisco Unicty Communication) you can change your
associated user PIN at any time.
[To change your login password]{style=“text-decoration: underline;”}:
Go to Session | Change Password.
Type your PIN.
Type the new PIN.
Retype the new PIN for confirmation
Click Save.
When you change your PIN make sure you follow security guidelines
provided by system administrator.
Here are few good practices:
The PIN should not contain your primary extension or its reverse
The PIN should contain at least three different digits.
The digits should not all be consecutive, in ascending or descending
order (for example, 12345 or 54321).
The PIN should not be a numeric representation of your first or last
name, or the combination of your first and last names. (For example,
if your name is John Doe, you could not use a numeric representation
of johnd, johndoe, jdoe, doe.)
13 - Companion Applications
Companion Applications
13.1 - CallReplay Administration
When you install CallReplay you can configure it to meet your specific
needs. After you completed the setup you will have on the server:
installed binaries, configured security permissions, configured registry
settings, configured database, and the web site.
Please refer to Install and Setup on Windows section for more details
on installing CallReplay.
You can access CallReplay in two ways: locally from the server, or
remotely.
To access CallReplay locally
Go to Start > CallReplay > CallReplay Administration.
To access CallReplay remotely
Open your browser
In the address bar introduce the address where the server is
installed
If you don't know the exact address, please your system administrator
13.2 - Change/Reset Password
Reset Password
Change Password
Each user that has permission to log in to application site can change
his password and pin by clicking Session / Change Password. They can change only password, only pin or both by leaving blank the
undesired field.
13.3 - Site Configuration
You need to run Site Configuration with administrator privileges
13.4 - Get Support
CallReplay Get Support is a symbolic link provided for convenience
giving quick access to the support web site that can be accessed at
CallReplay Contact{.external-link}.
Sales
For any products and sales related questions including quotes, terms and
conditions, or discounts available please contact us via:
For more details about CallReplay please visit
CallReplay
13.5 - pgAdmin
CallReplay uses an embedded PostgresSQL and pgAdmin is a popular
administration and development platform for PostgreSQL. Both PostgreSQL
and pgAdmin comes together with CallReplay.
Database server configuration (e.g. port, user, password) are set during
setup proceess
TeamViewer is a proprietary package for remote desktop control and
sharing, online meetings, web conferencing and file transfer between
computers or mobile devices.
It comes with CallReplay and is installed together with it.
It is provided as a mean for a better support and you can use it to
connect with our support specialists.
To open TeamViewer
Go to Start > CallReplay > TeamViewer.
Transmit Your ID and Password to our support specialists
For more details about TeamViewer features and other settings please
check TeamViewer
Website{.external-link}.
13.7 - Localization+
Requirements
For creating a custom localization of CallReplay you need at least
version 7.1.10 of application installed using a full setup.
Creating/editing CallReplay localization
CallReplay CallRecoder has two major components who need to be
translated separately. One component is recorder service and other is
site administration.
First thing which must be done is to create a copy of
entire Translations folder into CallReplay data
folder. Translations folder can be found in installation path,
usually c:\Program Files\CallReplay\System\Translations. Data folder
is the folder where the database is kept, default value is
C:\CallReplay.
Once we have new Translations folder we can start to create/edit
translations. All customizations must be done in this
new Translations folder otherwise will be lost after first running
of CallReplay Software Update or after a full setup.
The tools used for translation are "translate_site.cmd" and
"translate_server.cmd".
Create a new translation for CallReplay site
Go to the new Translations folder created using indications from
previous paragraph.
Duble-click on "translate_site.cmd" file. If this is the first time
when the translation tool is used you must select a language for
translation tool interface:
After language selection the main window of translation tools is shown:
Press the add language button:
Select desired language from the list:
The result is a new Language node:
Now select the new language and translate every key from the master
file to the new language. Next picture show how to do translate "All
rights are reserved" to Korean.
The untranslated keys are shown with blue color. So it is easy to know
which keys are translated and which not.
For saving the new language press "CTRL+S" which is a shortcut for
File>Save option and a new file having
name* "site_xx.properties"* will be created where xx is the
language code.
Create a new localization for CallReplay service
Go to new Translations folder and double-click on
"translate_server.cmd". The same tool as for translating site will
be shown excepting that the keys are for CallReplay service.
Create a new localization for CallRecoder service following the same
steps as for CallReplay site. The name of the new translation will be
"server_xx.properties" where xx is the language code.
Activate a new localization
A new localization becomes active after including in file
"locale.properties" the line: *xx=Language *and restarting of
CallReplay service.
e.g.: ko=[[한국의]{.hps}]{.short_text lang=“ko”}
Editing an existing localization for CallReplay site and service
Run the translation tool ( "translate_site.cmd" for site and
"translate_server.cmd" for service ), select the language and edit
the keys accordingly. Save the changes ( CTRL+S or File > Save ).
14 - Help
Help
14.1 - Manual
CallReplay comes with two manuals available in HTML format, both
providing detailed information about installing process, configuration,
system requirements, step-by-step operations
To access manuals
Go to Help > Manual
Choose the manual you want to consult
Administrator's Guide: A complete documentation for CallReplay.
User's Guide: A subset of the Administrator's Guide containg the
information required by a regular end-user for day-to-day operation and
usage of the CallReplay system.
You can download the PDF version of both manuals from
CallReplay website.
14.2 - Service Debug Settings
To configure debug
Go to Help > Service Debug Settings.
Change configuration according with your needs (or as per adviced by
support people)
Click Save.
Debug Capture:
None:
Basic - Control Stream:
All - Control and Data Stream:
Debug Capture Duration: Duration
Tracing Priority:
Max Trace Files:
JTAPI Tracing: Debug various kind of tracing at various level of
detail for JTAPI via JTPREFS.
Trace Levels:
WARNING: Trace only warning type events
INFORMATIONAL: Trace only status events
DEBUG: Trace only debugging events. By enabling DEBUG
you can enable or disable various debugging leveles.
2. Create a new phone button template for your phones ( Call Manager:
Device> Device Settings> Phone Button Template ) and select "Service
URL" for button which will be used as a speed dial for our phone
service.
3. Go to Device> Phone and select new defined template on phones
4. Subscribe the phone to the phone service
5. The last step is to assign the new subscribed phone service to the
phone button ( configured on step 2 ).
After phone reset, the speed dial is ready for use.
15.3 - Testing The Setup
Make sure there are no pending alerts below the menu bar, by clicking on
each alert and solving them.
Make a test call
Place a call to an external number. Recording internal calls with SPAN
requires the traffic between the two devices must be spanned as well.
Playing a call
1. From the menu, choose Recordings / Replay Calls as shown below:
2. If there are no calls displayed please skip to the
"Troubleshooting" chapter. 3. Click the More button (three lines sign on the right side of every
call), choose Properties and a new window, named "Call Details" will
appear, as shown below. This page contains all information about a call like caller party,
called party, duration of call, file size, file format. In the Advanced
tab, you will get information about RTP traffic (ip address and port
used in recording call). In the Description tab, you can provide a description for that call. In
the Export tab by pressing "Save Call" you can save the call under Wav
format or speex format. You can email that call by pressing "Send
Email" button.
Replay Calls > More button > Properties
Click on Play Button.
A pop-up will be open and the recording will start playing.
Attention: You must have a valid G.729 license to play a G.729
recording, otherwise an error will be displayed.
15.4 - Forked Recording Compatible Devices
Device/Phone Model
Forked Recording
Requirements
Analog Phone
No
N/A
Cisco 12 S
No
N/A
Cisco 12 SP
No
N/A
Cisco 30 SP+
No
N/A
Cisco 3905
No
N/A
Cisco 3911
No
N/A
Cisco 6901
No
N/A
Cisco 6911
Yes
Requires UCM 7.1(3) or later
Cisco 6921
Yes
Requires UCM 7.1(3) or later
Cisco 6941
Yes
Requires UCM 7.1(3) or later
Cisco 6945
Yes
Requires UCM 7.1(3) or later
Cisco 6961
Yes
Requires UCM 7.1(3) or later
Cisco 7811
Yes
Requires UCM 6.0(1) or later
Cisco 7821
Yes
Requires SIP firmware 10.1(1)
Cisco 7841
Yes
Requires SIP firmware 10.1(1)
Cisco 7861
Yes
Requires SIP firmware 10.1(1)
Cisco 7902
No
N/A
Cisco 7905
No
N/A
Cisco 7906
Yes
Requires UCM 6.0(1) or later
Cisco 7910
No
N/A
Cisco 7911
Yes
Requires UCM 6.0(1) or later
Cisco 7912
No
N/A
Cisco 7914 Sidecar
Yes
Requires UCM 6.0(1) or later
Cisco 7915 Sidecar
Yes
Requires UCM 6.0(1) or later
Cisco 7916 Sidecar
Yes
Requires UCM 6.0(1) or later
Cisco CKEM Sidecar
Yes
Requires UCM 7.1(3) or later
Cisco 7920
No
N/A
Cisco 7921
Yes
Requires UCM 6.0(1) or later
Cisco 7925 & 7925-EX
Yes
Requires UCM 6.0(1) or later
Cisco 7926
Yes
Requires UCM 7.0(1) or later
Cisco 7931
Yes
Requires UCM 6.0(1) or later
Cisco 7935
No
N/A
Cisco 7936
No
N/A
Cisco 7937
Yes
Requires UCM 6.0(1) or later
Cisco 7940
No
N/A
Cisco 7941
Yes
Requires UCM 6.0(1) or later
Cisco 7941G-GE
Yes
Requires UCM 6.0(1) or later
Cisco 7942
Yes
Requires UCM 6.0(1) or later
Cisco 7945
Yes
6.0(1) or later
Cisco 7960
No
N/A
Cisco 7961
Yes
Requires UCM 6.0(1) or later
Cisco 7961G-GE
Yes
Requires UCM 6.0(1) or later
Cisco 7962
Yes
Requires UCM 6.0(1) or later
Cisco 7965
Yes
Requires UCM 6.0(1) or later
Cisco 7970
Yes
Requires UCM 6.0(1) or later
Cisco 7971
Yes
Requires UCM 6.0(1) or later
Cisco 7975
Yes
Requires UCM 6.0(1) or later
Cisco 7985
No
N/A
Cisco 8811
Yes
Requires UCM 8.5(1) or later
Cisco 8831
Yes
Requires SIP firmware 9.3(2)
Cisco 8841
Yes
Requires UCM 8.5(1) or later
Cisco 8845
Yes
Requires UCM 8.5(1) or later
Cisco 8851
Yes
Requires UCM 8.5(1) or later
Cisco 8861
Yes
Requires UCM 8.5(1) or later
Cisco 8865
Yes
Requires UCM 8.5(1) or later
Cisco 8941
Yes
Requires UCM 7.1(5) or later
Cisco 8945
Yes
Requires UCM 7.1(5) or later
Cisco 8961
Yes
Requires UCM 7.1(3) or later
Cisco 9951
Yes
Requires UCM 7.1(3) or later
Cisco 9965
Yes
Requires UCM 7.1(3) or later
Cisco 9971
Yes
Requires UCM 7.1(3) or later
Cisco DX650
Yes
Requires UCM 7.1(3) or later
Cisco DX70
Yes
Requires UCM 8.5(1) or later
Cisco DX80
Yes
Requires UCM 8.5(1) or later
Cisco E20
No
N/A
Cisco EX60
No
N/A
Cisco EX90
No
N/A
Cisco CTS 500
No
N/A
Cisco CTS 500-32
No
N/A
Cisco CTS (all other device models)
No
N/A
Cisco ATA 186
No
N/A
Cisco ATA 187
No
N/A
Cisco ATA 188
No
N/A
Cisco IP Communicator
Yes
Requires CIPC v7.0(1) or later
Cisco Jabber for Windows -Softphone Mode
Yes
Requires Jabber for Windows 9.2 or later
Cisco Jabber for Windows -Extend/Connect Mode
No
N/A
Cisco Jabber for Windows -Remote Desktop Control Mode
Refer to the device model under remote control to determine support.
Refer to the device model under remote control to determine support.
Cisco Jabber for Mac -Softphone Mode
Yes
Requires Jabber for Mac 9.2 or later
Cisco Jabber for Mac - Remote Desktop Control Mode
Refer to the device model under remote control to determine support.
Refer to the device model under remote control to determine support.
Cisco Jabber for iPad (Wifi-only)
No
N/A
Cisco Jabber for iPhone
No
N/A
Cisco Jabber for Android
No
N/A
Cisco Unified Personal Communicator - Softphone Mode
No
N/A
Cisco Unified Personal Communicator - Remote Desktop Control Mode
Refer to the device model under remote control to determine support.
Refer to the device model under remote control to determine support.
Cisco Unified Communications Integration for Microsoft Office Communicator/Lync -Softphone Modes
No
N/A
Cisco Unified Communications Integration for Microsoft Office Communicator/Lync -Remote Desktop Control Mode
Refer to the device model under remote control to determine support.
Refer to the device model under remote control to determine support.
Cisco Unified Communications for RTX (CUCRTX) -Softphone Mode
No
N/A
Cisco Unified Communications for RTX (CUCRTX) - Remote Desktop Control Mode
Refer to the device model under remote control to determine support.
Refer to the device model under remote control to determine support.
Cisco Web Communicator forWx Social -Softphone Mode
No
N/A
Cisco Web Communicator forWx Social - Remote Desktop Control Mode
Refer to the device model under remote control to determine support.
Refer to the device model under remote control to determine support.
Cisco Unified Communications Integration for WebEx Connect -Softphone Mode
No
N/A
Cisco Unified Communications Integration for WebEx Connect - Remote Desktop Control Mode
Refer to the device model under remote control to determine support.
Refer to the device model under remote control to determine support.
VGC Phone
No
N/A
VG224
No
N/A
VG248
No
N/A
CTI Port
No
N/A
CTI Remote Device (Extend & Connect)
No
N/A
CTI Route Point
No
N/A
CTI Route Point (Pilot Point)
No
N/A
ISDN BRI Phone
No
N/A
Carrier Integrated Mobile
No
N/A
IMS Client
No
N/A
Mobile Communicator
No
N/A
Nokia S60
No
N/A
Remote Destination Profile (Single Number Reach)
No
N/A
15.5 - Storage Volumes Best Practices
The following guide outlines some considerations to take into account
when setting up your recording storage volume. In practice the
application administrator should tahe into account the specific needs,
available hardware and any other limitations.
The best and recommended way to set the CallReplay storage volume is on
a dedicated partition, on RAID (1 and above) protected drives.
Provisioning the total available space should be done considering the
number of calls you want to store. You can estimate that each 1GB will
hold approximately 160 hours of recordings using the speex format. That
is, you can keep 96,000 calls of 10 minutes on one 100 GB HDD.
For setting the volumes in CallReplay we will consider 2 examples:
Example 1: A dedicated 500GB partition
In this case, you might want to have both the recordings and the data
folder on the same partition. The quota setting, which sets the maximum
ammount of space that the recordings may take should leave enough room
on the partition for upgrade backups, logs, the database, and various
misc files. Therefore, a 450GB quota will leave a 50GB available space
for the rest of the data folder, and various operations. If the data
folder is actually on another partition, you can set a quota even
higher, leaving only 2-3 GB of free space. The free space we consider
even on a purely recording storage partition might be necessary at some
moment if large file operations are necessary (archiving of a few days
of recordings).
The reserved setting will keep you informed when the available space for
recordings (that is free space available + the size of current
recordings) drops below the specified amount. Use this to make sure that
the database and other operations (database backup on the same
partition, logs archiving on the same partition, etc) doesn't take up
the space needed for recording. In this case, setting the reserved space
just 2 GB smaller than the quota should achieve this purpose.
Example 2: A shared 100GB partition (OS partition)
For a partition that is shared between CallReplay and other applications
and most notably the OS, it is necessary to leave enough space available
for other uses. In this particular case, setting a quota of 40GB will
leave 60GB available for the OS and other applications, which should
suffice. The reserved space, in this case should be set lower, as it's
quite possible that the OS and the other applications will take more
space over time than initilaly envisioned. A 30 GB reserved space will
allow the other disk users to take up to 10GB of the planned CallReplay
storage space before sending notifications to the administrator.\
The default 1GB Reserved freee space should also be increased for such a
partition, 4GB should suffice.
15.6 - CallReplay Firewall Ports
Ports opened on the CallReplay server
Protocol
Port
Purpose
Configurable
UDP
1026
Database
No
TCP/UDP
5060
SIP default port
Yes
TCP
5432
Database
Yes
TCP
8080
Jetty web server
Yes
TCP
8081
Monitoring calls
No
TCP
8079
Software update
No
TCP
9000
Licensing
No
TCP
9853
Replication
No
UDP
25000-30000
RTP port range (even values)
Yes
CallManager Ports Required by Forked Recording
These ports must be opened on the CM server, or Forked will not work.
CallReplay uses an embedded Postgres 9.0 database. To connect to it you
can use PgAdmin III (Start / Programs / CallReplay / Support / PgAdmin
III). It is also accesible from Java, C# and all programming languages
which can access Postgres.
Port: Set during setup process, default 5432
User name: callreplay
Password: set during setup process, default CallReplay_2005
where SERVER is the call recorder ip/address, PORT is the configured
server port ( see CallReplay Site Configuration ), TENANT is the
registered name of the tenant ( if not provided, the "default" tenant
will be considered ), USER is the login name and PASSWORD is the
password in clear text.
If you do not want to provide clear password, you may discard
&password=, in that case CallReplay will ask you for password and use
provided TENANT and USER.
Also, you can use the base URL with POST method, using the same keys and
values as in normal URL:
where STORAGE_VOLUME_ID is the volume index number in the
table storage_volumes and CALL_PATH is the path to the required
file relative to storage volume, which can be found in
the **Call **detail dialog.
The storage web URL is protected by a password which is random by
default but can be configured from the Storage > Advanced > Player
Access Password. The user name is "player".
If you need to, you may construct and send HTTP Basic Authorization
Header yourself. To do this you need to perform the following steps:
Build a string of the
form username:password{.external-link},
e.g. "player:123"
Base64 encode the string, e.g. "cGxheWVyOjEyMw=="
Supply an "Authorization" header with content "Basic " followed
by the encoded string, e.g. "Basic cGxheWVyOjEyMw==" so the header
will look like "Authorization: Basic cGxheWVyOjEyMw==".
Note: HTTP error code 401 is sent when the password is missing or
incorrect, letting the browser prompt you for user/password. User name
is 'player'.
Searches the call in the database, then transcode it to the desired
output format, and send a redirect response to the temporary URL. If
there is more than one call matching the query, the first one is used.
Parameters below are optional, that is searches can be made using any
subset of parameters, so there is no longer any need to connect directly
to the CallReplay database:
spx or wav - redirects to audio files; when multiple callIds
were requested, their audio files are concatenated and the
response redirects to the resulted file
png - redirects to an image of audio file
json - returns a list of details for all calls matching the
query, in json format
beginTime and endTime - calls will be searched for start time
between these values (if provided).
pbxCallId is the SKINNY call ID or SIP call ID
callId is the database call GUID; multiple callIds may be requested
numbers and names are searched for
text [containing]{.underline} provided values
IPs, ports and MACs are searched for exact match
password is the password set in Storage > Advanced > Player Access
Password. Instead of using this parameter, you can send a HTTP Basic
Authorization Header instead.
lang - one of the 2 char language identifier supported by CallReplay
(see login dialog in administration site); used to display error
messages; can be omitted for english
Notes:
if the requested format is the same as storage format (see
Storage > Advanced), you will receive a redirect to a File Storage
URL for the file to be delivered straight from the storage. You need
to supply a HTTP Basic Authorization Header in order to successfully
download the file, as described in paragraph 5 File Storage URL.
since the same user/password is used for Transcoding URL and File
Storage URL, you may prefer sending HTTP Basic Authorization Header
to the Transcoding URL instead of 'password' parameter.
HTTP error code 401 is sent when the password is missing or
incorrect, letting the browser prompt you for user/password. User
name is 'player'.
HTTP error code 412 is sent when other errors occur, along with an
error message.
External Replication API {#InterfacingwithCallReplay-7.ExternalReplicationAPI}
Downloads call details using HTTP requests.
Prerequsites:
To use this feature, you must add a replication branch and configure it
for Replication API. This means go to the HQ/Branch Replication page,
then to the Branch tab, where you add a new HQ. That is, add here the IP
address of the computer from which you want to download calls. This is necessary for two reasons:
CallReplay has to maintain a replication queue for this HQ like it
does for all HQ-s. This is, in fact, a real HQ, more precisely, a
3rd party HQ (a computer where the calls will finally arrive).
This allows you to have multiple 3rd party HQ-s as well as
CallReplay HQ-s.
tenant - the tenant id from which to download call details; can be
omitted for default tenant
replicationQueueName - must contain the exact HQ name (case
sensitive) or the IP address entered for this HQ; it may be
anything, even a fake IP - it is used just to find the queue with
the not-replicated calls for this HQ.
lastReplicationId - the last confirmed replication id - first time
should be 0, the subsequent invocations should contain the last
received replication id in order to be deleted from the database and
advance to next operations; these IDs are in ascending order, but
not necessarily contiguous;
chunkSize - how many operations to return; can be omitted for
default which currently is 50
deletePrevious - whether to delete the row with lastReplicationId or
not; when false, it will be retrieved again and again until deleted
password - connection password set in the HQ dialog. Please
configure CallReplay server to use HTTPS in order to hide the clear
text password from a network analyzer. Instead of using this
parameter, you can send a HTTP Basic Authorization Header, similar
to the one in paragraph 5 File Storage URL. The user name
is "replicator".
lang - one of the 2 char language identifier supported by CallReplay
(see login dialog in administration site); used to display error
messages; can be omitted for english
3 - password parameter is missing or the password is wrong
4 - specified replication queue name was not found
5 - specified replication queue name was not configured for replication
API - please go to HQ/Branch Replication page, edit HQ and check 'Only
for Replication API'.
Notes:
HTTP error code 401 is sent when the password is missing or
incorrect, letting the browser prompt you for user/password. User
name is 'replicator'.
HTTP error code 412 is sent when other errors occur, along with an
error message.
Error messages will be returned in the chosen supported language
(default is English).
Deleting Calls
The Replicaton API can also be used to delete calls. You will need to
follow the steps from the Prerequsites section of the *External
Replication API
replicationQueueName - must contain the exact HQ name (case
sensitive) or the IP address entered for this HQ; it may be
anything, even a fake IP - it is used just to find the queue with
the not-replicated calls for this HQ.
callGuid - the GUID(Globally Unique Identifier) of the call to
delete
recursive - if true, the call will be deleted from any replication
branches it is found on. The default value is false.
password - connection password set in the HQ dialog. Please
configure CallReplay server to use HTTPS in order to hide the clear
text password from a network analyzer. Instead of using this
parameter, you can send a HTTP Basic Authorization Header, similar
to the one in paragraph 5 File Storage URL. The user name
is "replicator".
Response in case of successfully deleting a call
(non-recursively):
http://HOST:PORT/CallRecorder/Replicator?command=delete&replicationQueueName=Replication&password=PWD&callGuid=7d0b6426-ceaa-9012-4106-2d25f25dccfa

<?xml version="1.0" encoding="UTF-8" standalone="no"?>
<CallRecording>
    <LocalServerStatus>Call not found.</LocalServerStatus>
    <LocalServerMessage>Call not found.</LocalServerMessage>
    <Status>Call not found.</Status>
    <Action>Delete</Action>
    <CallRecordingId>7d0b6426-ceaa-9012-4106-2d25f25dccfa</CallRecordingId>
    <Servers/>
</CallRecording>
Response in case the call doesn't exist or has already been deleted
(non-recursively):
<?xml version="1.0" encoding="UTF-8" standalone="no"?>
<CallRecording>
    <LocalServerStatus>Call not found.</LocalServerStatus>
    <LocalServerMessage>Call not found.</LocalServerMessage>
    <Status>Call not found.</Status>
    <Action>Delete</Action>
    <CallRecordingId>7d0b6426-ceaa-9012-4106-2d25f25dccfa</CallRecordingId>
    <Servers/>
</CallRecording>
Response in case the call exists on the main server and on two other replication branches
Configure your own CallReplay Cloud Server - this way you have all
features of CallReplay Call Recorder.
Supported mobile phones: Android 2.3.3 or higher; other operating
systems may be supported in the future.
Configuring your own CallReplay Cloud Server
First of all, you should acquire a license for this. The license should
contain how many tenants you need (i.e. cloud accounts) and how many
phones and mobiles you want to record and upload calls.
Upload this license in your CallReplay installation using System ->
Licensing.
Add Tenants
then go to System -> Tenants page. You can add your tenants here.
System > Tenants
First enter the company name and fill the TLD field with your domain
name / website if any.
You can assign a number of Replication Branches, if you want to make
this tenant a Replication HQ. In this case, you should allocate a number
of channels to those branches and assign them individually from
HQ/Branch Licensing page. That is, if you want branches A, B and C to
upload calls to this tenant, write 3 in 'Branch' edit box. Then, if
you want A to have 5 channels, B and C have 10, write 25 in 'Channels'
edit box, then later go to HQ/Branch Licensing and assign each of them
the corresponding channel number. Here you will introduce the total
number of channels allocated to the group of branches associated with
this tenant.
In 'Mobile Phones' you will write the total number of mobile phones
that can upload calls to this tenant (cloud account).
'Storage Quota' - how much of storage space will be allocated to this
tenant from the total storage pool. Older records will be deleted when
the quota is reached. Enter 0 if you want to use global cleaning.
'Active' - use this checkbox to activate / deactivate the tenant.
'Validity' - if you want to automatically deactivate the tenant after
a period of time.
After pressing 'OK' button, a new tenant will be generated and you can
see it in the main list. There you can find the generated Tenant ID used
for tenant identification.
Add Tenant Admin
You may create multiple user accounts for each tenant, at least one of
them should have administrative rights. You can quickly create such an
administrative account using 'Add Admin' button from 'Tenants' page.
A password will be randomly generated for the tenant administrator and
it will be sent to the specified e-mail address.
Public Tenant Creation
This feature is available only on public CallReplay Cloud Server located
at http://cloud.call-replay.com.{.external-link} Anybody
can create a trial tenant for itself. This trial tenant will expire
after 1 month and its storage quota is limited to 200MB.
To convert a trial tenant to a permanent tentant, please contact sales
or support.
Tenant Login
Upon creation of the its account, the administrator will receive an
e-mail containing the login credentials. In order to access the Cloud
Server, the administrator (and users created subsequently) must enter
the Tenant ID along with the login name and password.
After login, you have access to all recorded and uploaded calls. You can
playback them (if not encrypted), e-mail them and so on.
15.9 - Localization
Requirements
For creating a custom localization of CallReplay you need at least
version 7.1.10 of application installed using a full setup.
Creating/editing CallReplay localization
CallReplay CallRecoder has two major components who need to be
translated separately. One component is recorder service and other is
site administration.
First thing which must be done is to create a copy of
entire Translations folder into CallReplay data
folder. Translations folder can be found in installation path,
usually c:\Program Files\CallReplay\System\Translations. Data folder
is the folder where the database is kept, default value is
C:\CallReplay.
Once we have new Translations folder we can start to create/edit
translations. All customizations must be done in this
new Translations folder otherwise will be lost after first running
of CallReplay Software Update or after a full setup.
The tools used for translation are "translate_site.cmd" and
"translate_server.cmd".
Create a new translation for CallReplay site
Go to the new Translations folder created using indications from
previous paragraph.
Duble-click on "translate_site.cmd" file. If this is the first time
when the translation tool is used you must select a language for
translation tool interface:
language_selection_image_not_found
After language selection the main window of translation tools is shown:
Press the add language button:
Select desired language from the list:
The result is a new Language node:
Now select the new language and translate every key from the master file
to the new language. Next picture show how to do translate "All rights
are reserved" to Korean.
The untranslated keys are shown with blue color. So it is easy to know
which keys are translated and which not.
For saving the new language press "CTRL+S" which is a shortcut for
File>Save option and a new file having
name* "site_xx.properties"* will be created where xx is the
language code.
Create a new localization for CallReplay service
Go to new Translations folder and double-click on
"translate_server.cmd". The same tool as for translating site will
be shown excepting that the keys are for CallReplay service.
Create a new localization for CallRecoder service following the same
steps as for CallReplay site. The name of the new translation will be
"server_xx.properties" where xx is the language code.
Activate a new localization
A new localization becomes active after including in file
"locale.properties" the line: *xx=Language *and restarting of
CallReplay service.
e.g.: ko=[[한국의]{.hps}]{.short_text lang=“ko”}
Editing an existing localization for CallReplay site and service
Run the translation tool ( "translate_site.cmd" for site and
"translate_server.cmd" for service ), select the language and edit
the keys accordingly. Save the changes ( CTRL+S or File > Save ).
15.10 - Download Files from Our FTP Server
You can download releases from our FTP server, which is located at this
address{.external-link}, using the
following credentials:
User: anonymous Pass: anonymous
Our FTP server can use the passive mode for data transfer on ports in
the range of 50000-51000, or active mode on port 20, so make sure to
allow connections on those ports in your firewall.
In order to download installation setup kits from our FTP server,
you can use a web browser such as Firefox or Google Chrome (but not
Internet Explorer), or a FTP client such as
WinSCP or
FileZilla.
Use no encryption when connecting to the server.
Below is a screenshot showing how to configure WinSCP. In this case, the
Passive mode is used, so ports in the range of 50000-51000 will be used.
If you uncheck the passive mode, then port 20 will be used in Active
mode.
Once logged in, you may proceed downloading the file of your choice:
Note that if you are using a web browser and point it
to ftp://ftp.call-replay.com/, then passive mode will be used by
default.
15.11 - Upload Files Manually to Our SFTP Server
To upload logs manually to our FTP server, first you need to locate the
log files which correspond to the time when the issue occurred, archive
them using a program such as 7-Zip, and then upload them to the FTP
server using the credentials shown below. Please notice that it helps us
if you set the Tracing Priority to All inside the
CallReplay -> Help -> Service Debug Settings menu before the
issue occurs, so that additional information gets included in the log.
Also, the most important logs are the ones ending in the .trx
extension, so make sure to include them as well.
By default, the log files can be found in the following location:
On Windows: C:\CallReplay\Logs On Linux: /var/lib/callreplay
The FTP server has been terminated and replaced by the SFTP server
To obtain a SFTP account, open this link in a
browser:
To upload the archive, you can use a SFTP client such as FileZilla,
available on both Windows and Linux, which can be downloaded from
here{.external-link},
or WinSCP, available on Windows only, which can be downloaded from
here{.external-link}.
Please make sure that the SFTP client settings are set on SFTP (not
FTP), using encryption. SFTP is not the same as FTPS.
You must use the port, account and password displayed by the account
creation page.
Port 1025 must be open for outbound data transfer.
Please tell us in an email message the name of the file that you
uploaded.
15.12 - Send Logs
AI Software is dedicated to its customer and willing to deliver best
user and business experience through the products and services.
Therefore, CallReply comes with a convenient and easy to use problem
reporting coponent that you can use to report, manually or
automatically, when something is not working.
Before using this feature it is important to provide contact information
that will help RAI Software support people to connect with you.
To configure contact information:
Go to Help > Send Logs.
Provide a name for the contact and that will be used for
communication
Introduce the prefered e-mail address to be used in connection with
CallReplay problem
Introduce the preferend telephone number
Click Save.
To report a problem manually:
Go to Help > Send Logs.
Select Manaual Reporting tab
Introduce requested information
Click Submit Report.
Problem description:
When the problem appeared:
Filter log files:
Include detabase backup:
Sending option:
Giving more detail int he description helps us to determine cause of a
problem much faster. Reporting issues when they happen helps make
CallReplay better, and we appreciate the time it takes to give us this
information
To report problem automatically:
Go to Help > Send Logs.
Select Automatice Reporting tab
Check Automatic Upload Enabled.
Introduce requested information.
By default CallReplay provides a precofigured FTP connection, but you
can configure custome ones according with your needs or as per support
people recommendation.
To add FTP connection
Go to Help > Send Logs.
Select Automatice Reporting tab
Click Add.
Introduce requested information.
To delete FTP connection
Go to Help > Send Logs.
Select Automatice Reporting tab
Check the row(s) containing the FTP connection(s) you want to
remove.
Click Delete.
15.13 - Adding new Phone Services
1. Customizing the Phone Services
The default CallReplay Phone Service will display a menu where
different functions can be selected. However, you can customize the
Phone Service URL so that you can access a specific function with a push
of a button. The different functions and their URL's are displayed in
Table 1.
Log in Cisco Unified CM Administration, then go to Device -> Device
Settings -> Phone Services and add a new service
Enter the new name of the service and the URL (which can be found in
Table 1) and then check Enable
3. Subscribe your phone to the new service
In the Phone Configuration window, select Subscribe/Unsubscribe Services
and click go, then select the new service in the pop-up window, click
next and subscribe.
4. Add the Service to a softkey button
On the right-hand side, look for add new SURL, click it and add the new
service. Attention: if the Add new SURL is in the Unassigned Associated
Items list, you will need to create a custom Phone Button Template, to
add the service URL to one of your available softkeys (see section 5).
5. Creating a new Phone Button Template
If you need to assign Service URL to softkeys, you will need to create a
new Phone Button Template. Go to Device -> Device Settings -> Phone
Button templates, find the one you are using for your phone, select it, press copy and set a new name for it.
Search for the new template, select it, and configure the softkeys you
wish with the Service URL option.
Finally, go back to the phone's configuration, select the new button
template and apply the new configuration.
15.14 - Editing Protocol Settings in PBXs
By default, the three protocols listed in a Cisco CallManager PBX are
Skinny, SIP and Forked Recording, which come with default settings to
record enabled. However, each of these protocols can be configured
further by clicking the Edit button on the respective protocol.
Play Recording Tone: Enable this option so that users will hear a
recording tone in their phones whenever the call is getting recorded.
Recorder Address: The IP of CallReplay.
Password: The password of the CallReplay username.
Username: The username which is used for the Recording Profile.
Record Encrypted Calls: Check this to be able to record encrypted
calls.
Port: The port used for SIP communication.
Disable This Protocol: Check this if you want to disable this
protocol for this PBX.
Deny: Ignore calls and do not record calls using this protocol for
this PBX.
15.15 - LDAP Authentication
Introduction
To be able to login in CallReplay with an LDAP account, the connection
to LDAP server needs to be configured in CallReplay
Overview for LDAP connection and configuration
To have the best integration for LDAP server, we recommend Microsoft
Active Directory.
Requirements
We recommend the forest and domain level to be at least
Windows Server 2012 R2
Connection settingssteps
Step 1. Go to System→ LDAP Authentication
Insecure Microsoft Active Directory Configuration example:
Step 2. Check “Use Active Directory / LDAP Authentication” and
enter the bellow settings
Server Name: LDAP Server FQDN (Fully Qualified Name) as
example DC FQDN
(wdc.record.local)
Server Port: LDAP server Port Number, for insecure
connection (389,3268) and
for secure connection (636, 3269)
TLS: Enabled for secure LDAP, Disabled for
insecure LDAP
Method: Type of LDAP connection Methods. Available
Methods are simple
DIGEST-MD5 and GSSAPI
Default Domain: Default domain used for user login as example
(record.local)
KDC host: Kerberos host FQDN as example DC FQDN
(wdc.record.local)
User Name: LDAP bind username. For Microsoft Active
Directory can be normal
domain user account. The username
can be sAMAccountName or UPN
for Microsoft Active Directory
Password: LDAP bind username password
If you want to enable secure LDAP, then select “edit keystore”
button and import the secure LDAP certificate, in PFX format as
recommendation
Secure Microsoft Active Directory Configuration example:
Step 3. After you have entered the needed settings, please press
the test button. If you receive a “Test Succeeded” message then if you have configured the
LDAP connection from CallReplay server. If the message it is different,
please review your settings.
Step 4. After the configuration it is tested with success, please
press the save button.Make sure to have both “Use DB Authentication”
and “Use Active Directory / LDAP
Authentication” enabled when you press the save
button. We recommend having both methods of authentication enabled, to
Use DB Authentication as fallback to LDAP Authentication.
Use DB authentication it is the default method of
CallReplay which has at least one user. It is the method used by
CallReplay when it is installed.
16 - Release Notes
Release Notes
16.1 - v10.0 Features
#
Subject
Category
2833
Upgrade to Azul JDK11
2070
memolith logs upgrade
Memolith
2659
Classifier speedup
3145
KeyStore Editor component
Security > Certificates
2901
Modern SVG icons
2891
Search by call id
3064
Computers panel missing
Replay
3103
Update AXL and jtapi.jar to v12.5
2779
System > Alerts
3078
Use DB Pooled Provider
3031
Unified Configuration needs Quick Search of categories
2700
Storage > Storage Volumes
Web Interface
2681
Opus codec support in Qodec and CallReplay
2740
Playback > Active Calls
2720
System > E-mail
2942
Upgrade DB to Postgres 12
2752
Help > About
2887
Change retention default from “keep until space required”
2744
Quality > Answers
2781
Quality Module
2788
Call Description in exported list
2857
Replay Calls
Replay
2839
redo PreConfiguration in HTML using a temporarily started localhost web server
Preconfiguration
2736
Storage > Storage Settings
2701
System > Ldap Authentication
Web Interface
2865
Licenses descriptors
2743
Quality > Reports
2718
System > Licenseing > Licensing Pools
2711
System > Configuration > Retention Policy
2774
Merge replication and licenses together.
2710
System > Configuration > Recording Policy
2830
Global Menu
Web Interface
2689
Login page
2841
Root page
2840
Maintenance Progress page
Web Interface
2729
CallReplay - ScreenRecorder > ScreenRecorders
ScreenRecorder
2836
Upgrade Innosetup to v6
2709
System > Configuration > Email Notification
2730
Help > Service Debug Settings
Web Interface
2733
Recording > Silence Compression
2734
Recording > SPAN Troubleshooting
2735
Recording > Advanced
2745
Backup > Backup
2754
Session > Logout Admin
2831
Upgrade to Vaadin 14
2722
System > HQ / Branch Replication > Branch
2721
System > HQ / Branch Replication > Headquarters
2717
System > Licenseing > HQ / Branch Licensing > Branch
2716
System > Licenseing > HQ / Branch Licensing > Headquarters
2708
System > Configuration > Filters
2731
Recording > Network Interfaces
2748
Screen Recorder > Settings
2753
Session > Change Password
2751
Help > Browser Logs
3057
Forked Recording without JTapi (Mobile Jabber Recording)
Recorder > Forked > JTapi
2977
Category-Period Summary Cache
Replay
2863
SSL Security
Recorder > Forked > Axl
2739
Playback > Replay Calls
303
Star calls
Web Interface
502
external (turret) config params
Recorder > IPTrade
716
thrift client should connect using https to a https configured server
Replication
907
HA deduplicate calls by cisco leg identifiers
High Availability
1174
Blocarea asocierii call-urilor pe noduri de configurare
Classifier
2161
ArrowLib
Recorder
2226
UX: Research for suitable framework -> Score Card to make a decision
Web Interface
3033
Search bar in unified configuration
Configuration
2963
URL for accessing call details specifically
2714
System > Licenseing > License > Licenses
Administration > Licensing
2732
Recording > Call Managers
3164
Improve password security
Security > Login
2597
Record Encrypted Calls on CUCM
Recorder > Forked
3129
Verify SRTP Calls on CUCM 12.5
Recorder > Calls
2819
Error when trying to export calls
2867
VAD not working with IPTrade
Recorder > IPTrade
2861
Secure LDAP method deprecated needs updating
Security > Ldap
2621
Update IP Trade recording
Recorder > IPTrade
16.2 - v10.2 Features
#
Subject
Category
3335
Search with category name
Web Interface
3313
HQ\Branch replication
3344
Replication Servlet error when replicationId does not exist
Replication
3355
Call UI improvements
Web Interface
3370
Call link NPE
3373
Do not quicksearch by device name
3377
Server does not start with wildcard certificate for HTTPS
Security > Certificates
3368
Encrypted call cannot be saved
Security > Encryption
Remove Flash web site
JRE upgrade
Postgres Upgrade to 12.5.1
Web Components Upgrade to 14.4.0
16.3 - v10.3 Release Notes
Transcription
The major feature in is the initial beta release of the CallReplay
Transcription technology, a fully in-house speech-to-text transcription
technology, available in the cloud or on the premises.
The fundamental issue with call recording is that less than 2% of all
calls get listened by a human supervisor, because there is simply not
enough physical time for a supervisor to listen to 50+ agents. But a
human can read about 10x faster than they can listen, so the coverage
can be improved tremendously. Other things made possible by
speech-to-text:
Include the content of calls in documents and reports.
Searching through calls
Use trigger words to send notifications.
Sentiment Analysis.
Content Classification
Important Facts about CallReplay Transcription:
Transcribes English to text, which can then be used to assist
playback or exported.
96% accuracy on our test set, but we can improve for any given
customer. We can also add industry specific vocabulary.
We can add more languages on request.
Usable on premises or as a cloud service. During the beta we will
only provide it as a cloud service to minimize problem resolution
time.
100% life cycle control with 100% of source code under RAI’s control
and management. So if any quality problem appears, we can fix it.
Fully integrated with the call recorder's UI. Words are highlighted
during playback. Clicking on a word will direct the player to the
relavant position.
Very easy to access using either HTTP or our Java SDK. Partnerships
are welcome!
[Very fast transcription speed compared to other cloud providers,
get your transcription back in minutes not
days.]{style=“letter-spacing: 0.0px;”}
Coming Soon
Real-time transcription for triggering alerts
Full text search
Sentiment Analysis.
Content Classification
Please let us know if you have any questions of this new and exciting
technology. We can also schedule a phone call at your convenience.
Fixes
#
Category
Subject
3404
Remote Licensing and Qodec license
3383
Login and Calls page timeouts
3406
Database
Slow database performance
3400
IPTrade
Filters made with suid did not work
3395
Encryption
Automatic Playback of encrypted calls
3398
UI
Cosmetics
2948
Documentation
Automatic documentation refresh
16.4 - v10.4 Release Notes
ID
Description
Configurable TLS protocols
#3422
Reworked Forked Wizard to preserve policy
#3436
Update channel pool when uploading a license
#3437
Email call as attachment
#3457
Bad user password on screen recorder
#3461
Recording Status and Actions
#3464
Unable to bulk export
#3467
Unable to configure email
16.5 - v10.5 Release Notes
Critical Update, please upgrade ASAP
This version changes the focus from Ease of Use to Secure-First. As
such, we overhauled the security infrastructure which introduces
breaking changes you should be aware of.
Breaking Changes
The web site can now be accessed over HTTPS only. The HTTP port
always redirects to HTTPS, no exceptions. If you do not have a
certificate already, you may generate a self signed one, using the
embedded Certificate Manager, but we recommend you generate one
using your enterprise root certificate. That also applies to all
other connections, such as Replication.
The database password becomes system controlled and is changed by
default to a random value. If you need direct access to the DB, you
should set a NEW manual password, using PreConfiguration. Do not
revert to the old password.
The default security profile is not compatible with SIP over TLS. In
order to accept connections from CUCM v14 SIP over TLS, please lower
the security profile from TLV v1.3 to v1.2.
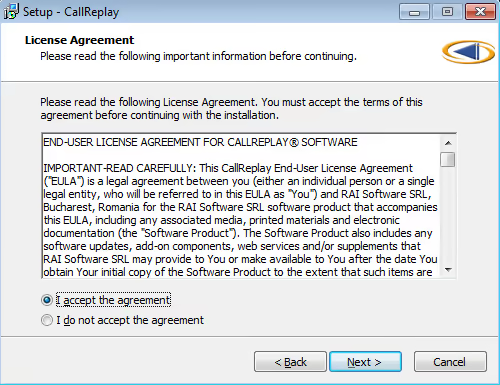
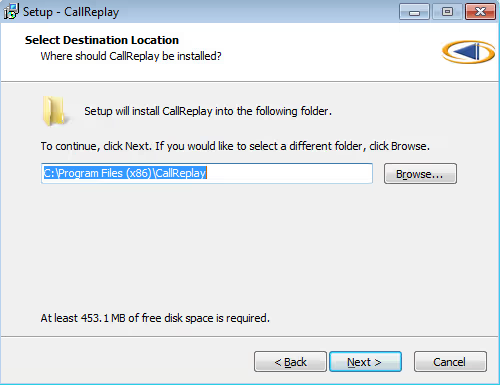
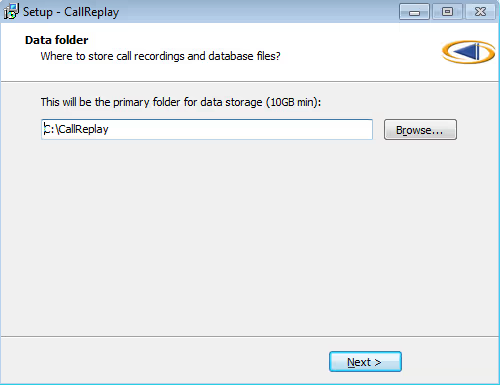
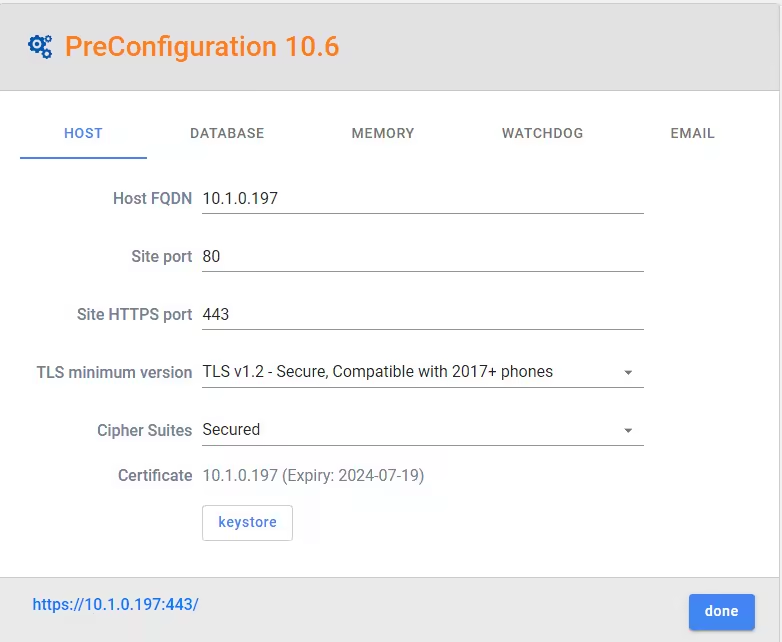
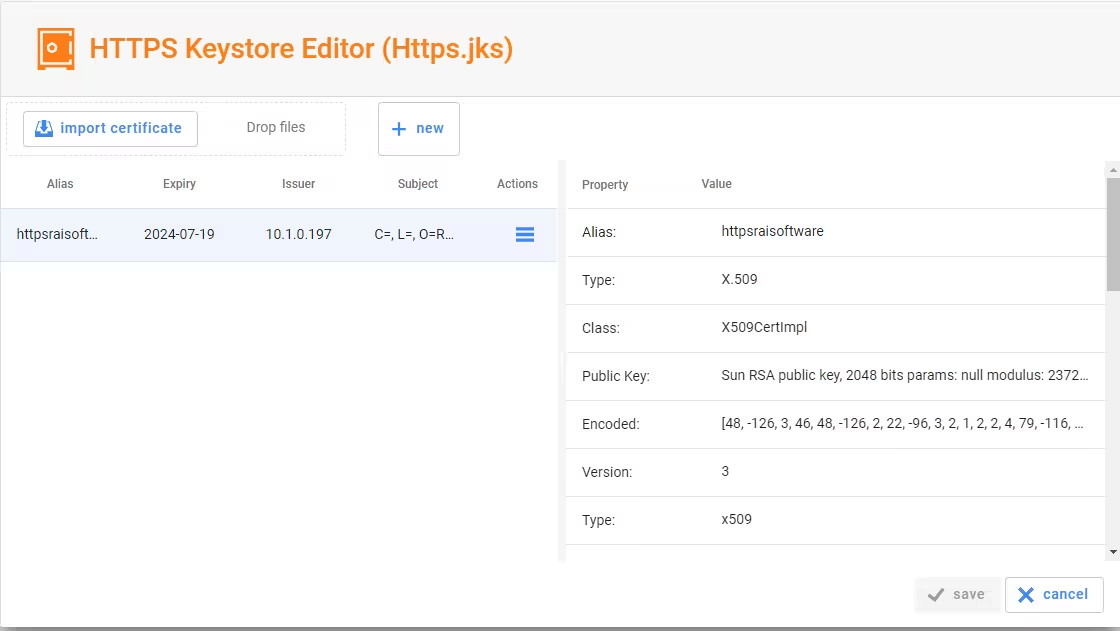
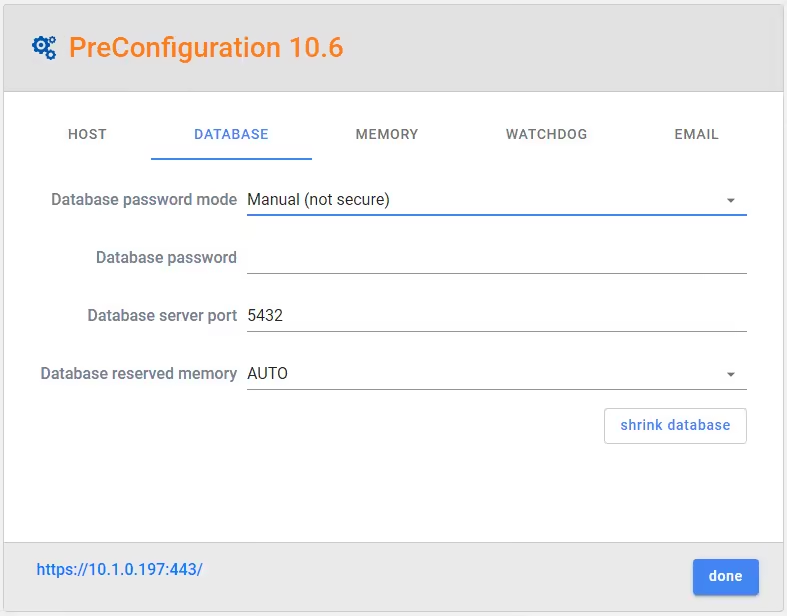
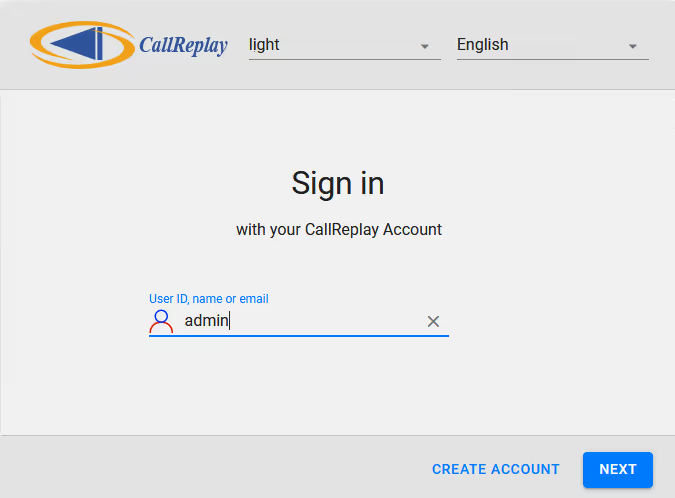
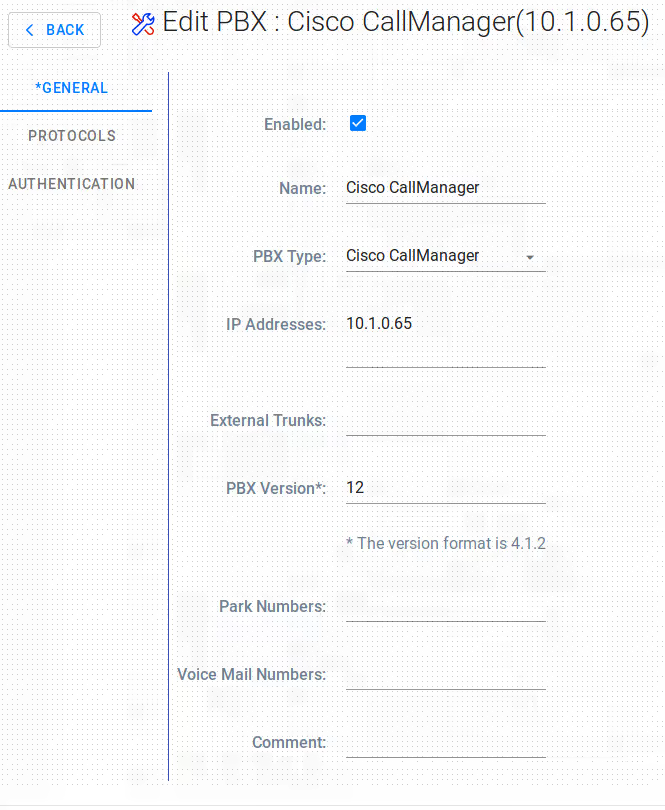
 button on the required
PBX, from PBXs page grid view.
button on the required
PBX, from PBXs page grid view.